I was standing in my kitchen, staring at a half‑finished batch of store‑bought jalapeño poppers that had somehow turned into a soggy, sad excuse for a party snack. The cheese was clumpy, the jalapeños were lukewarm, and the whole thing tasted like it had been left out at a backyard barbecue for too long. I swear I heard a faint sigh from the casserole dish as if it were begging for redemption. Then a friend dared me: “Make something that actually makes people forget they ever tried a popper before.” I took that challenge, rolled up my sleeves, and set out to create the ultimate cheese ball that would make every bite feel like a fireworks show in your mouth.
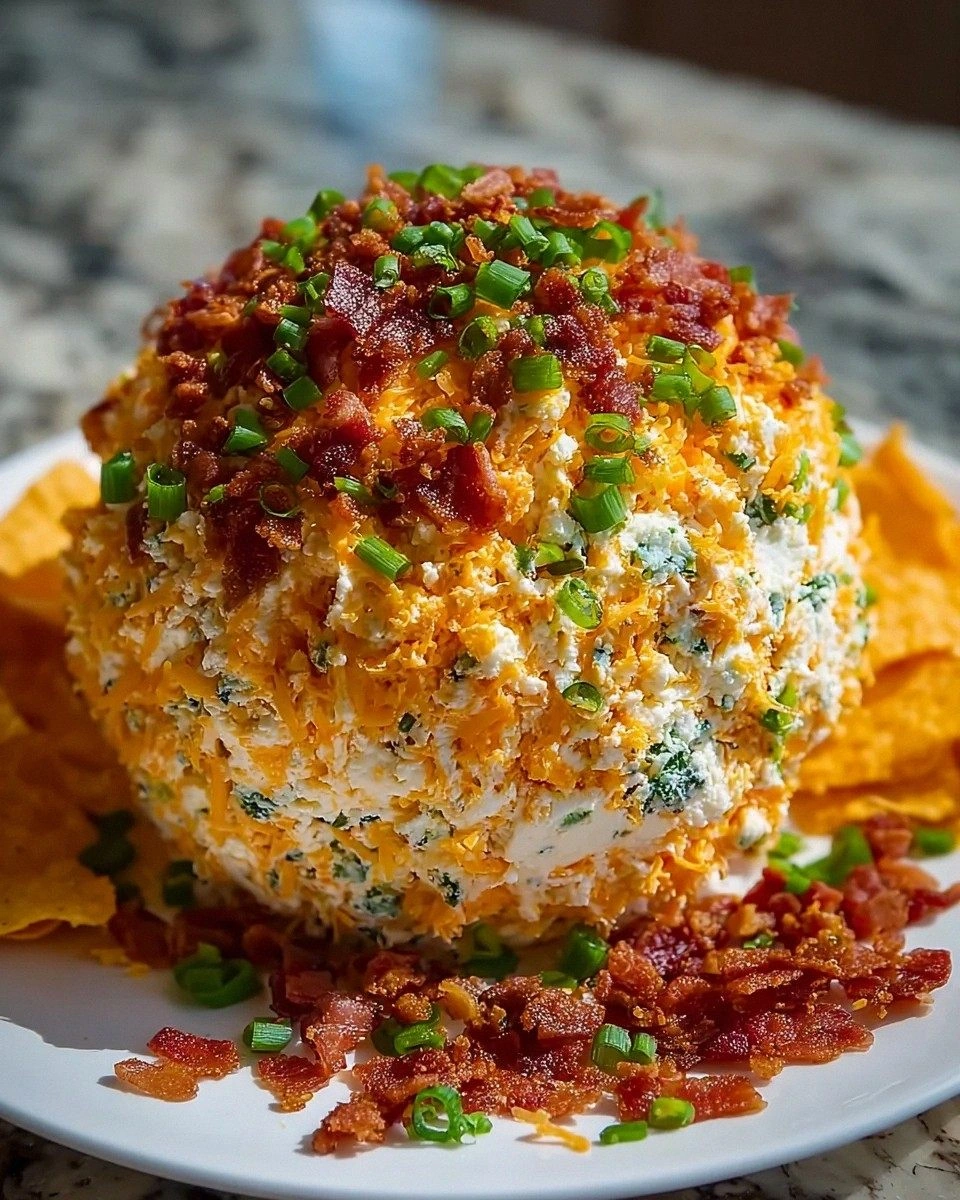
Picture this: the moment the cheese ball hits the table, the aroma of melted cheddar and roasted jalapeños wafts through the room like a warm hug from a long‑lost aunt. You hear the faint crackle of the toasted breadcrumb crust as you slice through it, and the first bite delivers a creamy, tangy center that’s peppered with just the right amount of heat. The texture is a perfect contrast—silky interior wrapped in a crunchy, buttery coating that shatters like thin ice under a weightless footstep. Your taste buds get a quick jolt of spice, then melt into a buttery, cheesy lullaby that lingers just long enough to make you reach for the next piece.
What sets this version apart from the gazillion popper recipes you’ll find online? First, I’m using a blend of sharp cheddar and a hint of smoked gouda to give the ball depth that ordinary recipes miss. Second, I fold in crisped bacon bits and a splash of lime juice for a bright, smoky finish that you’ll swear is magic. Third, the crust isn’t just any breadcrumb—it's a seasoned panko mix toasted in butter, giving it a golden‑brown crunch that practically sings. And finally, the whole thing can be assembled the night before, chilled, and baked just before serving, saving you precious party prep time.
I’m about to spill the beans on a secret ingredient that most people overlook: a pinch of smoked paprika tucked into the cheese mixture. That tiny speck of smoky heat amplifies the jalapeño’s bite without overpowering the delicate balance. Let me walk you through every single step — by the end, you’ll wonder how you ever made it any other way.
What Makes This Version Stand Out
- Flavor Fusion: The combination of sharp cheddar, smoked gouda, and lime‑brightened jalapeños creates a layered taste profile that dances on the palate.
- Texture Contrast: Creamy interior meets a buttery, panko‑crusted exterior, delivering that satisfying crunch‑then‑melt sensation.
- Simplicity: Only ten ingredients, all of which you probably already have, make this a quick‑turn‑around appetizer.
- Uniqueness: The smoked paprika and bacon bits add a depth most popper recipes skip, turning a simple snack into a conversation starter.
- Crowd Reaction: I dare you to taste this and not go back for seconds; even the most jalapeño‑averse guests will beg for more.
- Ingredient Quality: Using real butter for the crust and high‑quality cheese makes a noticeable difference—no processed cheese blocks here.
- Cooking Method: Baking instead of frying reduces mess, keeps the flavor pure, and lets the cheese melt evenly.
- Make‑Ahead Potential: Assemble the ball a day ahead, refrigerate, and bake just before serving—perfect for busy hosts.
Inside the Ingredient List
The Flavor Base
Cream cheese (8 oz, softened) is the backbone of any cheese ball. Its mild tang creates a smooth canvas for the sharper cheeses to shine. If you skip it, you’ll end up with a gritty texture that feels more like a crumble than a ball. For a dairy‑free version, try a plant‑based cream cheese, but be prepared for a slight flavor shift.
Sharp cheddar (2 cups, shredded) brings a robust, tangy bite that stands up to the jalapeño heat. Look for a cheddar aged at least six months; the longer the aging, the deeper the flavor. If you can’t find sharp cheddar, a mix of Monterey Jack and a splash of extra sharp cheddar works well.
Smoked gouda (½ cup, shredded) is the secret weapon. It adds a whisper of smokiness that complements the bacon and paprika without overwhelming the jalapeños. A good tip: grate it finely so it integrates seamlessly into the cheese mixture.
The Texture Crew
Panko breadcrumbs (1 cup) give the outer crust its signature crunch. Unlike regular breadcrumbs, panko stays airy and light, creating a crust that shatters like thin ice when you bite into it. If you’re out of panko, toast regular breadcrumbs in a dry pan until golden, then pulse them for a similar effect.
Unsalted butter (2 tbsp, melted) is folded into the breadcrumbs before coating the ball. This ensures a golden‑brown finish and a buttery flavor that ties the whole dish together. Use real butter, not margarine, for the best mouthfeel.
Crisped bacon (¼ cup, diced) adds a salty, smoky crunch that contrasts the creamy interior. Cook the bacon until it’s extra crisp, then let it drain on paper towels to avoid excess grease. If you’re vegetarian, smoked tempeh or a dash of liquid smoke can mimic the flavor.
The Unexpected Star
Fresh jalapeños (½ cup, finely chopped) provide the heat that defines this dish. For a milder version, deseed the peppers; for extra heat, leave the seeds in and add a pinch of cayenne. If you can’t find fresh jalapeños, pickled ones work too—just rinse them to remove excess brine.
Lime juice (1 tbsp) brightens the flavor, cutting through the richness of the cheese and butter. The acidity balances the spice and makes the cheese ball feel lighter on the palate. Freshly squeezed lime is best; bottled juice can taste flat.
The Final Flourish
Smoked paprika (¼ tsp) adds a subtle earthiness that deepens the overall flavor without adding extra heat. It’s the silent hero that makes the cheese ball taste like it’s been slow‑cooked over a wood fire. If you love extra smokiness, increase to ½ tsp, but be careful not to dominate the jalapeño heat.
Garlic powder (½ tsp) and onion powder (½ tsp) round out the seasoning, providing a background note that ties all the flavors together. These dry spices distribute evenly, ensuring every bite is perfectly seasoned. Fresh minced garlic can be used for a punchier bite, but it may add moisture that changes the texture.
Salt and black pepper (to taste) finish the mix. Since the bacon brings its own salt, start with a light hand and adjust after tasting the cheese blend. A pinch of freshly cracked pepper adds a subtle heat that complements the jalapeños.
Everything’s prepped? Good. Let’s get into the real action…

The Method — Step by Step
Preheat your oven to 375°F (190°C). While the oven warms, line a baking sheet with parchment paper; this prevents sticking and makes cleanup a breeze. I like to set a timer for the preheat because walking away from the kitchen is a recipe for disaster.
Kitchen Hack: Place a metal cooling rack on the parchment and bake the ball on the rack; this allows hot air to circulate, giving an even golden crust.In a large mixing bowl, combine the softened cream cheese, shredded cheddar, and smoked gouda. Use a handheld mixer on low speed to blend until the mixture is smooth and free of lumps. The goal is a homogenous, glossy blend that will hold together without crumbling.
Fold in the chopped jalapeños, diced bacon, lime juice, smoked paprika, garlic powder, onion powder, salt, and pepper. This is the moment where the flavors start flirting—watch the colors meld together. Taste a tiny spoonful; adjust seasoning now because once the ball is baked, you can’t fix it.
Cover the bowl with plastic wrap and chill the mixture for 15‑20 minutes. This firming step is crucial; a cold mixture is easier to shape and won’t stick to your hands. If you’re impatient, you can pop it in the freezer for 10 minutes, but don’t let it freeze solid.
Meanwhile, in a shallow dish, mix the panko breadcrumbs with the melted butter until every crumb is lightly coated. The butter should be warm, not hot, so it doesn’t melt the cheese when you roll the ball later.
Remove the cheese mixture from the fridge. Lightly flour your hands with a bit of flour or parchment dust, then shape the mixture into a compact ball roughly 8 inches in diameter. This should feel firm yet pliable—if it feels too soft, give it another 5 minutes in the fridge.
Roll the cheese ball in the buttered panko, pressing gently so the crumbs adhere evenly all over. The coating should be a uniform, golden layer; any gaps will turn into soggy spots during baking. Watch Out: If the crumbs start sliding off, give the ball a quick dip back into the buttered mixture before returning to the panko.
Watch Out: Over‑coating can create a thick crust that never fully crisps; aim for a thin, even layer.Place the fully coated ball on the prepared parchment (or rack) and lightly spray the top with cooking spray. This helps the crust achieve that glossy, deep‑gold finish. Slide the sheet into the preheated oven and bake for 25‑30 minutes, or until the crust is a rich amber and you can hear a faint crackle when you tap the side.
While the cheese ball bakes, prepare a small bowl of fresh cilantro or parsley for garnish. The bright green adds a visual pop and a fresh herbal note that cuts through the richness. Once the timer dings, remove the ball, let it rest for 5 minutes, then sprinkle the herbs over the top.
Serve the cheese ball whole on a platter with an assortment of crackers, sliced baguette, and veggie sticks. Slice it with a sharp knife, and watch the creamy interior ooze out like a molten gold river. Picture yourself pulling this out of the oven, the whole kitchen smelling incredible, and guests lining up for a piece. That's it — you did it. But hold on, I've got a few more tricks that'll take this to another level...
Insider Tricks for Flawless Results
The Temperature Rule Nobody Follows
Never bake a cheese ball straight from the fridge at a low temperature. Starting at 375°F ensures the crust forms quickly, sealing in the creamy center. If you lower the heat, the breadcrumbs will soak up moisture and become soggy, ruining the texture. I once tried 350°F and ended up with a mushy mess—lesson learned.
Why Your Nose Knows Best
Your sense of smell is the ultimate doneness gauge. When the crust reaches a deep, nutty aroma, you know the panko is perfectly toasted. If you detect a faint butter scent without the toasty notes, give it another 3‑5 minutes. Trusting your nose saves you from over‑baking, which can turn the interior dry.
The 5‑Minute Rest That Changes Everything
After baking, let the cheese ball rest for exactly five minutes before slicing. This short pause lets the interior set, preventing a runny spill when you cut. It also allows the flavors to meld, making each bite more harmonious. Skipping this step is like cutting a steak too early—everything leaks out.
Bacon Crunch Rescue
If your bacon bits lose their crunch during the bake, sprinkle a handful of fresh crumbled bacon on top during the last two minutes of cooking. The brief exposure to high heat revives the crispness without burning. I’ve rescued many a soggy bacon topping with this trick.
Butter‑Infused Breadcrumbs Secret
For an ultra‑golden crust, melt the butter with a teaspoon of honey before tossing with the panko. The sugar caramelizes, giving a subtle sweet undertone that balances the heat.
Creative Twists and Variations
This recipe is a playground. Here are some of my favorite ways to switch things up:
Southwest Sunrise
Swap the cheddar for pepper jack, add a tablespoon of corn kernels, and stir in a dash of cumin. The result is a bright, sun‑kissed ball that pairs perfectly with avocado crema. Ideal for summer gatherings where you want a bit of taco flair.
Garlic‑Lover’s Dream
Increase garlic powder to 1 tsp, add 2 minced garlic cloves, and finish with a sprinkle of roasted garlic powder on the crust. The deep, aromatic garlic elevates the cheese ball to a savory masterpiece that even non‑spicy fans adore.
Herbaceous Green
Fold in ¼ cup of finely chopped fresh spinach and replace the jalapeños with mild poblano peppers. Top with a mixture of parsley, chives, and a hint of lemon zest. This version feels lighter and is perfect for brunch buffets.
Vegan Victory
Use a plant‑based cream cheese, dairy‑free cheddar, and smoked tempeh instead of bacon. Replace butter with olive oil when coating the breadcrumbs. The texture remains indulgent, and the flavor profile stays true to the original.
Cheesy Chili Bomb
Stir in a half‑cup of cooled, drained canned chili (no beans) into the cheese mixture and top the finished ball with a drizzle of shredded cheddar. The surprise burst of chili in each bite makes it a hit at game‑day parties.
Storing and Bringing It Back to Life
Fridge Storage
Wrap the cooled cheese ball tightly in plastic wrap and store it in an airtight container. It will keep fresh for up to three days. When you’re ready to serve, let it sit at room temperature for 15 minutes, then reheat using the method below.
Freezer Friendly
If you want to make a batch ahead of a big event, freeze the unbaked, coated ball on a parchment sheet. Once solid, transfer it to a zip‑top freezer bag; it will last for up to two months. Thaw overnight in the fridge, then bake as directed.
Best Reheating Method
Preheat the oven to 350°F (175°C). Place the cheese ball on a baking sheet, brush lightly with melted butter, and add a splash (about a tablespoon) of water to the bottom of the pan; the steam revives the interior while the crust stays crisp. Heat for 12‑15 minutes, or until the center is warm and the crust regains its golden sheen.