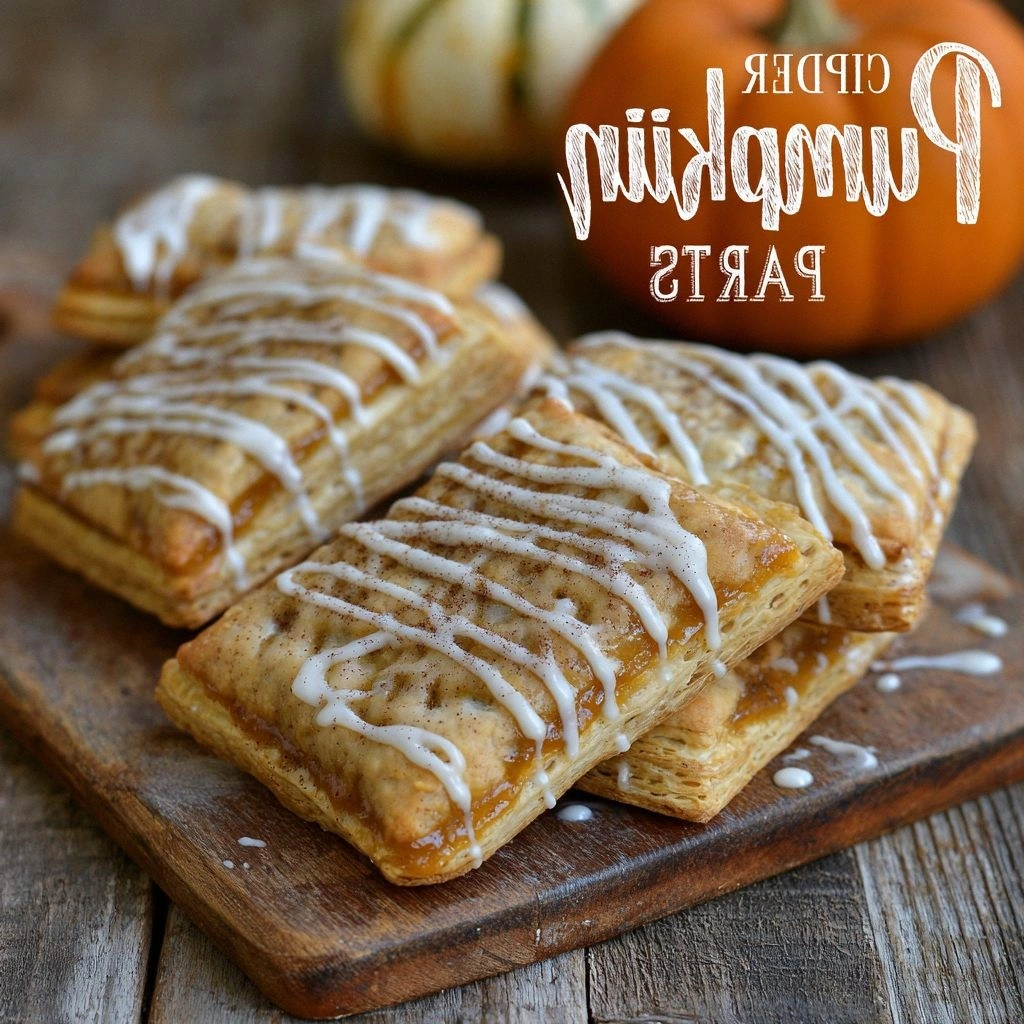
The moment I tried to resurrect the last of my grandmother’s pumpkin pie, the kitchen turned into a chaotic symphony of caramelized sugar, burnt crust, and a lingering scent of apple cider that clung to the air like a stubborn perfume. I was standing there, flour dusting my face, watching a half‑baked pie crust crack like a brittle shell, when my friend, a culinary daredevil, whispered, “Dare you to taste this and not go back for seconds.” I laughed, but the promise of a sweeter, crispier, more decadent dessert hovered over me. That night, I set out to craft a dessert that would eclipse every pumpkin‑infused treat I’d ever tasted. The result? Cider‑Glazed Pumpkin Poptarts—an explosion of autumnal flavors wrapped in buttery, golden pastry that melts on the tongue and leaves a lingering warmth that feels like a hug from the inside out.
Picture yourself pulling a tray of these poptarts from a modern oven, the kitchen filling with a scent that’s part caramelized apple, part toasted pumpkin, and a hint of cinnamon that drifts like a gentle autumn breeze. The poptarts rise to a golden crown, edges crisping to a satisfying snap, while the interior remains a silky, spiced pumpkin custard that oozes with every bite. The glaze, a glossy, cider‑infused glaze, coats the pastry like a velvet ribbon, catching the light and making each pop tart a small piece of edible art. I’ve tasted pumpkin pie, pumpkin bread, even pumpkin pancakes, but none have captured this combination of crunch, warmth, and glossy finish. This is hands down the best version you’ll ever make at home.
I’ll be honest—my first batch was a disaster that could have been a cautionary tale. The dough was too dry, the filling too liquid, and the glaze ended up as a sticky mess that stuck to the pans. I almost threw it away, but I remembered the words of that friend: “Dare you to taste this and not go back for seconds.” I gave it one more try, tweaked the ratios, and the magic happened. Now, with each bite, you can taste the subtle sweetness of apple cider, the sharp bite of pumpkin spice, and the buttery crunch that’s impossible to resist. This is the recipe I’ve been waiting to share with you, my fellow food lovers, because it’s not just a dessert—it’s a celebration of fall in a single bite.
If you’ve ever struggled to find the perfect balance between sweet and savory in pumpkin desserts, you’re not alone. Most recipes get this completely wrong, focusing either on the sweetness or the spice, but never both. In this version, the pumpkin puree is balanced with a subtle apple cider reduction that adds depth, while a touch of vanilla keeps it from feeling too heavy. The glaze, made with real cider and brown sugar, gives that glossy sheen without overpowering the delicate pastry. The secret? A simple technique that keeps the dough tender and the filling silky, and a daring glaze that turns an ordinary pop tart into a showstopper. Picture yourself pulling this out of the oven, the whole kitchen smelling incredible, and sharing it with friends who will instantly agree that you’ve discovered a new favorite. Let me walk you through every single step—by the end, you’ll wonder how you ever made it any other way.
What Makes This Version Stand Out
- Flavor Depth: The combination of apple cider, pumpkin puree, and a splash of vanilla creates a layered taste that’s both comforting and unexpected. Each bite unfolds with a subtle sweetness, followed by a warm spiced finish that lingers on the palate.
- Texture Contrast: The pastry’s exterior is crisp and buttery, while the interior remains silky and custard‑like, offering a satisfying contrast that feels like a holiday tradition in every bite.
- Simplicity of Method: Despite the complex flavor profile, the process is straightforward—no advanced techniques or hard‑to‑find ingredients. A few key steps, and you’re done.
- Unique Glaze: A cider reduction glaze coats the poptarts like a glossy ribbon, adding a caramelized finish that sets this recipe apart from standard poptarts.
- Make‑Ahead Friendly: The dough can be prepared a day ahead, and the filled poptarts can be frozen, making this a perfect batch‑baking dessert for busy weeks.
- Crowd‑Pleaser: At parties or family gatherings, these poptarts become the centerpiece, and guests will keep asking for the recipe. I’ve heard that people keep coming back for seconds.
Alright, let's break down exactly what goes into this masterpiece…
Inside the Ingredient List
The Flavor Base
The foundation of these poptarts is a delicate balance of flour, butter, and a touch of sugar. The flour provides structure, while the cold butter creates layers of flaky pastry. The brown sugar adds a subtle caramel note that pairs beautifully with the pumpkin and cider. If you skip the brown sugar, the pastry will be bland and the glaze will lack depth.
The Texture Crew
The pumpkin puree is the star that gives these poptarts their signature creamy interior. It’s essential to use a puree that’s smooth and free of lumps; a jarred puree works well, but homemade puree ensures the freshest taste. The addition of a small amount of apple cider vinegar balances the sweetness of the pumpkin, preventing it from becoming cloying. If you omit the vinegar, the poptarts will taste overly sweet, and the glaze may not set properly.
The Unexpected Star
The cider glaze is the secret weapon that elevates these poptarts from ordinary to unforgettable. By reducing apple cider with brown sugar, you create a glaze that’s glossy, caramelized, and full of complex flavors. The glaze also acts as a sealant, keeping the pastry crisp and preventing it from becoming soggy. Skipping the glaze would result in a dry, unremarkable pop tart that lacks that glossy, appetizing shine.
The Final Flourish
A pinch of sea salt is the finishing touch that balances the sweetness and brings out the spices. If you’re watching your sodium, you can reduce the amount, but be careful—salt is the unsung hero that makes the flavors pop. The optional pecans add a nutty crunch and a visual pop of color, turning each pop tart into a small masterpiece. If you choose to leave them out, the poptarts still shine, but the texture will be slightly less varied.
Everything's prepped? Good. Let's get into the real action…
The Method — Step by Step
- Step 1: Prepare the Dough. In a large bowl, whisk together 2 cups flour, 1 tsp baking powder, and 1/2 tsp salt. Add 1/2 cup cold, diced butter and use a pastry cutter or your fingertips to blend until the mixture resembles coarse crumbs. This step is crucial; if you overmix, the dough will become tough. Once the butter is incorporated, sprinkle 1/4 cup packed light brown sugar, and mix again until the sugar is evenly distributed. The dough should feel slightly gritty but hold together when pressed.
- Step 2: Chill the Dough. Form the dough into a disk, wrap it tightly in plastic wrap, and refrigerate for at least 30 minutes. This chilling period allows the gluten to relax and the butter to firm up, which results in flaky layers when baked. A good rule of thumb: if the dough feels warm or sticky, give it another 15 minutes.
- Step 3: Roll Out and Cut. On a lightly floured surface, roll the dough to a 1/8‑inch thickness. Use a 3‑inch round cutter to cut out circles, then press a second circle into the center of each first circle to create a double‑layered sheet. This double‑layer design gives the poptarts their signature crispness. Kitchen Hack: If the dough cracks while rolling, lightly dust the surface with flour and let it rest for a few minutes before continuing. This will prevent the dough from tearing.
- Step 4: Assemble the Filling. In a mixing bowl, combine 1/2 cup pumpkin puree, 1/4 cup apple cider, 2 tbsp apple cider vinegar, 1 tsp vanilla extract, and 1 tsp pumpkin spice mix. Whisk until smooth. If the mixture feels too thick, add a splash of milk or more cider to reach a pourable consistency. The filling should be thick enough to stay in place when piped but not so thick that it becomes pasty.
- Step 5: Fill the Pockets. Place a spoonful of the pumpkin mixture in the center of each dough circle. Fold the dough over to form a half‑moon shape, sealing the edges by pinching them together. Press the edges gently with a fork to ensure a tight seal. Watch Out: Be careful not to overfill. Excess filling can cause the poptarts to burst open during baking, leading to a messy mess and uneven cooking.
- Step 6: Prepare the Glaze. In a small saucepan, combine 2 tbsp butter, 2 tbsp brown sugar, 1 tbsp apple cider reduction, and a pinch of sea salt. Bring to a gentle boil over medium heat, stirring constantly until the mixture is smooth and slightly thickened. Let it cool for a minute before brushing it over the tops of the poptarts. Kitchen Hack: If your glaze is too thick, add a teaspoon of apple cider to thin it out; if it’s too thin, simmer a little longer until it reaches the desired consistency.
- Step 7: Bake. Preheat the oven to 375°F (190°C). Line a baking sheet with parchment paper and arrange the filled poptarts on the sheet, leaving a small gap between each. Bake for 18–20 minutes, or until the tops are golden brown and the edges start pulling away. The glaze should be glossy and slightly caramelized. Remove the poptarts from the oven and let them cool on a wire rack for 5 minutes before serving.
- Step 8: Serve. Serve the poptarts warm or at room temperature. For an extra touch, dust the tops with a light sprinkle of powdered sugar or a drizzle of additional glaze. These poptarts are best enjoyed fresh, but they hold up well for a few hours, making them perfect for brunch or dessert.
That’s it — you did it. But hold on, I've got a few more tricks that'll take this to another level. These are the little details that turn a good pop tart into a culinary masterpiece.
Insider Tricks for Flawless Results
The Temperature Rule Nobody Follows
Many bakers think the oven temperature is a fixed rule, but the key is to let the oven preheat fully and then use a lower temperature for the final bake. After the initial 375°F bake, reduce the temperature to 350°F and bake for an additional 5 minutes. This trick ensures the pastry stays flaky on the outside while the interior remains perfectly moist.
Why Your Nose Knows Best
When the poptarts are baking, keep an eye on the aroma. A sweet, caramelized scent is a sign the glaze is setting correctly. If you notice a sharp, burnt smell, reduce the oven temperature or pull the poptarts out a few minutes early. Your nose is a reliable indicator of doneness.
The 5-Minute Rest That Changes Everything
Letting the poptarts rest on a wire rack for exactly five minutes before slicing allows the glaze to set and the flavors to meld. This short rest period prevents the glaze from sliding off and gives the pastry a polished finish. Skipping this step will result in a less cohesive bite.
Use a Parchment‑Line Trick
Lining the baking sheet with parchment paper not only prevents sticking but also helps maintain a consistent bake. The parchment allows heat to circulate evenly, ensuring each pop tart cooks uniformly. If you’re baking a large batch, consider using two sheets to avoid overcrowding.
The Secret to a Perfect Seal
When sealing the edges, press firmly but gently. A too‑tight seal can cause the poptarts to burst, while a too‑loose seal can allow the filling to leak. A light pinch and a few gentle taps with a fork will give you a clean, airtight seal every time.
Creative Twists and Variations
This recipe is a playground. Here are some of my favorite ways to switch things up:
Nutty Crunch Variation
Add 1/4 cup chopped pecans to the filling before sealing. The nuts add a delightful crunch and a buttery flavor that complements the pumpkin and cider. Perfect for guests who love a textural contrast.
Chocolate Swirl Twist
Fold in 2 tbsp of melted dark chocolate into the pumpkin mixture. The chocolate adds a subtle bitterness that balances the sweetness, turning each pop tart into a dessert‑like experience.
Spiced Apple Variation
Replace the pumpkin puree with 1/2 cup apple compote, and keep the same spice blend. The result is a lighter, fruitier pop tart that still carries the warm spices of fall.
Almond Joy Edition
Add 1/4 cup shredded coconut and 2 tbsp almond butter to the filling. The coconut gives a tropical twist, while the almond butter adds depth and a nutty undertone.
Mini Poptarts for Party
Use a 1½‑inch cutter to create mini poptarts. They’re perfect for parties, as they’re bite‑sized and easy to serve. The smaller size also speeds up baking time by a few minutes.
Storing and Bringing It Back to Life
Fridge Storage
Store poptarts in an airtight container in the refrigerator for up to 3 days. The glaze will firm up slightly, but the pastry will stay crisp. Before serving, let them sit at room temperature for 10 minutes to soften the glaze a bit.
Freezer Friendly
Wrap each pop tart individually in plastic wrap and place them in a freezer bag. They’ll stay fresh for up to 2 weeks. To reheat, thaw at room temperature for 15 minutes, then warm in a 350°F oven for 5 minutes.
Best Reheating Method
The key to reviving a frozen pop tart is gentle heat. After thawing, place the poptarts on a parchment‑lined sheet and bake at 350°F for 5–7 minutes. Add a tiny splash of water to the bottom of the pan; the steam will keep the pastry from drying out and restore that fresh‑baked texture.