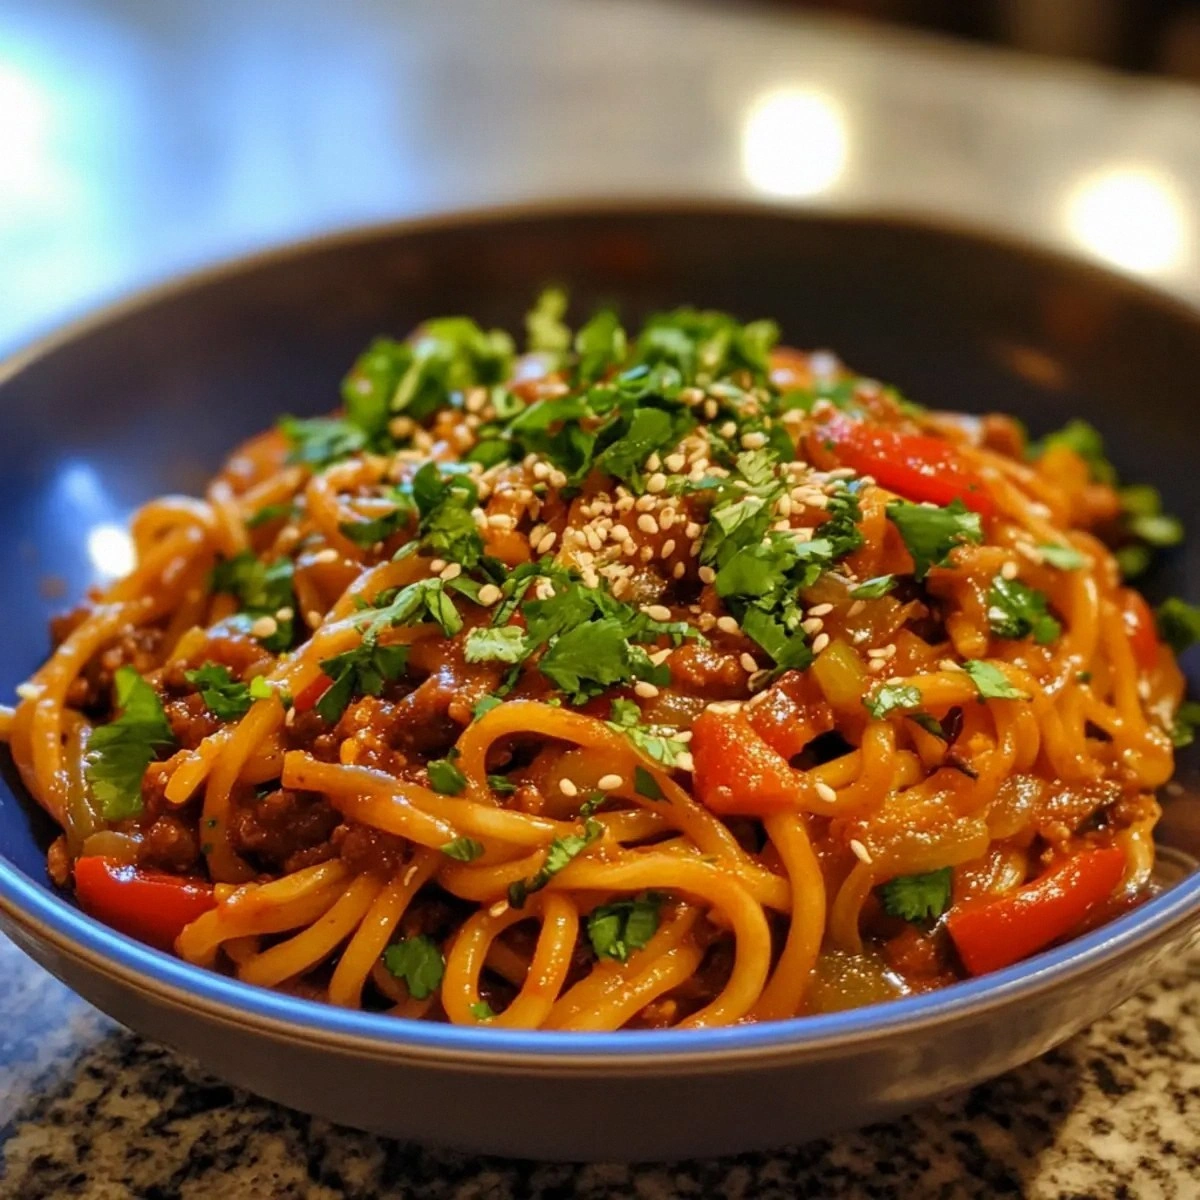
I still remember the first time I tried to recreate those legendary Cheddar Bay biscuits at home. What started as a casual Sunday craving turned into a three-hour kitchen disaster involving a smoke alarm, a scorched baking sheet, and a very confused golden retriever. But here's the thing — that glorious cheese-and-garlic flavor haunted my dreams for weeks. Fast forward through countless experiments, and I finally cracked the code by turning that addictive flavor bomb into the most outrageously comforting casserole you'll ever meet. Picture this: tender pasta shells swimming in a velvety cheese sauce, studded with perfectly seasoned ground beef, all crowned with those signature crispy, garlicky edges that make you want to face-plant right into the baking dish.
The magic happens when you take everything you love about those famous restaurant biscuits — the sharp cheddar, the whisper of garlic, the buttery richness — and transform it into a complete meal that feeds a crowd without breaking a sweat. This isn't just another boring hamburger casserole that your grandma made in 1972. Oh no, my friend. This is the rebellious love child of comfort food and restaurant-quality flavor that'll make you the undisputed champion of potluck dinners. The first time I served this to my neighbors, they literally formed a human barrier around the casserole dish, guarding it like it was the last slice of pizza at a frat party.
What makes this version absolutely irresistible is how we've cracked the code on that signature biscuit seasoning blend and woven it through every single bite. We're talking about a symphony of flavors where the beef gets caramelized to perfection, the pasta achieves that ideal al dente texture, and the cheese sauce becomes so luxuriously smooth it could make a grown adult weep with joy. The aroma that fills your kitchen while this bakes is basically an invitation for every hungry soul within a three-block radius to show up at your door with empty plates and puppy-dog eyes.
Stay with me here — this is worth it. I'm about to show you how to create a dish that'll have your family fighting over the crispy corner pieces and requesting it on repeat. The best part? It looks impressive enough to serve at your fancy dinner party, but it's secretly easier than making a box of mac and cheese. Let me walk you through every single step — by the end, you'll wonder how you ever made it any other way.
What Makes This Version Stand Out
Flavor Bomb: Unlike those bland casseroles that taste like cardboard mixed with sadness, this version packs a punch of concentrated umami that'll make your taste buds do a happy dance. The secret lies in how we layer the seasoning at every step, building complexity that restaurant chefs would envy.
Texture Paradise: We're creating a textural wonderland here — creamy sauce clinging to every pasta ridge, tender beef that melts in your mouth, and those coveted crispy edges that provide the perfect contrast. It's like getting three different dishes in one magical baking dish.
Weeknight Warrior: Despite tasting like you spent hours slaving away, this whole operation comes together in under 45 minutes. I've made this on Tuesday nights when my energy level was somewhere between zombie and caffeinated squirrel, and it still turned out restaurant-quality.
Crowd Psychology: This casserole has some kind of mystical power over people. I've watched picky eaters clean their plates, vegetable-haters ask for seconds, and teenagers actually put down their phones to focus on eating. It's like culinary hypnosis in casserole form.
Ingredient Integrity: No canned soup shortcuts or mystery ingredients here. We're using real butter, genuine sharp cheddar, and fresh herbs that create a flavor profile so authentic you'll feel like you're sitting in that famous seafood chain restaurant.
Make-Ahead Magic: This beauty actually improves overnight as the flavors meld together. You can assemble it in the morning, pop it in the fridge, and bake it when you get home from work. Future you will be so grateful for present you's foresight.
Leftover Gold: Speaking of making ahead, the leftovers (if you have any) reheat like a dream. Unlike sad casseroles that turn into rubbery messes, this one stays creamy and delicious for days.
Alright, let's break down exactly what goes into this masterpiece...
Inside the Ingredient List
The Flavor Base
Ground beef is the star of our show, but not just any ground beef will do. You want an 80/20 blend — enough fat to keep things juicy and flavorful, but not so much that you're swimming in grease. The beef gets browned until it develops those gorgeous caramelized bits that stick to the pan, because those little flavor nuggets are liquid gold. Don't you dare drain off all that beautiful fond — we'll deglaze it with a splash of Worcestershire sauce that lifts every bit of that concentrated beefy goodness right back into the mix.
The onion deserves more respect than it usually gets in casserole recipes. We're not just throwing in some sad, chopped onion here. We're talking about slowly caramelizing it until it becomes sweet and jammy, creating a depth of flavor that makes people wonder what your secret ingredient is. The garlic gets added at the very end of the onion cooking time so it perfumes the whole dish without turning bitter and acrid.
The Texture Crew
Pasta selection is crucial for casserole success, and I've tested them all like some kind of carb-obsessed scientist. Medium shells are the winner because they catch the sauce in their little cupped shapes, ensuring every bite delivers maximum cheesy satisfaction. Cook them for exactly two minutes less than package directions — they'll finish cooking in the oven and absorb all that glorious sauce without turning to mush.
The cheddar situation requires some real talk. Skip the mild stuff that tastes like yellow disappointment. You want extra-sharp aged cheddar that actually tastes like something. The aging process concentrates the flavor, giving you that bold, tangy punch that defines this dish. And yes, we're using a lot of it — this is not the time to be shy about cheese quantities.
The Unexpected Star
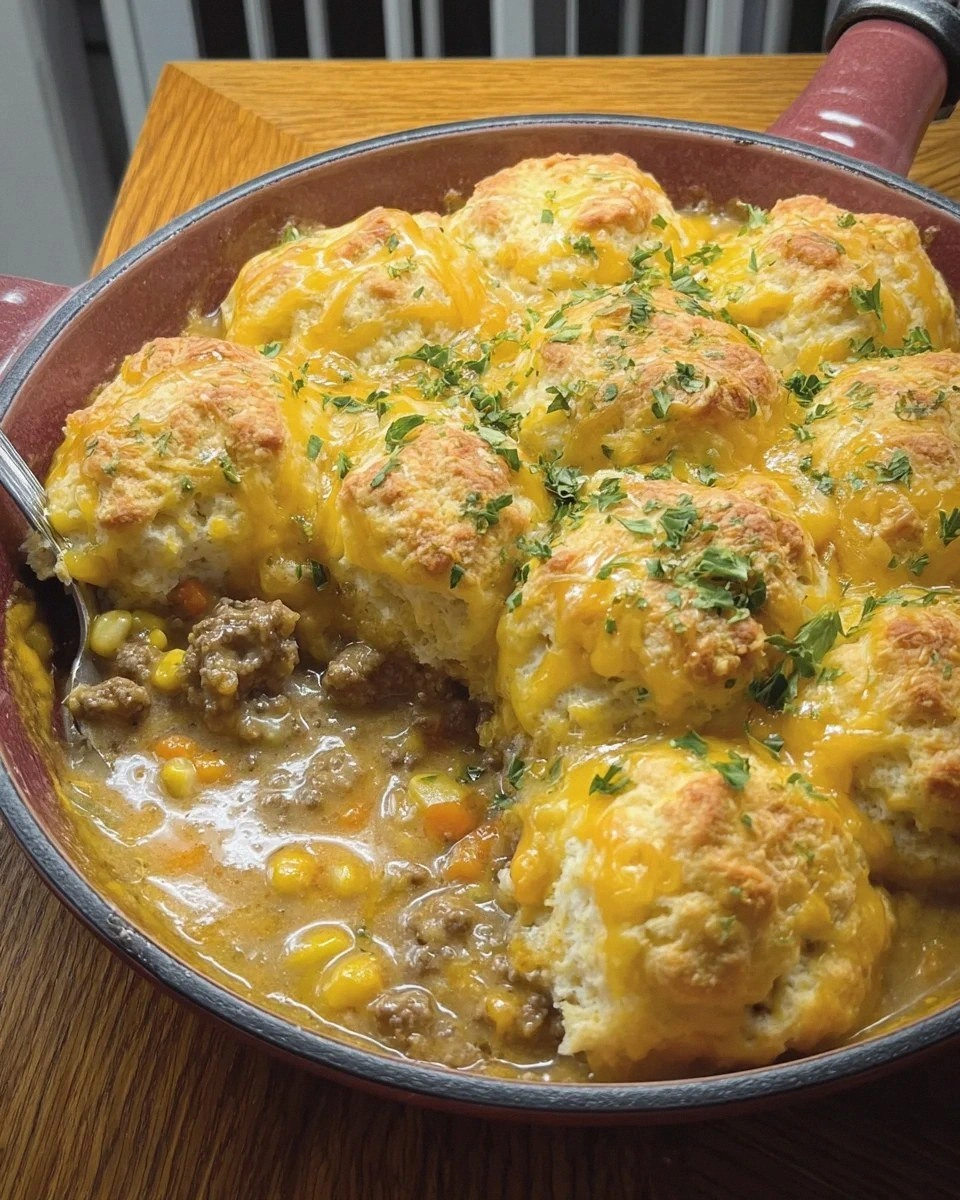
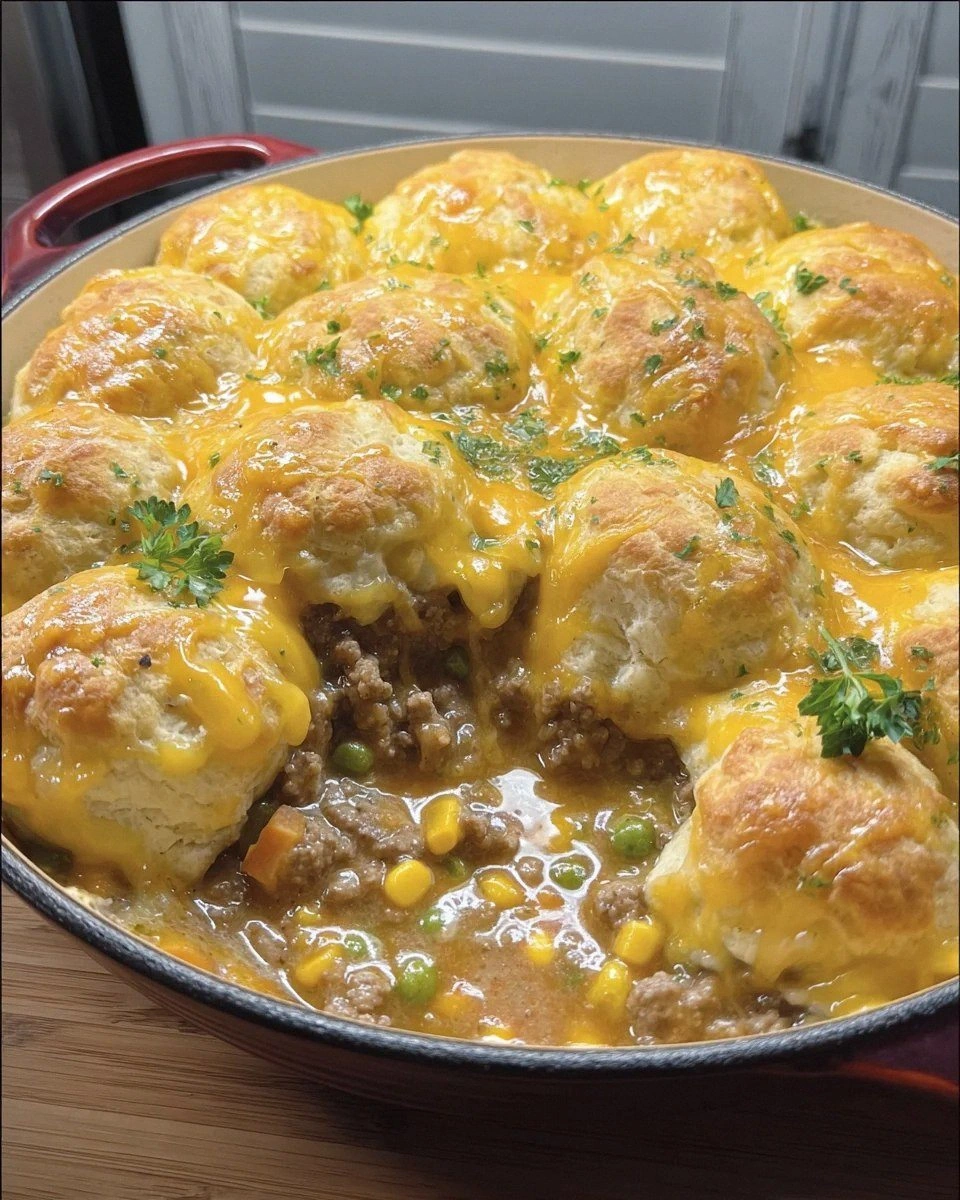
Here's where things get interesting. That signature biscuit flavor? It comes from a blend of garlic powder, onion powder, dried parsley, and a touch of Old Bay seasoning. Old Bay might seem weird in a non-seafood dish, but trust me — it adds that certain something that makes people say "I can't quite place it, but this tastes amazing." The garlic butter that gets brushed on top is what creates those crispy, golden edges that everyone fights over.
The secret weapon is a modest amount of cream cheese melted into the sauce. This isn't about making it taste like cream cheese — it's about creating an impossibly smooth, stable sauce that won't break or get grainy. It acts like culinary insurance, ensuring your casserole stays creamy even if you accidentally overbake it by a few minutes.
The Final Flourish
Fresh parsley might seem optional, but it's the difference between good and restaurant-quality. Those little flecks of green add a pop of freshness that cuts through all that richness. The same goes for a squeeze of lemon juice right before serving — it brightens everything up and makes all the other flavors sing in harmony.
Everything's prepped? Good. Let's get into the real action...
The Method — Step by Step
- Start by heating your largest skillet over medium-high heat until it's screaming hot. I'm talking about when you hold your hand over it, you feel the heat radiating like a tiny sun. Add the ground beef in one even layer and resist the urge to stir for a full two minutes — this is where the magic happens. Those gorgeous brown bits forming on the bottom? That's pure flavor gold. When you finally break it up with your spatula, the beef should have these beautiful caramelized edges that tell you you're on the right track.
- While your beef is developing that incredible crust, get your pasta water going in a large pot. Salt it like you mean it — the water should taste like the ocean. This is your only chance to season the pasta itself, and trust me, it makes a difference. When the beef is about 80% cooked through, push it to one side of the pan and add your diced onions to the cleared space. Let them hang out in the beef fat, stirring occasionally until they turn translucent and start to take on some golden color.
- Here's where things get exciting. Add your minced garlic to the onions and stir constantly for about 30 seconds — just until it becomes fragrant. Garlic burns faster than your ex's new relationship, so keep it moving. Now it's time for the Worcestershire sauce. Pour it directly onto the browned bits stuck to the pan and watch as it bubbles and hisses, lifting all that concentrated flavor right back into the beef mixture. Your kitchen should smell absolutely incredible right now.
- Reduce the heat to medium and sprinkle in your seasoning blend — the garlic powder, onion powder, dried parsley, Old Bay, and a generous amount of black pepper. Stir it all together and let the spices toast for about a minute. This step is crucial because it activates the essential oils in the dried spices, intensifying their flavor. The mixture should start smelling like those famous biscuits we all know and love.
- Drop your pasta into the boiling water and set a timer for two minutes less than the package directions. While that's cooking, it's sauce time. In the same pan (we're building layers of flavor here, people), add the butter and let it melt completely. Sprinkle in the flour and whisk constantly for about two minutes to create a roux. It should smell slightly nutty and turn a pale golden color. This is your sauce thickener, and getting it right means the difference between a silky smooth sauce and a gloppy mess.
- Slowly pour in the warm milk while whisking continuously. The sauce will thicken dramatically — this is exactly what you want. Keep whisking until it's smooth and velvety, about 3-4 minutes. Now add the cream cheese in small cubes, whisking until it's completely melted and incorporated. The sauce should coat the back of a spoon like liquid velvet. Stir in 2/3 of the shredded cheddar until it's melted and smooth, then season with salt to taste.
- Drain your pasta when the timer goes off — remember, it should be quite firm because it'll finish cooking in the oven. Add it directly to the sauce along with the beef mixture. Fold everything together gently, making sure every shell is coated in that glorious cheese sauce. The mixture should look creamy but not soupy — if it seems dry, add a splash of the pasta cooking water.
- Preheat your oven to 375°F and grab a 9x13 baking dish. Pour the mixture in and spread it out evenly. Sprinkle the remaining cheddar over the top, then mix the melted butter with the remaining garlic powder and drizzle it over the cheese. This creates that signature biscuit topping that gets golden and slightly crispy. Slide it into the oven and bake for 20-25 minutes, until it's bubbling around the edges and the top is golden brown.
- The hardest part? Waiting. Let it rest for 5 minutes before serving — this allows the sauce to thicken up and prevents molten cheese lava from burning your mouth. Garnish with fresh parsley and watch as everyone dives in like they haven't eaten in days. The edges will have formed those coveted crispy bits while the center stays creamy and decadent.
That's it — you did it. But hold on, I've got a few more tricks that'll take this to another level...
Insider Tricks for Flawless Results
The Temperature Rule Nobody Follows
Here's the thing about cheese sauces — they're divas that demand specific conditions. Your dairy products need to be at room temperature before they hit the pan, or you'll end up with a broken, curdled mess that looks like cottage cheese had a bad day. Set out your cream cheese, milk, and butter about 30 minutes before you start cooking. This simple step ensures everything incorporates smoothly without shocking the proteins. I learned this the hard way after serving what looked like cheese-flavored scrambled eggs to my book club.
Why Your Nose Knows Best
Trust your senses more than the clock when making this dish. When the onions are properly caramelized, they'll smell sweet and look golden, not just translucent. The garlic is ready when it becomes fragrant — if you wait for it to brown, you've gone too far and it'll taste bitter. Same with the roux — it should smell slightly nutty, like toasted almonds, not like raw flour. Your nose is actually a more reliable indicator than any timer I could give you.
The 5-Minute Rest That Changes Everything
I know it's torture when you're hungry and that casserole is sitting there smelling like heaven, but those five minutes of rest time are crucial. During this pause, the starches in the sauce continue to absorb liquid, thickening everything to the perfect consistency. The cheese sets slightly, preventing that molten cheese pull that leaves long strings connecting your plate to the serving dish. Plus, it drops to a temperature that won't destroy your taste buds for a week.
The Cheese Grating Revelation
Pre-shredded cheese is coated with cellulose to prevent clumping, which also prevents it from melting smoothly into your sauce. Grating your own cheese takes an extra two minutes but results in a sauce that's impossibly smooth and glossy. Plus, block cheese is often cheaper per pound than pre-shredded. I keep a big block in my fridge and grate what I need — it's like having a secret weapon for any cheesy dish.
The Seasoning Sweet Spot
Old Bay seasoning is potent stuff — a little goes a long way. Start with less than you think you need; you can always add more, but you can't take it out. I made this mistake once and ended up with a casserole that tasted like a seafood boil had a fight with a cheeseburger. Taste your sauce before adding the pasta and adjust accordingly. Remember, the flavors will concentrate slightly during baking, so err on the side of under-seasoning at this stage.
Creative Twists and Variations
This recipe is a playground. Here are some of my favorite ways to switch things up:
The Bacon Lovers' Dream
Everything's better with bacon, and this casserole is no exception. Cook 6 slices of bacon until crispy, then crumble it over the top before baking. Use the bacon fat instead of butter for your roux — it adds an incredible smoky depth that makes people ask what your secret is. The bacon bits create crispy little flavor bombs throughout the dish. I've had friends threaten to move in after trying this version.
The Spicy Southern Belle
Add a diced jalapeño to the onions, include a teaspoon of Cajun seasoning with the other spices, and swap half the cheddar for pepper jack. The result is a casserole with a gentle heat that builds as you eat, making it impossible to stop at one serving. Top it with some crispy fried onions for textural contrast. This version pairs perfectly with an ice-cold beer and a football game.
The Veggie-Loaded Version
Stir in a bag of frozen mixed vegetables or a couple cups of fresh broccoli florets during the last few minutes of cooking the beef. The vegetables add color, nutrition, and those little pops of sweetness that balance all that richness. Kids who normally turn up their noses at vegetables will eat this version because the cheese sauce is basically a vegetable delivery system disguised as comfort food.
The Breakfast Mashup
Replace half the ground beef with breakfast sausage, add some scrambled eggs to the mix, and serve it with a side of fruit for what I call "breakfast for dinner, but make it fancy." The sage in the breakfast sausage plays beautifully with the cheddar and garlic. My family requests this version every Sunday night, and honestly, I'm not complaining.
The Upscale Makeover
Use ground lamb instead of beef, swap the cheddar for Gruyère, and add some fresh thyme and rosemary. The result is sophisticated enough to serve at a dinner party but still comforting enough for a rainy Tuesday. The lamb adds a rich, slightly gamey flavor that pairs beautifully with the herbs. Top it with some toasted panko mixed with herbs for extra crunch.
The Gluten-Free Game Changer
Substitute gluten-free pasta and use a cornstarch slurry instead of the flour roux. The rest of the recipe stays exactly the same, and honestly, nobody will notice the difference. I've served this to gluten-eating friends who couldn't tell it was gluten-free until I mentioned it. It's that good, and nobody has to feel left out at the dinner table.
Storing and Bringing It Back to Life
Fridge Storage
Let the casserole cool completely before covering it tightly with plastic wrap or transferring to an airtight container. It'll keep in the fridge for up to 4 days, though honestly, it rarely lasts that long in my house. The flavors actually meld together beautifully overnight, making leftovers even more delicious than the original. Store individual portions in microwave-safe containers for easy grab-and-go lunches that'll make your coworkers jealous.
Freezer Friendly
This casserole freezes like a dream, making it perfect for meal prep or gifting to new parents. Assemble the entire casserole but don't bake it — wrap it tightly in plastic wrap then aluminum foil, and it'll keep for up to 3 months. Thaw it in the fridge overnight before baking as directed. You might need to add an extra 10-15 minutes to the baking time since it'll be starting cold. Pro tip: write the baking instructions on a piece of tape and stick it to the foil before freezing.
Best Reheating Method
The microwave works in a pinch, but the oven is where the magic happens. Add a splash of milk to the portion you're reheating — this loosens up the sauce and prevents it from drying out. Cover it with foil and bake at 350°F for about 15 minutes, removing the foil for the last 5 minutes to let the top crisp back up. It's almost as good as fresh, and way better than any sad desk lunch has a right to be.