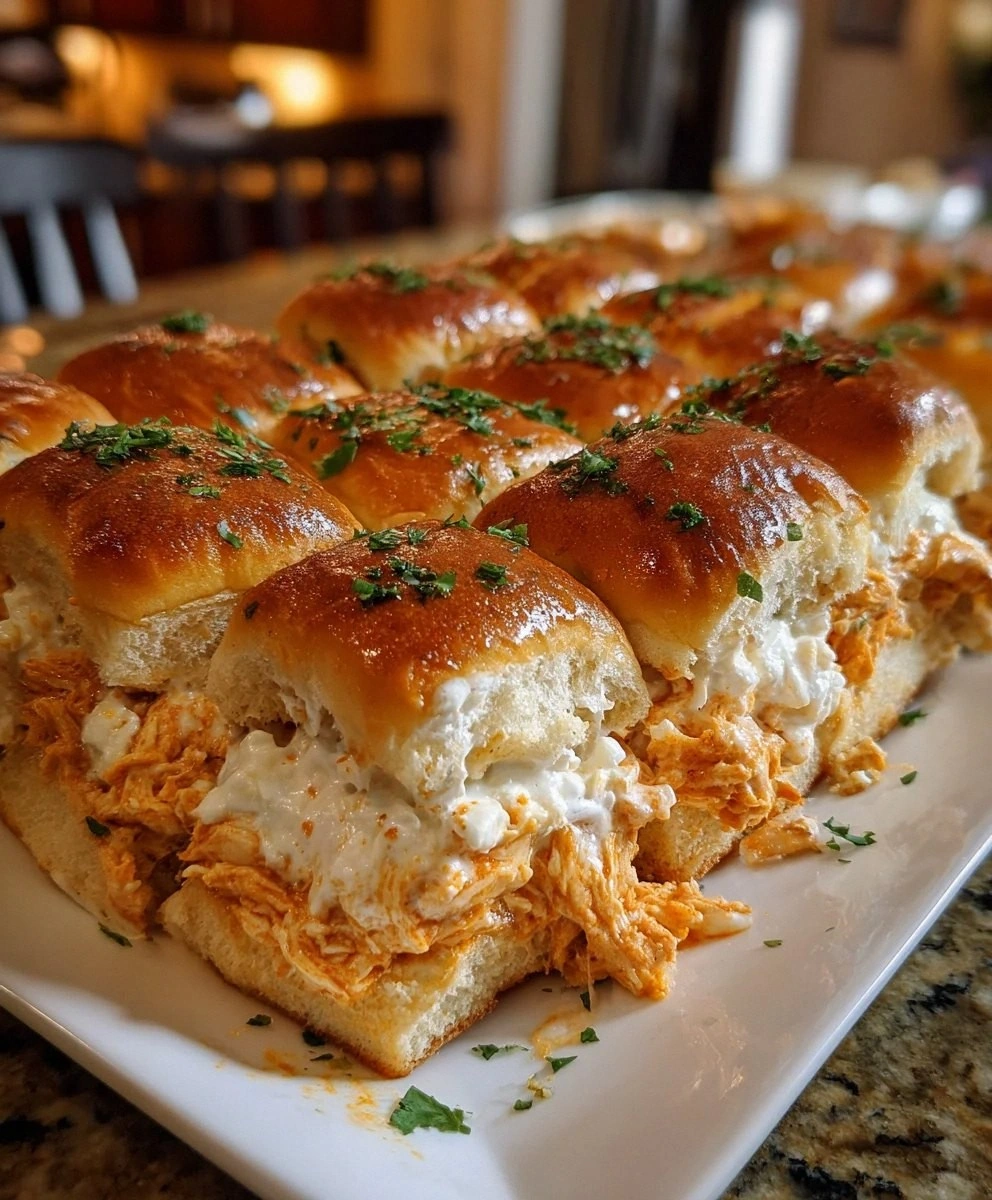
The first time I made these Buffalo Chicken Pizza Dip Sliders, I burned my tongue so badly I couldn't taste anything for three days — and I still went back for a fourth helping. I'm not saying this to scare you off, I'm saying it because when that molten, cheesy, spicy lava of buffalo chicken perfection hits your mouth, you're going to understand why pain is temporary but flavor memories last forever. Picture this: it's Sunday afternoon, the game's about to start, and I promised my friends I'd bring "something casual" to the potluck. Casual, right? What they got was a tray of golden slider buns oozing with a buffalo chicken dip so addictive that by halftime, we'd formed a protective circle around the baking dish like it was the last slice of pizza at a college party.
Here's the thing about most buffalo chicken recipes — they get it completely wrong. They treat the chicken like a background singer when it should be the rockstar, they drown everything in so much sauce that your mouth goes numb before you taste anything, and they forget that texture matters just as much as flavor. Most recipes are just lazy casseroles wearing a buffalo costume. But these sliders? They're the real deal. We're talking about tender shredded chicken that actually tastes like chicken, a buffalo sauce that hits you with heat and then immediately apologizes with creamy ranch, and cheese that stretches like it's auditioning for a pizza commercial. The kicker? All of this magic happens inside pillowy slider buns that get brushed with garlic butter and baked until the tops are golden and the bottoms are soaking up all those incredible juices.
I stumbled on this recipe after a particularly aggressive grocery shopping trip where I bought buffalo wing sauce, cream cheese, and slider buns because they were on sale — classic move. Three days later, staring into my fridge like it was going to solve all my problems, I had one of those lightning bolt moments that either results in culinary genius or a call to the fire department. This time, it was genius. The secret isn't just throwing everything together and hoping for the best. It's about building layers of flavor so that every bite hits you with creamy, spicy, cheesy, tangy, and buttery notes in perfect harmony. And the best part? You can make the entire filling ahead of time, stuff it into those buns, and just pop them in the oven when you're ready to become the most popular person at any gathering.
Let me walk you through every single step — by the end, you'll wonder how you ever made it any other way.
What Makes This Version Stand Out
Before we dive into the ingredient deep-dive, let me hit you with the reasons why this isn't just another buffalo chicken recipe that'll get lost in the sea of mediocre appetizers. These differences aren't subtle — they're the gap between "yeah, it's fine" and "I need the recipe right now."
- Double-Cheese Strategy: Most recipes throw in mozzarella and call it a day, but we're using both mozzarella for that Instagram-worthy stretch and sharp cheddar for depth. The result? A cheese pull that could win awards and a flavor complexity that keeps you coming back for "just one more" until the tray is mysteriously empty.
- Reverse Buffalo Logic: Instead of drowning the chicken in buffalo sauce like most recipes, we create a creamy base first, then add buffalo sauce to taste. This means you can control the heat level without sacrificing flavor, and the sauce actually sticks to the chicken instead of pooling at the bottom like a sad buffalo puddle.
- Texture Contrast Game: The filling stays creamy while the slider buns develop a buttery, garlicky crust that's slightly crisp on top while remaining soft inside. It's this contrast between creamy and crispy, soft and slightly chewy that makes these sliders impossible to ignore.
- Make-Ahead Magic: You can prep the entire filling up to three days ahead, stuff the sliders, and refrigerate them until you're ready to bake. Game day just got a whole lot less stressful, and you just became the friend who "has it all together" (even if your laundry situation says otherwise).
- Portion Control (Sort Of): Each slider is a perfect two-bite serving, which means you can tell yourself you're only having "one" while conveniently forgetting you've already had six. They're dangerously poppable, and that's exactly the point.
- Leftover Transformation: If you somehow have filling left over (and that's a big if), it becomes the world's best dip for tortilla chips, celery sticks, or just a spoon. I've never seen leftovers last more than 24 hours, but theoretically, you could also stuff it into bell peppers or serve it over rice for a completely different meal.
Alright, let's break down exactly what goes into this masterpiece...
Inside the Ingredient List
Great recipes aren't just about throwing tasty things together — they're about understanding how each component plays its part in the final symphony. Every ingredient here has a job, and when they all show up to work, the result is pure magic. But skip one or substitute poorly, and suddenly you've got a one-star review waiting to happen.
The Flavor Base
The cooked chicken breast isn't just a protein placeholder — it's the canvas that holds all the other flavors. I specifically call for breast meat because it shreds into those perfect, tender strands that grab onto every bit of sauce. Thighs work too, but they'll give you a richer, more intense flavor that can sometimes compete with the buffalo sauce. The key is using chicken that's been cooked gently, either poached in seasoned water or roasted until just done. Overcooked chicken becomes stringy and dry, and no amount of creamy sauce can save it. When you shred it, go for bite-sized pieces that will nestle perfectly into those slider buns without creating massive, impossible-to-eat chunks.
Buffalo wing sauce is where most recipes go completely off the rails. They treat it like hot sauce, dumping in way too much and creating a mouth-numbing experience that obliterates every other flavor. We're using it as a accent, not the main event. The sauce should add heat and that distinctive tangy vinegar note, but it shouldn't make your taste buds surrender after one bite. If you're sensitive to heat, start with less — you can always add more, but you can't take it out once it's in there. And please, for the love of all things delicious, use a good quality buffalo sauce. That bargain brand stuff tastes like spicy vinegar with food coloring.
The Texture Crew
Cream cheese is the unsung hero of creamy dips, and here it serves multiple crucial functions. First, it creates a luxurious, smooth base that coats every piece of chicken like velvet. Second, it tempers the heat from the buffalo sauce, creating a more complex flavor profile that builds slowly instead of hitting you like a spicy freight train. Third, when melted, it creates that gooey, cohesive texture that holds everything together instead of having your filling slide out of the bun like a guilty secret. The trick is using softened cream cheese — cold cream cheese will fight you every step of the way, creating lumps that refuse to blend no matter how aggressively you stir.
Ranch dressing isn't just a cool, herby afterthought — it's the yin to buffalo sauce's yang. It brings a tangy creaminess with herbs and garlic that complements the heat perfectly. Some people swear by blue cheese, and if you're one of those people who loves the funky, bold flavor of blue cheese, go for it. But ranch is more crowd-pleasing, and these sliders are all about making everyone happy. The dressing also adds moisture, ensuring your filling stays creamy even after baking. Don't skip it, don't substitute it with plain sour cream, and definitely don't use that watery, diet ranch. You want the good stuff, thick enough to coat a spoon.
The Unexpected Star
Sour cream might seem redundant when you've already got cream cheese and ranch dressing, but it's the secret weapon that takes the texture from good to absolutely irresistible. It adds a bright tanginess that cuts through the richness, preventing the filling from becoming too heavy or one-note. The slight acidity also helps balance the heat from the buffalo sauce, creating a more rounded flavor that keeps you coming back for more. Plus, it's looser than cream cheese, which helps create the perfect dipping consistency if you end up with leftover filling. When you're buying sour cream, go for full-fat — the low-fat stuff breaks down when heated and can make your filling watery.
The Final Flourish
The cheese blend is where we separate the amateurs from the pros. Mozzarella brings that Instagram-worthy stretch and mild, milky flavor that makes everything more indulgent. But mozzarella alone would be boring — it's like a one-note song that gets old fast. Enter sharp cheddar, bringing complexity, a slight tang, and that rich, cheesy flavor that makes you close your eyes and sigh with happiness. The ratio matters too — too much cheddar and it overpowers everything, too little and you lose that depth. We're going for a 3:1 mozzarella to cheddar ratio that gives you the best of both worlds.
Everything's prepped? Good. Let's get into the real action...
The Method — Step by Step
- Start by preheating your oven to 375°F (190°C) — and yes, I know every recipe tells you to preheat first, but here's why it actually matters for these sliders. When those cold buns hit the hot oven, they need immediate heat to start crisping the bottoms while keeping the insides soft. A lukewarm oven will give you soggy-bottomed sliders that fall apart when you pick them up, and nobody wants to eat their appetizer with a fork. While the oven heats, grab a 9x13-inch baking dish and give it a light spray with cooking spray. You could skip this step, but then you'll be the person at the party trying to chip rock-hard cheese off glass while everyone else is watching the game.
- In a large bowl, combine your softened cream cheese, ranch dressing, and sour cream. Here's where patience pays off — use a hand mixer or really get in there with a sturdy spatula and work those ingredients until they're completely smooth. Lumps at this stage will become stubborn pockets of cream cheese in your final product, and they're impossible to fix later. The mixture should be the consistency of thick yogurt, smooth and creamy enough to coat the back of a spoon. If your cream cheese is still cold, microwave the bowl for 10-second bursts, stirring between each, until everything blends smoothly.
- Now comes the fun part — adding your buffalo sauce. Start with half of what you think you need, because you can always add more but you can't take it out. Stir it in completely, then taste. The mixture should have a noticeable buffalo flavor but shouldn't make your eyes water. Remember, the heat will concentrate slightly as it bakes, so err on the side of caution. Once you've got the heat level right, fold in your shredded chicken. Use a gentle hand here — you want the chicken coated, not mashed into oblivion. The chicken should be well-distributed throughout the mixture, like little treasures waiting to be discovered in every bite.
- Time to add the cheese — but hold on, we're not just dumping it all in. Add about two-thirds of your mozzarella and half the cheddar to the chicken mixture, saving the rest for later. Stir until the cheese is evenly distributed throughout. The cheese in the filling will melt and create those irresistible cheese pulls, while the cheese on top will form a golden, bubbly crust that makes these sliders look as good as they taste. The mixture should be thick but still spoonable, like a really good chicken salad that's been hitting the gym.
- Slice your slider buns in half horizontally, keeping them connected if possible — this makes assembly easier and creates that perfect pull-apart effect that makes these so fun to serve. Place the bottom halves in your prepared baking dish, cut side up. Now, here's where we depart from regular sliders: don't be shy with the filling. Pile it on thick, spreading it all the way to the edges. Those edge pieces where the filling caramelizes against the pan? Those are the baker's bonus pieces, coveted by anyone who knows what's good in life.
- Sprinkle the remaining cheese over the top of the filling — this is what creates that golden, bubbly crust that makes people hover around the oven asking "are they done yet?" every thirty seconds. Place the top halves of the buns on, cut side down. They should fit snugly, like they're giving the filling a little bread hug. Don't press down too hard — you want them to stay fluffy, not become dense hockey pucks.
- In a small bowl, melt your butter and stir in the garlic powder. Brush this heavenly mixture over the tops of the buns, making sure to get into all the nooks and crannies. This isn't just for flavor (though it adds incredible flavor) — it helps the buns develop that beautiful golden color and creates a subtle garlic bread effect that takes these from good to "why can't I stop eating these?" The butter also helps the tops crisp slightly while keeping the insides soft and pillowy.
- Cover the baking dish with foil and slide it into your preheated oven. The covered baking time is crucial — it allows the filling to heat through and the cheese to melt completely without burning the tops of the buns. After 15 minutes, remove the foil and let them bake uncovered for another 10-15 minutes. This is when the magic happens: the tops turn golden, the cheese bubbles up around the edges, and your kitchen starts smelling like a sports bar but better. The edges of the buns that touch the pan will caramelize slightly, creating those crispy bits that everyone fights over.
- When the sliders are golden and bubbly, remove them from the oven and let them rest for 5 minutes — I know, I know, this is the hardest part. But here's why it matters: the filling needs time to set up slightly so it doesn't come gushing out like molten lava when you bite in. Plus, those 5 minutes let the flavors meld together into something even more incredible than the sum of their parts. Sprinkle with fresh parsley if you're feeling fancy, then serve them up and watch them disappear faster than free samples at Costco.
That's it — you did it. But hold on, I've got a few more tricks that'll take this to another level...
Insider Tricks for Flawless Results
The Temperature Rule Nobody Follows
Here's a truth bomb: room temperature ingredients blend better, cook more evenly, and taste more vibrant than their cold counterparts. When your cream cheese is soft, it incorporates smoothly without lumps. When your chicken isn't fridge-cold, it distributes more evenly throughout the filling. Even your buffalo sauce blends better when it's not ice-cold from the refrigerator. Take everything out 30 minutes before you start cooking, and you'll wonder why you ever put up with lumpy, separated fillings. This isn't just kitchen snobbery — it's chemistry in action, and your taste buds will thank you.
Why Your Nose Knows Best
Don't rely on timers alone — your nose is one of the most sophisticated cooking tools you own. When these sliders are perfectly done, your kitchen will smell like garlic bread had a baby with buffalo wings and raised it in a cheese factory. If you smell burning bread, you've gone too far. If you don't smell anything after 20 minutes, your oven might be running cool. The aroma should be intoxicating but not acrid, making neighbors knock on your door asking what you're making. Trust your senses over the clock every time — ovens vary, baking dishes conduct heat differently, but your nose knows when golden perfection has been achieved.
The 5-Minute Rest That Changes Everything
I know you're hungry. I know they smell incredible. But cutting into these sliders immediately is like opening presents before Christmas morning — technically possible, but you'll ruin the magic. That 5-minute rest isn't just about saving your tongue from third-degree burns (though it will). It's about letting the cheese set up so it doesn't run out like a dairy avalanche, allowing the buns to absorb some of those incredible juices without becoming soggy, and giving the flavors time to meld into something greater than the sum of their parts. Use this time to set out plates, open drinks, or just hover over the pan inhaling deeply like some kind of buffalo-scented meditation.
The Assembly Secret for Maximum Cheese Pull
Want those Instagram-worthy cheese pulls that stretch for days? The secret is in the layering. Don't just mix all your cheese into the filling — reserve about a third of the mozzarella and sprinkle it directly on top of the bottom buns before adding the filling. Then add more cheese on top of the filling before placing the bun tops on. This creates distinct cheese layers that melt at slightly different rates, giving you those dramatic cheese pulls when you separate the sliders. It's like creating little cheese bridges between each slider, and yes, it's as glorious as it sounds.
The Make-Ahead Method That Actually Works
You can prep these sliders completely up to 24 hours ahead, but here's the crucial detail — don't add the garlic butter topping until just before baking. Mix up the butter and garlic powder, store it covered at room temperature, and brush it on right before they go in the oven. If you add it ahead of time, the butter can make the buns soggy, and the garlic powder can create bitter spots. Everything else? Fair game for advance prep. The filling actually gets better as it sits, letting those flavors mingle and get to know each other better. Just bring everything to room temperature before baking for the best results.
Creative Twists and Variations
This recipe is a playground. Here are some of my favorite ways to switch things up:
The BBQ Ranch Remix
Swap out the buffalo sauce for your favorite BBQ sauce and use ranch dressing as the cooling agent. The result is a sweeter, smokier version that kids and spice-wimps adore. Add some crispy bacon bits to the filling for extra crunch and smoky flavor. The BBQ version travels better to potlucks too — no one has to worry about accidentally burning their mouth with surprise heat. It's like a pulled chicken sandwich and a slider had a delicious baby.
The Breakfast Buffalo Bombs
Add scrambled eggs to the filling and serve these for brunch — they're incredible for curing hangovers or justifying eating buffalo chicken before noon. The eggs add protein and create a breakfast-sandwich vibe that works surprisingly well. Top with everything bagel seasoning instead of garlic powder for a trendy twist. I've served these at brunch parties, and they're always the first thing to disappear, even before the mimosas run out.
The Veggie-Loaded Version
Add finely diced celery, carrots, and bell peppers to the filling for extra crunch and nutrition. The vegetables add texture and make you feel slightly better about eating half a tray of cheese-filled bread. Celery is traditional with buffalo wings anyway, so it doesn't feel forced. Dice everything small so it distributes evenly and doesn't create awkward, crunchy bites that compete with the creamy filling.
The Mexican Mash-Up
Replace the ranch with salsa con queso, use pepper jack cheese instead of cheddar, and add a packet of taco seasoning to the cream cheese mixture. Top with a sprinkle of cilantro and serve with salsa for dipping. It's like buffalo chicken and tacos had a wild night together, and this is their delicious love child. The spice level is higher, but the flavors are incredible together.
The Thanksgiving Leftover Special
Use leftover turkey instead of chicken, add some cranberry sauce to the cream cheese mixture, and use stuffing seasoning instead of garlic powder on top. It's the ultimate post-holiday transformation that makes everyone actually excited about leftovers. The sweet-tart cranberry plays beautifully with the buffalo heat, and the stuffing seasoning makes the whole thing taste like Thanksgiving decided to get wild.
Storing and Bringing It Back to Life
Fridge Storage
Cooked sliders will keep in an airtight container in the refrigerator for up to 4 days, but let's be real — they've never lasted more than 24 hours in my house. Store them in a single layer if possible, with wax paper between layers if you must stack. The buns will absorb some moisture and become softer, but that's not necessarily a bad thing — it creates a different, almost steamed texture that's still delicious. Just know that the texture won't be exactly the same as fresh from the oven, but the flavors will have melded even more beautifully.
Freezer Friendly
You can freeze these sliders before baking for up to 2 months — wrap the entire baking dish tightly in plastic wrap, then aluminum foil. When you're ready to serve, thaw overnight in the refrigerator, then bake as directed, adding 5-10 extra minutes to account for the cold temperature. Don't freeze them after baking — the texture gets weird, and nobody wants a mushy slider. The filling also freezes beautifully on its own for up to 3 months, so you can make a double batch and have buffalo chicken dip ready for any emergency snack situation.
Best Reheating Method
The microwave is your enemy here — it turns the buns rubbery and the filling watery. Instead, reheat in a 350°F oven for 10-12 minutes, covered with foil for the first half to prevent over-browning. Add a tiny splash of water to the baking dish before covering — it creates steam that helps rehydrate everything without making it soggy. If you're just reheating one or two, a toaster oven works perfectly. The goal is to warm them through without drying them out, bringing back that just-baked magic that makes these sliders so irresistible.