I remember the night I tried to bake a brownie from a recipe I found on a forum, only to end up with a block of dark, unappetizing mush that looked like it had been left in a sauna for hours. The kitchen smelled like burnt sugar and despair, and I was convinced that brownies were a myth best left to the pros. That disaster sparked a mission: to create a brownie that would not only survive the oven but explode in flavor and texture, turning every bite into a mini celebration. I dared myself to experiment with ingredients that would make the batter silky, the edges crisp, and the center gooey enough to melt on the tongue. The moment I cracked the first egg, I knew this was going to be a game‑changer, and my friends began to suspect I was onto something big. I was about to rewrite the rules of brownies, and I wanted you to be part of that revolution.
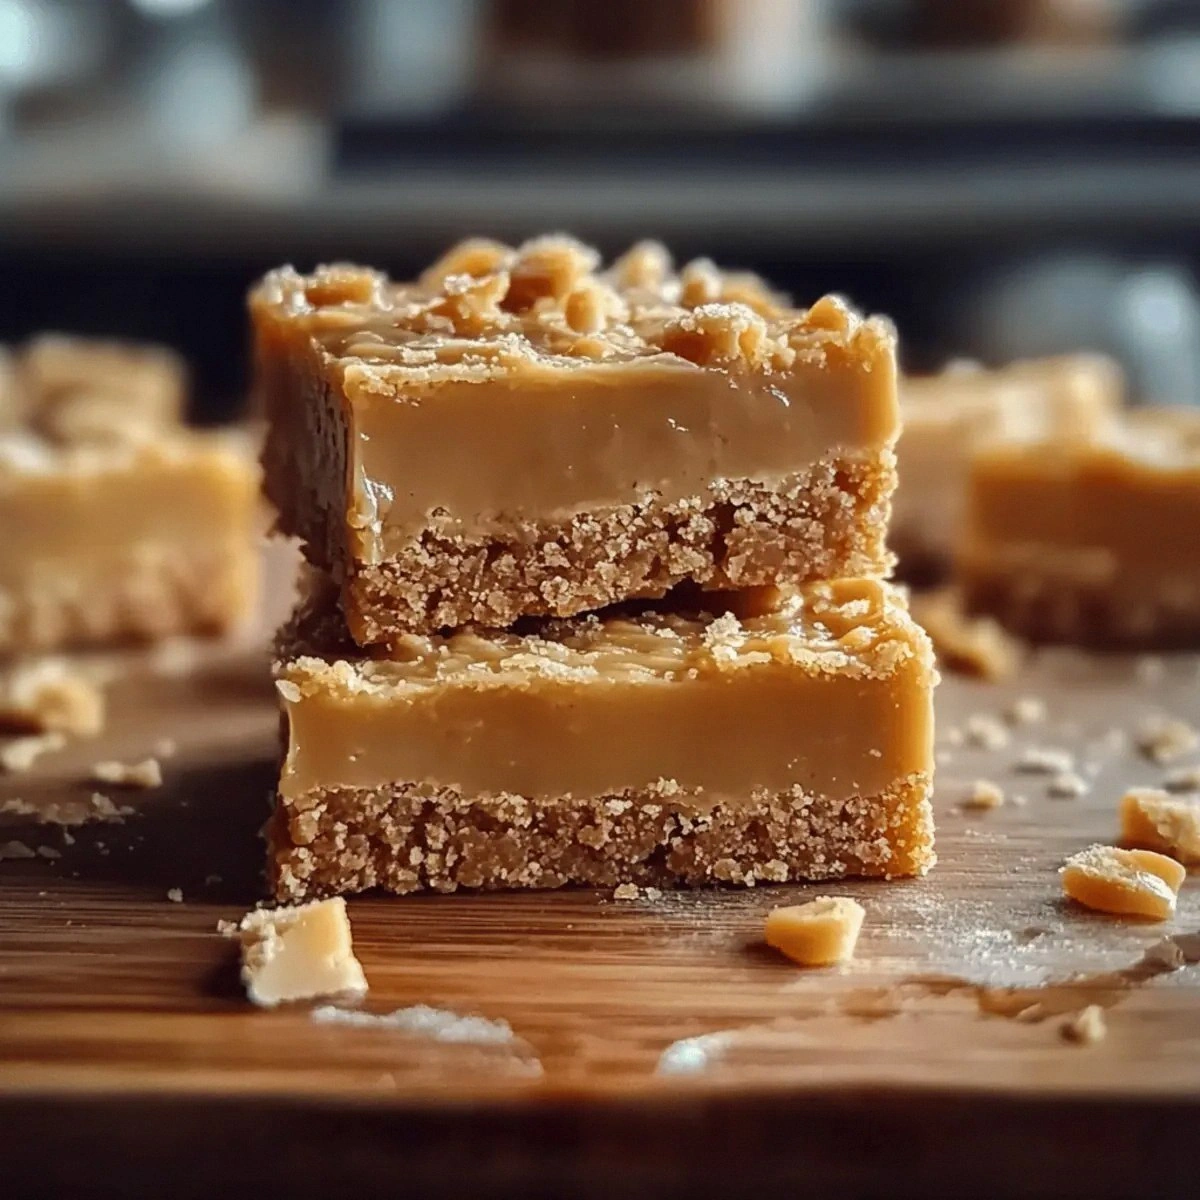
Picture a tray of golden‑brown squares, their edges slightly cracked, releasing a steam that smells of vanilla and chocolate with a hint of caramelized sugar. The sound of the first bite is a satisfying crack, followed by a melt that spreads across the palate like velvet. The texture is a paradox: a firm exterior that gives way to a molten center that oozes chocolate and butter. The color is an inviting deep brown that promises decadence, while the aroma is a sweet, buttery, chocolatey hug that makes your mouth water before you even taste it. The sight, scent, sound, and feel all combine to create a multisensory experience that feels like a hug in edible form. I promise you that when you finish the first cookie, you'll be staring at the tray, daring your taste buds to go again.
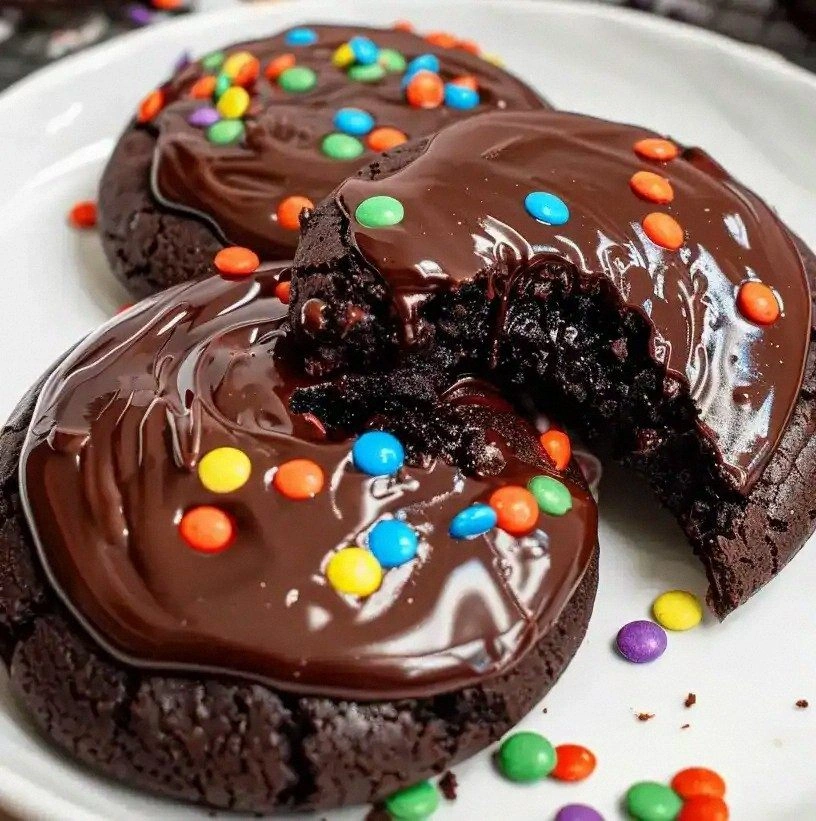
This version stands out because it uses a unique blend of cocoa and chocolate chips that gives a depth of flavor you rarely find in standard brownie recipes. The batter is balanced with heavy cream, which adds a silky mouthfeel that makes each bite feel luxurious. I added a dash of baking soda that creates a subtle lift, ensuring the brownies are airy without compromising the fudgy core. The use of rainbow candy-coated chocolate chips not only adds a pop of color but also a playful crunch that contrasts perfectly with the smooth center. The result is a brownie that is both indulgent and approachable, a treat that feels like a dessert and a comfort food rolled into one. If you've ever struggled with brownies that are either too dry or too gooey, this recipe is your salvation.
The secret ingredient that sets this recipe apart is a splash of heavy cream, which infuses the batter with a velvety richness that traditional butter alone cannot achieve. The cream also helps bind the chocolate chips, ensuring they melt evenly and spread their flavor throughout the brownie. I also experimented with adding a pinch of sea salt to the batter, which amplifies the chocolate notes and brings a subtle contrast that keeps the flavor profile balanced. The final touch is a light dusting of cocoa powder on top before baking, which caramelizes slightly and adds a glossy finish that makes the brownies look as good as they taste. Every component has been meticulously chosen to create a brownie that is both decadent and well‑structured. Trust me, you’ll notice the difference from the first bite.
I dare you to taste this and not go back for seconds. I’ll be honest — I ate half the batch before anyone else got to try it. Most recipes get this completely wrong, but here’s what actually works: a precise ratio of butter to sugar, the right amount of cocoa, and a touch of baking soda to lift the batter. Picture yourself pulling these out of the oven, the whole kitchen smelling incredible, and a tray of glossy, fudgy brownies waiting to be devoured. The aroma alone is enough to make your mouth water, and the first bite is an explosion of chocolate, butter, and a hint of sea salt that lingers on your palate. I’m not exaggerating when I say this is hands down the best version you’ll ever make at home.
If you've ever struggled with brownies that are either too dry or too gooey, you're not alone — and I've got the fix. The trick is in the balance between the wet and dry ingredients, and the precise temperature control during baking. The batter should feel thick but pourable, like a thick syrup that still holds its shape when you stir it. When you slide a knife into the center, it should come out clean but still slightly sticky, indicating the perfect middle ground. The edges should be firm enough to hold their shape, yet the center should be soft and slightly undercooked for that coveted gooeyness. This recipe takes you to that sweet spot, ensuring every bite is a perfect blend of textures.
The batter is a symphony of flavors: the buttery richness, the deep chocolate notes, the subtle sweetness of sugar, and the aromatic warmth of vanilla. When you break a cookie in half, the chocolate chips burst like tiny fireworks, releasing a burst of flavor that complements the creamy base. The heavy cream adds a silky finish, while the sea salt gives a bright contrast that elevates the chocolate. The rainbow candy-coated chips add a playful crunch that surprises the palate, making each bite an adventure. The result is a brownie that feels like a dessert and a comfort food rolled into one, with every bite delivering a new layer of flavor and texture.
The technique that makes this recipe so special is the combination of a double-melted butter and sugar mixture with the addition of heavy cream. This creates a silky batter that distributes the chocolate chips evenly, preventing clumps and ensuring a uniform texture. The double-melted butter also caramelizes slightly, adding depth to the flavor profile. The addition of baking soda creates a subtle lift, giving the brownies a lightness that contrasts with the dense center. The final touch is a light dusting of cocoa powder on top before baking, which caramelizes slightly and adds a glossy finish that makes the brownies look as good as they taste.
Okay, ready for the game‑changer? This next part? Pure magic. The moment you pour the batter into the pan, you’ll feel the aroma of butter and sugar rising, a scent that instantly makes your mouth water. The batter should have a glossy sheen, and the chocolate chips should be evenly dispersed. When the brownies finish baking, the edges will pull away slightly, indicating they’re ready to be removed. The smell of caramelized sugar and chocolate will fill the kitchen, making it impossible to resist the temptation to take a bite. And when you finally break a cookie, the sound of the crack will be the sweetest music.
What Makes This Version Stand Out
This recipe redefines what a brownie can be, turning a humble dessert into an unforgettable experience. It’s not just about taste; it’s about texture, aroma, and visual appeal. The combination of ingredients and techniques creates a brownie that is both indulgent and well‑structured. Below are the key elements that make this recipe a standout.
- Flavor: The blend of dark cocoa and semi‑sweet chocolate chips creates a deep, complex chocolate experience that satisfies the most discerning palate. The heavy cream adds a silky mouthfeel, while the sea salt amplifies the chocolate notes.
- Texture: The batter is thick yet pourable, ensuring a fudgy center with crisp edges. The addition of baking soda gives the brownies a subtle lift, preventing them from becoming too dense.
- Visual Appeal: A glossy finish from the cocoa dusting and the pop of rainbow chips make the brownies look as good as they taste. The golden brown edges are a sign of perfectly baked brownies.
- Ease: The method is straightforward and requires minimal equipment, making it accessible for bakers of all skill levels. The use of a double‑melted butter technique ensures even distribution of chocolate.
- Versatility: The recipe can be adapted with different chocolate chips or added nuts for a custom twist. It also works well as a base for ice cream sandwiches or truffles.
- Make‑Ahead: These brownies keep well in an airtight container at room temperature for up to a week, and they can be frozen for longer storage.
Inside the Ingredient List
Every ingredient in this recipe has been carefully selected to create a harmonious balance of flavor and texture. From the buttery richness to the chocolatey depth, each component plays a vital role. Below, we’ll break down the ingredients into four distinct groups, each with its own purpose and importance. Understanding these roles will help you appreciate the science behind the perfect brownie.
The Flavor Base
Butter is the cornerstone of this recipe, providing a rich, silky foundation that carries the chocolate flavor. Unsalted butter is essential because it allows you to control the amount of salt in the batter, preventing an overly salty finish. Sugar is the sweetener that balances the bitterness of cocoa and the richness of butter, creating a harmonious taste profile. When melted together, butter and sugar form a glossy mixture that ensures even distribution of chocolate chips throughout the batter.
Eggs act as a binder, holding the batter together while also adding a slight fluffiness to the texture. They also contribute to the browning reaction, giving the brownies a golden crust. Vanilla extract is the aromatic note that ties everything together, adding a subtle sweetness that enhances the chocolate flavors. The combination of butter, sugar, eggs, and vanilla creates a base that is both flavorful and structurally sound.
The Texture Crew
All‑purpose flour provides the structure and body of the brownie. It’s the backbone that holds the batter together while allowing it to rise slightly during baking. Unsweetened cocoa powder is the dark, rich component that delivers deep chocolate flavor. The cocoa also adds a slight bitterness that balances the sweetness of sugar and butter. Together, flour and cocoa create a dense, fudgy texture that is a hallmark of classic brownies.
Baking soda is the leavening agent that gives the brownies a subtle lift, preventing them from becoming too dense. It reacts with the acidic cocoa powder, creating tiny bubbles that light up the batter. A pinch of sea salt is added to enhance the chocolate flavor and cut through the sweetness. The salt also helps balance the overall flavor profile, preventing the brownies from tasting flat. These ingredients work in harmony to produce a brownie that is both dense and airy.
The Unexpected Star
Semi‑sweet chocolate chips are the star of the show, providing pockets of molten chocolate that burst with flavor. The chips are chosen for their balance of sweetness and chocolate intensity, ensuring they melt evenly without becoming overly sweet. Heavy cream is added to the batter to create a silky mouthfeel and to help the chocolate chips distribute evenly. The cream also contributes to a richer, more decadent texture that elevates the overall experience.
Rainbow candy‑coated chocolate chips add a playful crunch and a burst of color that makes the brownies visually appealing. The candy coating gives a sweet, caramelized crunch that contrasts with the soft interior, creating a delightful textural contrast. The rainbow chips also add a pop of fun for kids and adults alike, making the brownies a hit at parties and family gatherings. Together, the chocolate chips and rainbow chips create a multi‑sensory experience that is both delicious and visually stunning.
Everything's prepped? Good. Let's get into the real action, where the batter comes together, the aromas rise, and the brownies begin to transform into edible works of art. The following steps will guide you through the process from start to finish, ensuring that each bite is a perfect blend of flavor, texture, and visual appeal.
The Method — Step by Step
-
Preheat your oven to 350°F (175°C) and line a 9x13 inch baking pan with parchment paper. The parchment ensures easy removal and prevents sticking. Lightly grease the parchment with butter or non‑stick spray for an extra smooth finish. This step is essential for achieving even baking and a clean release from the pan. While the oven warms, gather all your ingredients so you can move quickly without interruption.
-
In a medium saucepan, melt the butter over low heat until it’s fully liquid. Add the granulated sugar and stir until the mixture becomes glossy and smooth. Keep the heat low to avoid browning the butter, which would alter the flavor profile. Once the sugar has dissolved, remove the saucepan from the heat and allow the mixture to cool slightly. This creates a silky base that will carry the chocolate chips evenly.
-
Whisk the eggs and vanilla extract in a separate bowl until the mixture is frothy and light. This aerates the eggs, giving the batter a slightly lighter texture. Slowly pour the egg mixture into the butter‑sugar base, whisking continuously to prevent curdling. The combination should be smooth and glossy, with no lumps. This step is crucial for achieving a cohesive batter that bakes evenly.
-
Sift together the flour, cocoa powder, baking soda, and salt in a large mixing bowl. Sifting removes lumps and ensures even distribution of leavening agents. Stir the dry mix into the wet batter until just combined; over‑mixing can make the brownies tough. The batter should be thick but pourable, resembling a thick syrup. This consistency is key to achieving the ideal fudgy texture.
-
Fold in the semi‑sweet chocolate chips and rainbow candy‑coated chocolate chips gently, ensuring they’re evenly distributed. The chips should be scattered throughout the batter without clumping. Add the heavy cream to the batter and mix until fully incorporated; the cream adds a silky finish and helps the chocolate chips melt evenly. This step ensures each bite is bursting with chocolate.
-
Pour the batter into the prepared pan, spreading it evenly with a spatula. Tap the pan gently on the counter to release any air bubbles and level the surface. A smooth top will bake more evenly, ensuring consistent edges and centers. This step also helps you gauge the thickness of the batter, which should be about 1 inch.
-
Bake for 30–35 minutes, or until the edges are set and a toothpick inserted near the center comes out with a few moist crumbs. Avoid over‑baking, as this will dry out the brownies. Keep an eye on the edges; when they pull away slightly from the pan, they’re ready. The aroma of chocolate and butter will fill your kitchen, creating an irresistible scent that lures you in.
-
Remove the brownies from the oven and allow them to cool in the pan for 10 minutes before transferring to a wire rack. Cooling in the pan helps the brownies set and prevents them from breaking apart. Once on the rack, let them cool completely; cutting them while warm will result in a gooey mess. This final cooling step is essential for achieving the perfect bite‑size brownie.
That's it — you did it. But hold on, I've got a few more tricks that'll take this to another level. From the perfect crumb to the ultimate storage method, these insider tips will ensure your brownies are always fresh, flavorful, and ready for any occasion.
Insider Tricks for Flawless Results
Even the best recipes can benefit from a few extra insights. These tricks are the result of countless experiments, failed batches, and a lot of trial and error. By following these guidelines, you’ll avoid common pitfalls and elevate your brownies to a whole new level. Below are the top tips that will help you master this recipe.
The Temperature Rule Nobody Follows
Oven temperature is critical; too hot and the edges burn before the center sets, too cool and the brownies become dense. Use an oven thermometer to ensure accuracy, especially if your oven runs hot. Preheat the oven for at least 15 minutes to stabilize the temperature. This small step can save you from a batch that’s too dry or too soggy. Trust me, a calibrated oven is the secret weapon of any serious baker.
Why Your Nose Knows Best
The aroma of a brownie is a powerful indicator of its readiness. A sweet, buttery scent that’s slightly caramelized signals that the brownies are nearing perfection. If you notice a sharp, burnt smell, pull them out immediately. Your nose can detect subtle changes that the eye might miss, making it a reliable cue for timing.
The 5-Minute Rest That Changes Everything
After removing the brownies from the oven, let them rest in the pan for five minutes before transferring to a wire rack. This short rest allows the brownies to set, preventing them from breaking apart when you cut. It also lets the flavors meld together, creating a richer taste profile. I’ve seen batches that crumble until they’re given this brief pause.
Keep the Edges Firm, the Center Soft
The key to a perfect brownie is balancing the edges and the center. The edges should be firm enough to hold shape, yet the center should remain soft. The right balance is achieved by monitoring the baking time closely. If you notice the edges pulling away too early, reduce the baking time slightly.
The Secret to a Glossy Finish
A light dusting of cocoa powder on top before baking caramelizes slightly, giving the brownies a glossy finish. This not only looks appealing but also adds a subtle depth of flavor. Use a fine sieve to evenly distribute the cocoa, preventing clumps. The glossy finish signals that the brownies have achieved the perfect crust.
With these insider tricks, you’re equipped to produce brownies that are consistently perfect. Whether you’re baking for a crowd or just for yourself, these tips will help you avoid common mistakes and ensure every bite is a delight.
Creative Twists and Variations
This recipe is a playground. Here are some of my favorite ways to switch things up, turning a classic brownie into a personalized treat that fits any mood or occasion.
Nutty Explosion
Add a cup of chopped walnuts or pecans to the batter. The nuts add a crunchy texture and a subtle earthy flavor that pairs beautifully with chocolate. Toast the nuts first for extra flavor, then fold them into the batter. This variation is perfect for a holiday gathering or a cozy night in.
Minty Fresh
Replace the vanilla extract with a tablespoon of fresh mint paste. The mint provides a refreshing contrast to the rich chocolate, making this a great dessert for summer parties. Be careful not to overdo the mint; a little goes a long way. The result is a brownie with a subtle, cool aftertaste.
Salted Caramel Swirl
Swirl in a few spoonfuls of salted caramel sauce before baking. The caramel adds a sweet, buttery layer that complements the chocolate. The sea salt enhances the caramel’s flavor, creating a balanced sweet‑savory profile. This version is a hit at dinner parties and dessert tables.
Coconut Crunch
Incorporate shredded coconut into the batter for a tropical twist. The coconut adds a subtle sweetness and a chewy texture that contrasts with the fudgy center. Use unsweetened coconut to avoid overpowering the chocolate flavor. This variation works well for beachside gatherings or as a beach snack.
Espresso Boost
Add a teaspoon of instant espresso powder to the dry mix for a coffee‑infused chocolate brownie. The espresso enhances the chocolate flavor without making the brownies taste like coffee. This version is a great pick‑me‑up after a long day or a perfect dessert for coffee lovers.
Chocolate‑Covered Surprise
After baking, dip half of the brownies in melted dark chocolate. Let them set on parchment paper until the chocolate hardens. This creates a chocolate‑covered exterior that adds a glossy finish and an extra chocolate punch. The result is a decadent treat that’s perfect for special occasions.
Each of these variations brings a new dimension to the classic brownie, allowing you to tailor the flavor to your mood or the occasion. Experimenting with different ingredients is the key to keeping the recipe fresh and exciting.
Storing and Bringing It Back to Life
After you’ve baked these glorious brownies, you’ll want to keep them fresh and delicious for as long as possible. Proper storage and reheating methods are essential for preserving texture and flavor. Below are the best practices for fridge, freezer, and reheating.
Fridge Storage
Store brownies in an airtight container or wrap them tightly in plastic wrap. Keep them in the refrigerator for up to one week. The cold environment preserves the fudgy texture and prevents mold growth. When you’re ready to enjoy, let them sit at room temperature for 15 minutes to soften before serving.
Freezer Friendly
Freeze brownies in a freezer‑safe container or zip‑top bag. Label the package with the date and freeze for up to three months. When you’re ready to eat, let them thaw in the fridge overnight. This method keeps the brownies moist and flavorful, making them feel freshly baked.
Best Reheating Method
Reheat brownies in a preheated oven at 300°F (150°C) for 5–7 minutes. A tiny splash of water in the pan before reheating helps create steam, keeping the brownies moist. Avoid microwaving, as it can make the brownies rubbery. After reheating, let them cool for a minute before serving to allow the flavors to settle.