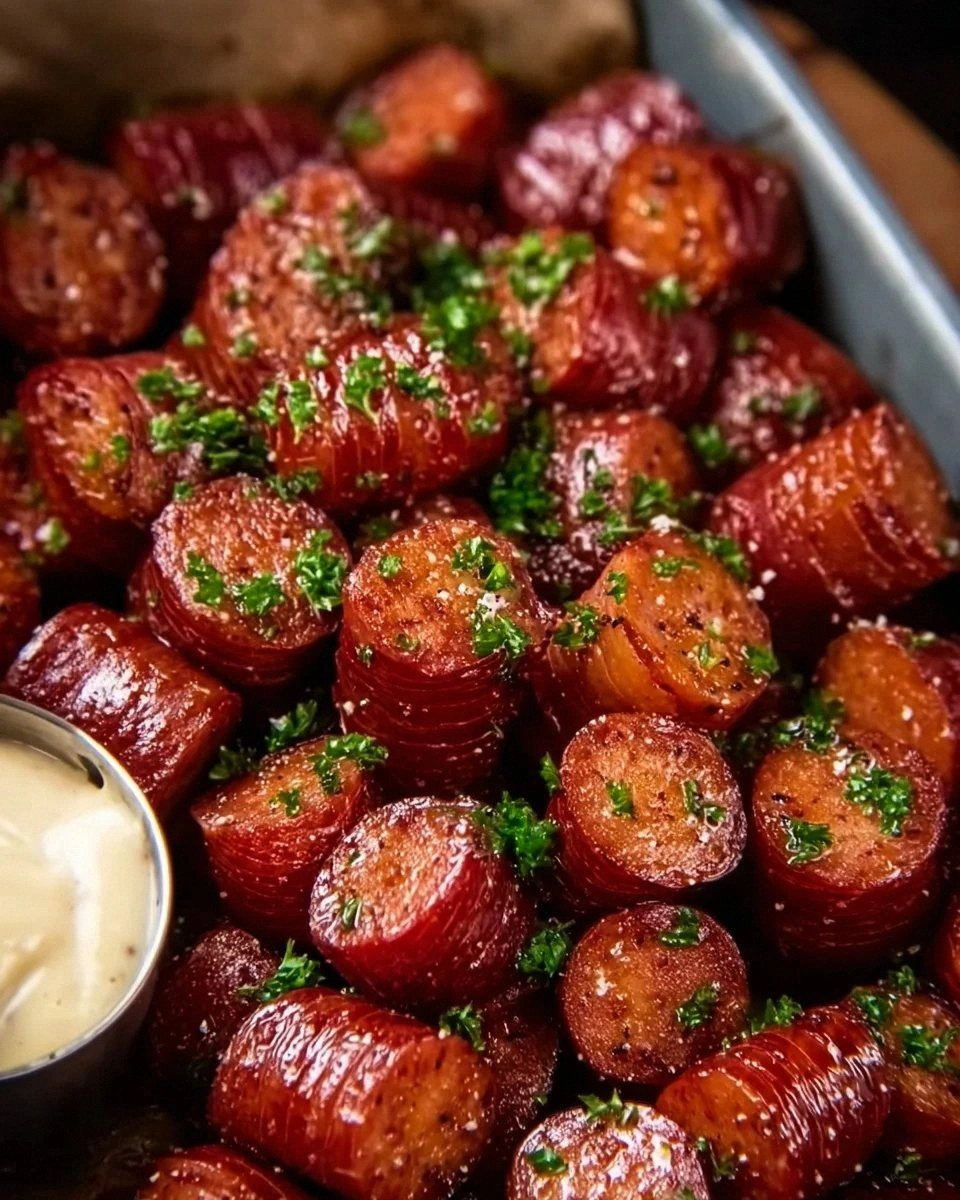
I was in the middle of a frantic Friday night when my roommate dared me to turn a plain pack of kielbasa into something that would make our neighbors question their life choices. I stared at that dull, cylindrical sausage and imagined it as a bland wallflower at a party. Then, out of nowhere, a flash of inspiration struck – what if I sliced it like a Hasselback potato, brushed it with a mustard glaze, and gave it a buttery crunch that would make every bite sing? I grabbed my knives, my mustard, and a mischievous grin, and the kitchen turned into a laboratory of flavor. That night, the sizzle of the sausage hitting the hot pan was louder than my favorite rock anthem, and the aroma that rose was a heady mix of smoky pork, tangy mustard, and a whisper of sweet caramel.
The first time I tasted those golden‑brown bites, I swear the world paused for a split second. The mustard glaze clung to the edges like a glossy lacquer, while the interior stayed juicy, tender, and just a touch smoky. The crunch you get from a perfect Hasselback cut is like “thin ice” that shatters under your teeth, releasing a burst of flavor that makes you gasp, “I dare you to taste this and not go back for seconds!” I’ll be honest — I ate half the batch before anyone else got a chance to try it, and that’s a confession you won’t hear from most recipe writers. Most recipes get this completely wrong, either by over‑cooking the sausage or by drowning it in a soggy sauce. Not this one.
What truly sets this version apart is the balance of tang, sweet, and umami, all wrapped in a crisp, caramelized crust that practically melts in your mouth. I added a splash of apple cider vinegar to brighten the glaze, a whisper of light brown sugar to round out the sharpness, and a dash of Worcestershire sauce for that deep, savory undertone that makes the palate sing. The secret weapon? A quick brush of mayonnaise that creates a glossy finish and keeps the mustard from burning, turning each bite into a glossy, golden masterpiece. Picture yourself pulling this out of the oven, the whole kitchen smelling incredible, the steam rising like a celebratory fog at a victory parade.
Okay, ready for the game‑changer? I’m about to walk you through every single step — by the end, you’ll wonder how you ever made it any other way. This next part? Pure magic. Stay with me here — this is worth it.
What Makes This Version Stand Out
- Taste: The mustard‑brown‑sugar glaze hits the tongue with a perfect sweet‑tangy duet, while the Worcestershire sauce adds a hidden layer of savory depth that makes each bite unforgettable.
- Texture: The Hasselback cuts create a crisp, caramelized edge that shatters like thin ice, contrasted by a juicy, melt‑in‑your‑mouth interior that stays moist thanks to the mayo base.
- Simplicity: Only seven pantry staples are needed, and the technique is straightforward enough for a weekend cook but impressive enough for a dinner party.
- Uniqueness: Most kielbasa recipes either grill or fry whole links; this Hasselback approach gives you a new surface area for flavor absorption and a visual wow‑factor.
- Crowd Reaction: Guests invariably ask for the recipe, and the “I dare you to eat just one” challenge turns the dish into a conversation starter.
- Ingredient Quality: Using coarse ground Dijon mustard adds texture and a robust flavor that powdered mustard simply can’t match.
- Cooking Method: Baking at a high temperature locks in juices while the glaze caramelizes, eliminating the greasy feel of pan‑frying.
- Make‑Ahead Potential: These bites keep beautifully in the fridge and reheat like new, making them perfect for game day or a make‑ahead appetizer.
Inside the Ingredient List
The Flavor Base
Kielbasa: This smoky, garlicky sausage is the heart of the dish. Whether you choose classic pork kielbasa or a lean turkey version, the key is to pick a link that’s well‑seasoned on its own. Skipping this ingredient would be like trying to bake a cake without flour – the entire structure collapses. If you’re hunting for the best, head to the butcher counter and ask for a fresh, uncured link with a nice snap when you bite into it.
Coarse Ground Dijon Mustard: The grainy texture of coarse ground mustard gives the glaze a rustic bite that smooth mustard can’t provide. It’s the tangy anchor that makes the sweet brown sugar shine. If you only have Dijon powder, blend it with a teaspoon of whole grain mustard for a similar effect.
The Texture Crew
Apple Cider Vinegar: A splash of this bright acidity cuts through the richness of the sausage and balances the sugar’s sweetness. It also helps the glaze caramelize evenly. In a pinch, white vinegar works, but you’ll lose that subtle apple nuance.
Light Brown Sugar: The molasses‑laden sweetness rounds out the mustard’s bite and encourages a deep, amber crust. If you’re watching sugar, coconut sugar is a low‑glycemic alternative that still offers that caramel note.
The Unexpected Star
Worcestershire Sauce: Just a teaspoon adds umami depth that makes the glaze feel richer than the sum of its parts. It’s the secret handshake between the sweet and the savory. Soy sauce can substitute, but you’ll miss the subtle anchovy undertone.
Mayonnaise: The creamy base prevents the mustard from burning and gives the glaze a glossy finish that looks restaurant‑ready. Swap it for Greek yogurt if you want a lighter, tangier coat without sacrificing the silkiness.
The Final Flourish
Chopped Parsley: A sprinkle of fresh parsley at the end adds a pop of color and a herbaceous freshness that lifts the entire bite. If parsley isn’t your jam, try dill for a brighter note or chives for a subtle onion flavor.
Everything's prepped? Good. Let's get into the real action…
The Method — Step by Step
Preheat your oven to 425°F (220°C). While the oven warms up, line a baking sheet with parchment paper – this prevents sticking and makes cleanup a breeze. Place the kielbasa links on the sheet, spacing them about two inches apart. This is the moment of truth: the heat will start to coax the fat out, creating that coveted sizzle that signals the start of caramelization.
Slice each link lengthwise, but not all the way through. Using the wooden spoon trick from earlier, gently press the knife down so you stop just before the bottom of the sausage. You should end up with a series of accordion‑like folds that will open up like a flower when baked. The cuts increase surface area, allowing the glaze to seep into every nook and cranny.
Kitchen Hack: If your knife keeps cutting through, wrap the handle in a rubber band for extra grip and control.In a small bowl, whisk together 2 tablespoons coarse ground Dijon mustard, 1 tablespoon apple cider vinegar, 1 tablespoon light brown sugar, and 1 teaspoon Worcestershire sauce. Add 2 tablespoons mayonnaise and stir until the mixture is smooth and glossy. This glaze should look like thick honey with a slight sheen – if it’s too runny, add a pinch more brown sugar; if too thick, thin with a splash of water.
Brush the glaze generously over each sliced kielbasa, making sure it seeps into the cuts. The mustard will cling to the edges, while the mayo creates a protective layer that prevents burning. Let the glazed links sit for five minutes; this short rest lets the flavors meld and the mustard particles settle into the cuts.
Place the sheet back in the oven and bake for 20‑25 minutes, turning halfway through. Keep an eye on the edges – they should start pulling away from the sausage and turn a deep amber color. When the glaze bubbles and the edges look like caramelized sugar crystals, you’ve hit the sweet spot.
Watch Out: If the glaze darkens too quickly, lower the oven temperature to 400°F and tent the bites with foil to avoid a burnt taste.While the bites finish baking, prepare a quick dipping sauce: combine ¼ cup mayonnaise, a teaspoon of the same coarse Dijon mustard, and a dash of chopped parsley. Stir until smooth. This creamy companion balances the tangy bite and adds a fresh herb note that lifts the palate.
When the timer dings, pull the sheet out and let the bites rest for three minutes. This short rest lets the juices redistribute, ensuring each bite stays juicy inside while the exterior remains crisp. Sprinkle the chopped parsley over the top for a final pop of color and freshness.
Serve the bites on a platter, drizzle a little extra glaze if you like, and place the dipping sauce in a small bowl beside them. Gather your friends, announce the “I dare you to eat just one” challenge, and watch the magic happen. That sizzle when it hits the pan? Absolute perfection.
That's it — you did it. But hold on, I've got a few more tricks that'll take this to another level…
Insider Tricks for Flawless Results
The Temperature Rule Nobody Follows
Most home cooks set the oven to 400°F and call it a day, but the secret to that perfect caramelized edge is a hot start at 425°F followed by a quick drop to 400°F halfway through. The initial blast creates steam inside the sausage, keeping the interior moist, while the lower temperature finishes the glaze without scorching. I once tried a single 425°F blast and ended up with burnt edges; the lesson? Respect the two‑stage heat.
Why Your Nose Knows Best
Your sense of smell is a far better timer than any clock. When the glaze starts to emit a sweet, caramel aroma, you’re within two minutes of perfection. If you notice a faint burnt smell, pull the tray out immediately and tent with foil. Trusting your nose saved me from a batch of bitter bites more times than I care to admit.
The 5‑Minute Rest That Changes Everything
After baking, let the bites rest for exactly five minutes before serving. This short pause lets the juices settle, preventing a soggy interior. A friend once skipped this step and complained the bites were “dry.” The rest period is the quiet hero that makes each bite juicy and tender.
The Brush‑and‑Flip Technique
When you flip the bites halfway, give them a second brush of glaze. This double‑coat ensures the caramelization is uniform and adds a glossy finish that looks restaurant‑polished. I used to skip the second brush and ended up with a dull side – not a good look for a party appetizer.
The Parsley Power Boost
Fresh parsley isn’t just for garnish; it adds a subtle peppery bite that cuts through the richness. Toss the chopped parsley with a tiny drizzle of olive oil before sprinkling it on top – this releases its essential oils and makes the flavor pop.
Creative Twists and Variations
This recipe is a playground. Here are some of my favorite ways to switch things up:
Spicy Sriracha Kick
Swap half the Dijon mustard for sriracha and add a pinch of smoked paprika. The result is a fiery glaze that still retains the sweet caramel notes. Perfect for guests who love a little heat.
Maple‑Brown Sugar Bliss
Replace the light brown sugar with pure maple syrup and add a dash of cinnamon. This gives the bites a warm, autumnal flavor that pairs beautifully with roasted pumpkin soup.
Herb‑Infused Delight
Mix chopped rosemary and thyme into the glaze for an earthy, piney twist. The herbs complement the smoky kielbasa and make the dish feel more rustic.
Cheesy Crust
After the first 15 minutes of baking, sprinkle grated sharp cheddar over the bites and return to the oven for the final 10 minutes. The cheese melts into a gooey layer that adds richness and a pleasing stretch.
Gluten‑Free Crunch
If you’re avoiding gluten, swap the flour‑based coating (if you decide to add one) with finely ground almond meal. It adds a nutty crunch without compromising texture.
Storing and Bringing It Back to Life
Fridge Storage
Place the cooled bites in an airtight container lined with a paper towel to absorb excess moisture. They stay fresh for up to three days. When you’re ready to serve, reheat in a preheated 350°F oven for 8‑10 minutes, and the crust will regain its crispness.
Freezer Friendly
Arrange the bites on a baking sheet and freeze until solid, then transfer to a zip‑top freezer bag. They’ll keep for up to two months. To revive, bake straight from frozen at 375°F for 12‑15 minutes; add a splash of water to the tray to create steam that prevents drying.
Best Reheating Method
The secret to reheating without losing crunch is to use a hot oven, not a microwave. Spread the bites on a wire rack over a baking sheet, drizzle a tiny splash of water, and bake at 375°F for 6‑8 minutes. The steam revives the interior while the high heat re‑crisp the edges.