I still remember the day I almost set my kitchen on fire trying to pan-fry dumplings while simultaneously whisking together a peanut sauce that seized up like cement. The smoke alarm was wailing, my roommate was fanning the air with a dish towel, and I was standing there with a spatula in one hand and a half-empty jar of peanut butter in the other, wondering how my life had come to this. Fast forward through three failed attempts, a minor burn on my thumb, and one very expensive takeout order later, and I discovered something that changed my dumpling game forever: the oven is your best friend when you want that perfect crispy-tender texture without the drama of hot oil splattering everywhere.
But here's where it gets interesting. Most oven-baked dumpling recipes are about as exciting as watching paint dry. They promise "healthier" versions but deliver rubbery, sad little parcels that taste like cardboard dipped in sadness. Not this one. This recipe creates dumplings with bottoms so crispy they shatter like thin ice, while the tops stay pillowy and tender. And that peanut sauce? We're talking about a silky, addictive concoction that coats every ridge and fold like liquid gold, balancing sweet, salty, tangy, and spicy in a way that'll make you want to lick the plate clean. I dare you to taste this and not go back for seconds.
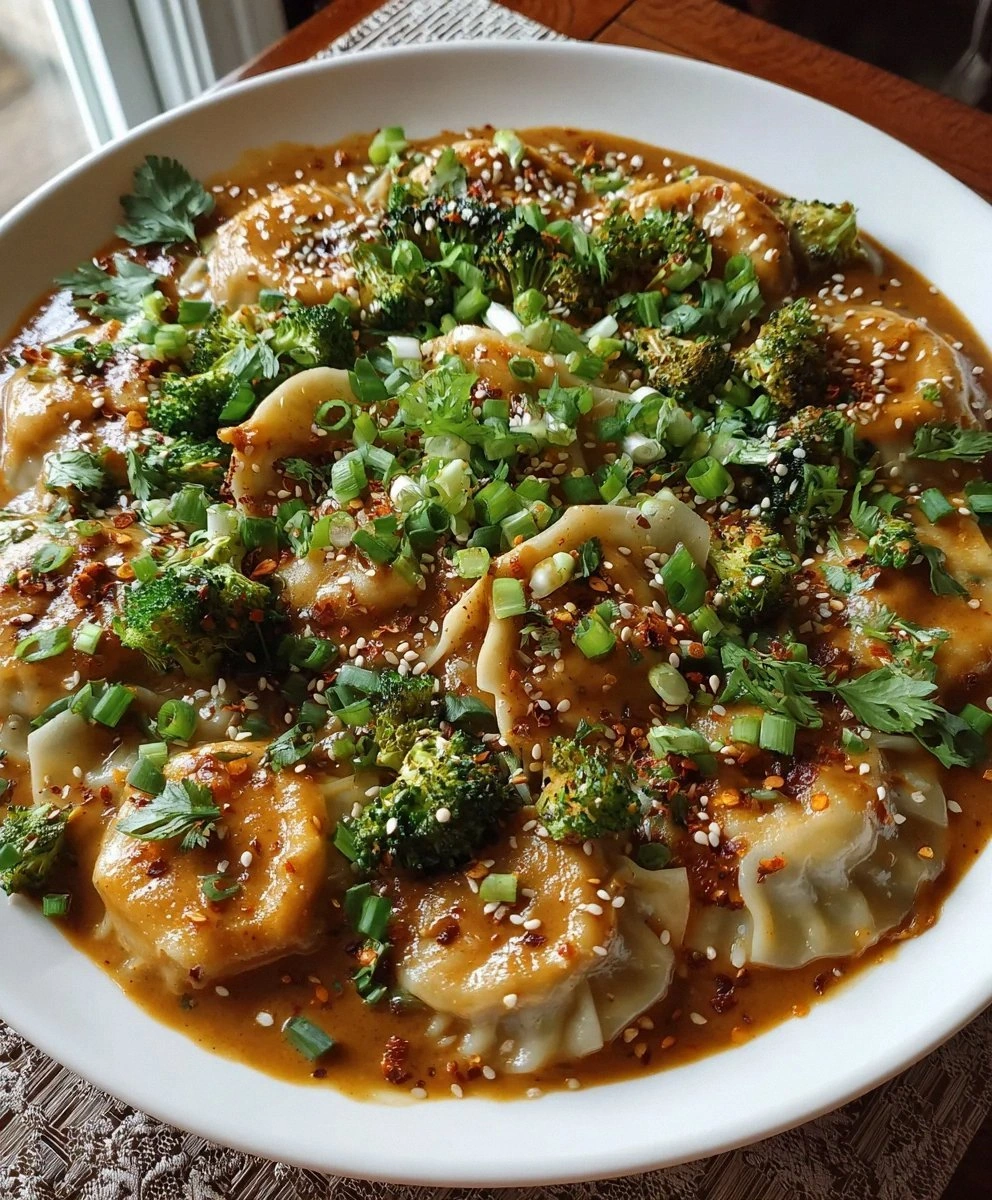
Picture yourself pulling this out of the oven, the whole kitchen smelling like toasted peanuts and garlic, with those little dumplings sizzling away in their bath of creamy sauce. The broccoli florets have soaked up all that flavor, turning into these incredible little flavor bombs that even vegetable haters devour. I'll be honest — I ate half the batch before anyone else got to try it, standing over the counter with a pair of chopsticks, burning my tongue because I couldn't wait for it to cool down. That sizzle when the sauce hits the hot pan? Absolute perfection.
What makes this version different is the technique nobody else seems to be talking about. Instead of just dumping everything together and hoping for the best, we're building layers of flavor and texture that'll make you question why you ever settled for steamed dumplings or takeout. The secret lies in how we treat the peanut sauce — we're not just mixing it and calling it a day. We're coaxing it into something transcendent. Let me walk you through every single step — by the end, you'll wonder how you ever made it any other way.
What Makes This Version Stand Out
Crispy Without the Deep Fry: We're achieving that coveted golden-brown bottom without a single drop of oil in a pan. The oven creates this incredible contrast where the base of each dumpling becomes shatteringly crisp while the wrapper stays tender. It's like having your cake and eating it too, except it's dumplings and you can eat twenty without feeling like you need to run a marathon.
The Sauce That Changes Everything: This isn't your typical thick, gloppy peanut sauce that sits on top like an afterthought. We're creating an emulsion that clings to every surface, seeping into the folds and creating these amazing little pockets of flavor. The rice vinegar cuts through the richness, the soy sauce provides depth, and the garlic — oh, the garlic becomes this mellow, almost sweet background note that makes everything taste more complex.
One Pan, Zero Drama: Everything bakes together in a single dish, which means the broccoli soaks up all those incredible peanut sauce flavors while the dumplings get crispy. No juggling multiple pots and pans, no timing five different components. Just toss everything together and let the oven do the heavy lifting while you pour yourself a drink.
Weeknight Friendly: From freezer to table in under 45 minutes, this recipe respects your time. Using frozen dumplings isn't cheating — it's smart cooking. They're consistent, they're already perfectly seasoned, and they hold their shape better than fresh ones in the oven. Plus, you can keep a bag in your freezer for those "I forgot to plan dinner" emergencies.
Addictively Customizable: Want it vegan? Use vegetable broth and skip the optional fish sauce addition. Need it gluten-free? Rice-based dumpling wrappers work beautifully. Love heat? That chili crisp will become your new obsession. The base recipe is just the beginning of a thousand different directions you can take it.
The Texture Play: We're not just throwing everything together and hoping for the best. The timing matters here — adding broccoli at just the right moment so it stays vibrant and crisp-tender, not mushy and sad. The sesame seeds toast slightly in the oven, releasing their oils and becoming these little nutty flavor bombs that pop against the creamy sauce.
Crowd-Pleasing Magic: I've served this to everyone from picky toddlers to food-snob friends, and the reaction is always the same: stunned silence followed by frantic chopstick action and requests for the recipe. It's that perfect balance of familiar comfort food with just enough "wow factor" to feel special.
Inside the Ingredient List
The Flavor Base
Frozen dumplings are the unsung heroes of weeknight cooking, and I won't hear otherwise. These little pockets of joy save you from the tyranny of making wrappers from scratch while delivering consistent results every single time. Choose whatever variety makes your heart happy — pork and chive, chicken and cabbage, even vegetable if you're feeding vegetarians. The key is picking ones that aren't too huge (they won't cook through) or too small (they'll dry out). Look for dumplings that feel heavy for their size in the bag, which means they've got good filling-to-wrapper ratios.
Broccoli florets aren't just here for health points — they're the perfect sponge for soaking up that incredible peanut sauce. Fresh broccoli gives you that satisfying crunch and vibrant color that frozen just can't match. Cut them into bite-sized pieces, but not too small or they'll turn to mush. Those little tree tops create perfect crevices for the sauce to nestle into, making each floret a mini flavor bomb. If you absolutely must use frozen broccoli, thaw it first and squeeze out the excess water, or you'll end up with a watery sauce.
The Texture Crew
Creamy peanut butter is the absolute star of this show, and quality matters here. Skip the natural stuff that separates into an oil slick on top — you want the homogenized kind that stays smooth and emulsifies beautifully with the other sauce ingredients. I've tried this with almond butter, cashew butter, even sunflower seed butter, and while they're all good, nothing beats the nostalgic comfort of peanut flavor. The secret is using it at room temperature so it melts into the sauce instead of forming stubborn clumps that refuse to cooperate.
Garlic transforms from raw and aggressive to mellow and almost sweet as it bakes, creating these little pockets of aromatic goodness throughout the dish. Fresh garlic is non-negotiable here — the pre-minced stuff in jars has this weird metallic taste that'll ruin everything. Mince it fine so it distributes evenly, but don't crush it or it'll burn and turn bitter. Four cloves might seem like a lot, but trust me on this one — it mellows beautifully in the oven.
The Unexpected Star
Rice vinegar is my secret weapon for cutting through the richness of the peanut sauce. It's got this bright, clean acidity that wakes up all the other flavors without overwhelming them. White vinegar is too harsh, apple cider vinegar fights with the peanut flavor, but rice vinegar? It's like the perfect plus-one that gets along with everyone at the party. If you absolutely can't find it, a mix of lemon juice and a pinch of sugar gets you close, but really, rice vinegar is worth the hunt.
Soy sauce provides that essential umami backbone that makes everything taste more complex and satisfying. Go for the good stuff if you have it — the difference between cheap soy sauce and premium is like the difference between instant coffee and a perfectly pulled espresso. If you're watching sodium, low-sodium soy works fine, but you'll want to add a pinch of salt elsewhere to compensate. Tamari works beautifully for gluten-free folks, and coconut aminos will do in a pinch, though you'll lose some of that deep, fermented complexity.
The Final Flourish
Green onions bring that fresh, sharp bite that cuts through all the richness. Save the dark green tops for garnish — they stay vibrant and add color contrast. The white and light green parts go into the sauce where they soften and mellow, becoming almost sweet. Don't skip this step — that pop of fresh onion flavor at the end is what keeps the dish from feeling heavy and one-note. If green onions aren't happening, chives work, or even a handful of fresh cilantro if you're one of those people who doesn't think it tastes like soap.
The Crunch Factor
Sesame seeds might seem like a throwaway garnish, but they bring this incredible nutty aroma that gets released when they toast slightly in the oven. I prefer a mix of white and black for visual appeal, but use whatever you have. Toast them first in a dry pan until they start to smell fragrant — this extra step makes them taste like they've been kissed by a thousand tiny flavor angels. If sesame seeds aren't happening, crushed peanuts work too, or even some crispy fried shallots if you're feeling fancy.
Chili crisp is completely optional but absolutely transforms the dish if you like heat. That spicy, crunchy, umami-packed oil drizzled over the top right before serving gives you these amazing pops of flavor and texture. Lao Gan Ma is the classic, but there are so many great versions now. Start with less than you think you need — you can always add more, but you can't take it away once it's on there. For the heat-averse, a drizzle of sesame oil at the end gives you that same glossy finish without the fire.
Everything's prepped? Good. Let's get into the real action...
The Method — Step by Step
- Preheat your oven to 425°F (220°C) with your baking dish inside. This is crucial — that screaming hot pan is going to give your dumplings the crispy bottoms that make this dish legendary. While it's heating, whisk together your peanut sauce: combine the peanut butter, soy sauce, rice vinegar, minced garlic, and half your green onions in a bowl. Add the broth or water gradually — you want it thinner than you think because it'll thicken as it bakes. The consistency should be like heavy cream, not peanut butter straight from the jar.
- When the oven's ready, carefully remove the hot dish using oven mitts. This next part? Pure magic. Arrange your frozen dumplings in a single layer, flat side down. They should sizzle when they hit the hot surface — if they don't, your pan wasn't hot enough. Pour the peanut sauce around and over the dumplings, but don't drown them. You want them about halfway submerged, like they're relaxing in a warm peanut butter spa. The sauce will bubble up dramatically — that's exactly what you want to see.
- Slide the dish back into the oven and bake for 15 minutes. Don't walk away — this is when the transformation happens. The sauce will start to bubble and thicken, the dumpling bottoms are crisping up, and your kitchen is starting to smell like a peanut butter lover's dream. After 15 minutes, scatter the broccoli florets around the dumplings. They'll steam slightly in the sauce while getting those delicious roasted edges. This timing is everything — add them too early and they turn to mush, too late and they stay raw and aggressive.
- Continue baking for another 10-12 minutes until the sauce has thickened to the consistency of heavy cream and the dumpling bottoms are golden brown. The broccoli should be bright green and tender-crisp, not army green and sad. If the sauce looks too thick, add a splash of water and give it a gentle stir. If it's too thin, let it go another 2-3 minutes — it'll reduce down. Watch for those crispy edges around the sides of the pan — that's concentrated flavor gold right there.
- Remove from the oven and let it rest for 5 minutes. I know, I know — you're starving and everything smells incredible. But this rest is crucial for the sauce to settle and the dumplings to finish cooking through residual heat. Garnish with the remaining green onions, sesame seeds, and that chili crisp if you're using it. The contrast between the hot dumplings and the cool, fresh garnish is what takes this from good to absolutely unforgettable.
- Serve directly from the baking dish for maximum rustic appeal, or transfer to individual bowls if you're feeling fancy. Make sure everyone gets some of that crispy-edged sauce from the sides and bottom — it's like peanut butter candy with umami. The dumplings should be eaten immediately while the bottoms are still crisp. If you've got leftovers (unlikely), they reheat beautifully with a splash of water to loosen the sauce back up.
- The final flourish is a drizzle of sesame oil right before serving — just a few drops to make everything glossy and aromatic. Don't mix it in; let it sit on top so each bite has that little pop of toasted sesame flavor. And now? Now you get to experience what I've been raving about. Grab your chopsticks or a spoon, break through that crispy bottom, and scoop up a dumpling with all that incredible sauce. The first bite is always a moment of silence, followed by frantic eating and plans to make this again next week.
- That's it — you did it. But hold on, I've got a few more tricks that'll take this to another level...
Insider Tricks for Flawless Results
The Temperature Rule Nobody Follows
Here's the thing about oven temperature — 425°F isn't just a random number I pulled out of thin air. It's the sweet spot where the peanut sauce thickens without burning, the dumpling bottoms crisp without drying out, and the broccoli cooks through without turning to mush. A friend tried making this at 375°F once and ended up with sad, soggy dumplings swimming in watery sauce. Don't be that friend. Your oven needs to be hot enough to create that initial sizzle when the dumplings hit the pan — if they're not sizzling, close the door and wait another 5 minutes.
The other temperature trick is ingredient temperature. Cold peanut butter straight from the fridge will seize up and form stubborn lumps that never quite dissolve into the sauce. Room temperature ingredients mix together like they're old friends catching up after years apart. If you're in a rush, microwave the peanut butter for exactly 10 seconds — any more and it gets weirdly liquid and separates. Same goes for your broth or water — warm liquid helps everything emulsify smoothly instead of looking like a broken vinaigrette.
Why Your Nose Knows Best
Your sense of smell is your best kitchen timer for this recipe. When the garlic hits that perfect mellow sweetness and the peanut butter starts to smell almost caramel-like, you're in the zone. If you catch a whiff of anything sharp or bitter, you're about 30 seconds away from burnt sauce — pull it immediately. The broccoli should smell green and fresh, not sulfurous and overcooked. Trust your nose over the timer every single time.
I learned this the hard way when I got distracted by a phone call and came back to a kitchen that smelled like burnt peanuts and regret. The sauce had turned from golden and glossy to dark and bitter in the time it took to explain to my mom that no, I wasn't trying to burn down my apartment again. Now I set a timer for 2 minutes less than I think I need, then hover by the oven like a hawk until it smells just right.
The 5-Minute Rest That Changes Everything
This rest period isn't just for show — it's when the magic happens. The sauce thickens to the perfect consistency, the dumplings finish cooking through residual heat, and the flavors settle into perfect harmony. Skip this step and you'll have dumplings that are still cold in the middle and sauce that's too thin. Plus, the garnish needs time to warm slightly from the residual heat — cold green onions on hot dumplings are just weird and sad.
During this rest, the sauce also has time to reabsorb some of the moisture from the broccoli and dumplings, creating this incredible cohesive dish instead of separate components. It's like all the ingredients finally get introduced to each other and decide to become best friends. Cover loosely with foil if your kitchen is drafty, but don't seal it completely or you'll lose that crispy bottom texture we worked so hard to achieve.
The Crispiness Preservation Society
Once you've achieved dumpling bottom perfection, you want to preserve it at all costs. Never cover the dish completely while it's hot — steam is the enemy of crispiness. If you need to keep it warm, tent loosely with foil, leaving gaps for steam to escape. And whatever you do, don't stir the dumplings once they're out of the oven — let them rest undisturbed to maintain that crispy bottom integrity.
If you're making multiple batches or need to reheat leftovers, the best method is back in a hot oven on a preheated sheet pan. The microwave will turn everything rubbery and sad. A quick 5-7 minutes at 400°F will revive those crispy bottoms and reheat the sauce without turning it into a gluey mess. Add a splash of water to loosen the sauce if needed, but go easy — you can always add more, but you can't take it away.
Creative Twists and Variations
The Thai-Inspired Remix
This recipe is a playground. Here are some of my favorite ways to switch things up: Swap the rice vinegar for lime juice, add a tablespoon of red curry paste to the sauce, and throw in some Thai basil at the end. The curry paste gives you this incredible depth and just enough heat to make things interesting. I like to use coconut milk instead of broth for an even richer, more tropical vibe. The lime juice brightens everything up in a way that makes you want to eat this on a beach somewhere, even if you're actually in your tiny apartment kitchen.
The Veggie-Packed Powerhouse
Broccoli is just the beginning. Try adding snap peas, bell pepper strips, or thin carrot coins in the last 8 minutes of baking. They all cook at different rates, so stagger them accordingly. Snap peas go in with the broccoli, bell peppers can handle the full time, and carrots should go in right from the start. The variety of colors makes it look like confetti, and each vegetable soaks up the sauce in its own special way. Kids love the rainbow effect, and you get to feel virtuous about vegetable consumption.
The Protein Power-Up
For those days when you need something heartier, add cubed firm tofu or cooked chicken pieces in the last 10 minutes. The tofu soaks up the sauce like little sponges and becomes incredibly flavorful. If you're using chicken, make sure it's already cooked — raw chicken will release too much liquid and dilute your sauce. Pressed, marinated tofu is my favorite because it adds protein without competing with the dumplings for attention.
The Spice Seeker's Dream
Replace half the peanut butter with chili crisp oil for a version that'll make spice lovers weep with joy. The oil from the chili crisp carries all that umami flavor while the peanut butter keeps things grounded. I like to use Lao Gan Ma's black bean version for extra complexity. Start with a 50/50 split and adjust to your heat tolerance. Fair warning — this version is seriously addictive and might ruin you for the original.
The Nut-Free Wonder
Sunflower seed butter works surprisingly well as a peanut butter substitute for those with allergies. It's got a similar texture and mild flavor that takes on the other ingredients beautifully. You might need to add a touch more soy sauce since sunflower seed butter is naturally sweeter. Tahini works too, but it's more bitter, so balance it with an extra teaspoon of honey or sugar. The result is different but equally delicious, with a more grown-up, sophisticated flavor.
The Breakfast-for-Dinner Special
Okay, this one sounds weird but hear me out: add some breakfast sausage pieces and use maple syrup instead of sugar in the sauce. The sweet-savory combination is incredible, especially with a fried egg on top. It's like the best parts of breakfast and Asian takeout had a beautiful baby. The maple plays off the peanut butter in ways that'll make you question everything you thought you knew about flavor combinations.
Storing and Bringing It Back to Life
Fridge Storage
Leftovers keep beautifully in an airtight container in the fridge for up to 4 days, though let's be real — rarely does it last that long. The key is storing the dumplings and sauce together so the flavors continue to meld. Use a shallow container so everything reheats evenly, and don't pack it too tightly or the dumplings will get squished and lose their shape. The sauce will thicken considerably when cold, but that's actually a good thing — it means all the flavors are concentrating.
I like to portion leftovers into individual containers for easy grab-and-go lunches. One serving fits perfectly in a 2-cup container, and you can reheat it right in the container if it's microwave-safe (though the oven method is superior). Add a tiny splash of water before reheating — about a teaspoon per serving — it steams back to perfection and prevents everything from drying out. The broccoli might lose a bit of its vibrant color, but it still tastes incredible.
Freezer Friendly
This dish doesn't freeze well as a whole — the dumpling wrappers get weird and gummy when thawed. However, you can freeze the peanut sauce separately for up to 3 months. Pour it into ice cube trays for perfect portion-sized blocks that thaw quickly. When you're ready to use it, just thaw the sauce cubes and proceed with fresh dumplings and vegetables. The sauce might separate slightly when thawed, but a quick whisk brings it back together.
If you absolutely must freeze leftovers, undercook everything slightly so the dumplings don't turn to mush when reheated. Freeze in a single layer on a sheet pan first, then transfer to a freezer bag. This prevents everything from freezing into one solid block. Reheat directly from frozen with a splash of water and lower heat for longer — patience is key here. It's not quite as good as fresh, but it's better than letting leftovers go to waste.
Best Reheating Method
The oven is your friend for reheating — 375°F for about 10-12 minutes does the trick. Cover loosely with foil for the first 8 minutes to prevent over-browning, then uncover for the last few minutes to crisp things back up. Add a tablespoon of water to the dish before reheating — it creates steam that prevents everything from drying out while the bottoms re-crisp. The result is almost as good as fresh, with crispy bottoms and a sauce that's returned to its former glory.
Microwave reheating works in a pinch, but you'll sacrifice the crispy bottoms. Heat on 70% power for 2-3 minutes, stirring halfway through. Add a splash of water and cover with a damp paper towel to create steam. It's not the same texture, but the flavors are all there. Sometimes I'll microwave to heat through, then pop it under the broiler for 2 minutes to crisp things back up — it's a two-step process but worth it if you miss that textural contrast.