I was in the middle of a frantic Friday night when my roommate dared me to bake something that would make the entire building smell like a tropical vacation. I stared at the empty pantry, the clock ticking, and the only thing that felt right was a bright, citrusy promise that could cut through the stale pizza leftovers lingering in the air. I grabbed the one thing I had in the fridge that could actually deliver that promise: a tiny jar of key lime juice that I had rescued from a forgotten margarita mix. The moment the lime zest hit the cutting board, a zing of green perfume erupted, and I knew I was about to create something that would change my dessert game forever.
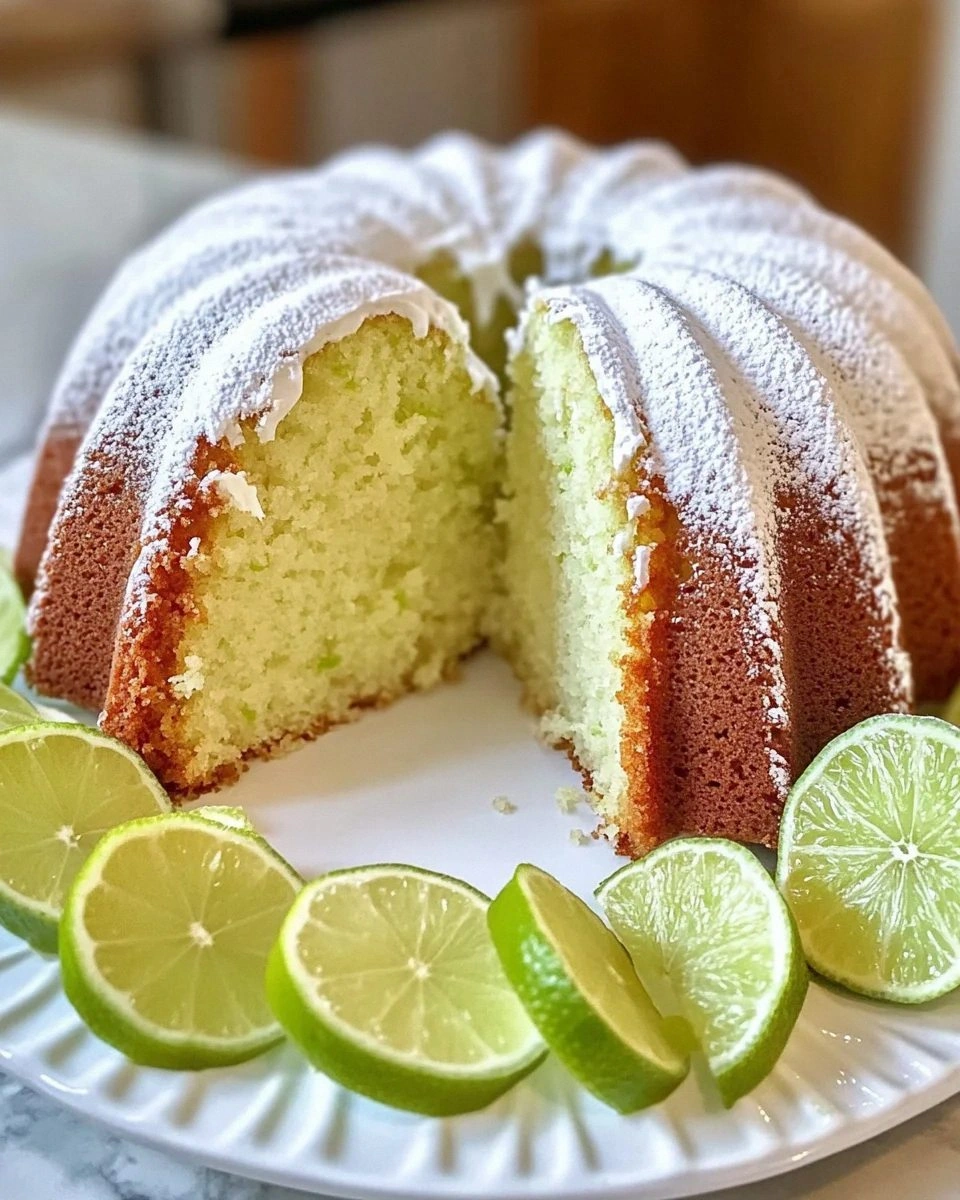
Picture this: a golden‑brown loaf emerging from the oven, its top speckled with tiny bubbles that look like a sunrise over a lime‑green sea. The crust cracks just enough to reveal a tender crumb that’s as soft as a cloud but holds its shape like a well‑built brick. When you slice through, a burst of lime‑infused creaminess oozes out, sending a fragrant mist that makes your kitchen feel like a sun‑drenched patio in Key West. The first bite? It’s a perfect balance of sweet and tart, with the buttery richness of a classic pound cake amplified by the bright, slightly floral tang of real key limes.
Most recipes I’ve tried either drown the lime in sugar or, worse, forget the zest entirely, leaving a bland, overly sweet cake that feels more like a sugar bomb than a dessert. This version, however, respects the lime’s personality: we use both juice and zest, a splash of sour cream for extra moisture, and a careful folding technique that keeps the crumb airy without compromising the dense, buttery feel we all love in a pound cake. I dare you to taste this and not go back for seconds – the citrus punch is so precise it feels like a secret handshake between your palate and the cake.
Let me walk you through every single step — by the end, you’ll wonder how you ever made it any other way. Okay, ready for the game‑changer? We’re about to dive into a technique that most home bakers overlook, and it’s pure magic. Stay with me here — this is worth it.
What Makes This Version Stand Out
- Flavor Punch: The combination of key lime juice and zest delivers a bright, authentic citrus flavor that cuts through the sweetness without overwhelming it.
- Moisture Mastery: Adding sour cream and a splash of milk creates a crumb that stays moist for days, turning every slice into a melt‑in‑your‑mouth experience.
- Texture Balance: The classic pound‑cake density is preserved, yet the batter is light enough that the cake rises just enough to give you those coveted airy edges.
- Simplicity: Only eight pantry staples plus fresh key limes are required – no fancy equipment, no complicated steps.
- Crowd Reaction: This cake consistently clears the dessert table; guests rave about the “tangy surprise” and ask for the recipe within minutes.
- Ingredient Quality: Using real key lime juice (not bottled lime concentrate) makes the flavor sing, while high‑quality unsalted butter ensures a buttery richness.
- Make‑Ahead Potential: The cake freezes beautifully, and a quick reheat brings back that fresh‑baked aroma as if you just pulled it from the oven.
Inside the Ingredient List
The Flavor Base
Key lime juice is the heart of this cake. Freshly squeezed, it brings a sharp, fragrant acidity that lifts the entire flavor profile. If you skip it for bottled concentrate, you’ll lose the subtle floral notes that make the cake feel upscale. A good rule of thumb: always use juice from the actual fruit, even if it means squeezing a few extra limes.
Key lime zest, on the other hand, adds an aromatic oil layer that sits on top of the batter, giving each bite a fragrant snap. The zest is where the magic happens; it’s the difference between “lime‑flavored” and “lime‑kissed.” If you’re out of fresh key limes, regular Persian limes work in a pinch, but the flavor will be milder.
The Texture Crew
All‑purpose flour provides the structural backbone, but we keep the amount modest (just 2 cups) so the cake doesn’t become too heavy. The baking powder adds a gentle lift, ensuring the crumb stays tender without turning airy. Skipping the baking powder will give you a dense, almost bread‑like texture that no one wants.
Unsalted butter, softened to room temperature, is creamed with sugar to create a light, fluffy base. This step traps air, which later expands in the oven, giving the cake its signature rise. If you use melted butter, you’ll end up with a greasy crumb that collapses.
The Unexpected Star
Sour cream is the secret weapon that keeps the cake moist and adds a subtle tang that complements the lime. It also contributes to a tender crumb by slightly acidifying the batter, which weakens gluten formation. You could swap it for Greek yogurt, but the texture will be a shade less velvety.
Whole milk adds a touch of richness without diluting the lime intensity. It helps dissolve the sugar and butter mixture, ensuring a smooth batter. If you’re dairy‑free, almond milk works, but you’ll lose a bit of the buttery depth.
The Final Flourish
Vanilla extract rounds out the flavor, providing a warm, sweet background that lets the lime shine. A splash of powdered sugar glaze on top adds a glossy finish and an extra hint of sweetness for those who love a little sparkle. If you prefer a glaze, whisk together powdered sugar, a teaspoon of lime juice, and a drop of milk for a glossy drizzle.
Everything's prepped? Good. Let’s get into the real action…
The Method — Step by Step
Preheat your oven to 350°F (175°C) and generously butter a 9‑inch loaf pan, then line the bottom with parchment. The butter creates a crisp crust, while the parchment ensures a clean release. Let the pan sit while you assemble the batter – this short wait builds anticipation.
In a medium bowl, whisk together the flour, baking powder, and salt. This dry blend guarantees an even distribution of leavening, preventing any pockets of flour that could cause uneven rise. Set aside and give the bowl a gentle tap to settle any clumps.
Using a stand mixer on medium speed, cream the softened butter with the granulated sugar for about 3‑4 minutes, until the mixture is pale, fluffy, and smells faintly of caramel. This is the moment of truth – if the batter looks dull, you’ve under‑creamed and the cake will be dense.
Add the eggs one at a time, beating well after each addition. The batter should become glossy and slightly thickened – think of a smooth custard. If the mixture looks curdled, keep beating; the emulsification will smooth it out.
Stir in the vanilla extract, key lime zest, and key lime juice. You’ll notice the batter turning a pale green hue, a visual cue that the lime is fully integrated. This is where the flavor really starts to sing.
Fold in the sour cream and milk, alternating with the dry flour mixture. Begin and end with the dry ingredients, using a gentle folding motion to preserve the air you’ve trapped. The batter should be thick but pourable, with a glossy sheen.
Pour the batter into the prepared loaf pan, smoothing the top with a spatula. Tap the pan lightly on the counter three times; this releases any trapped air bubbles and settles the batter evenly.
Bake for 30‑35 minutes, or until a toothpick inserted into the center comes out with just a few moist crumbs. The edges should pull away from the pan, and the top will have a golden‑brown crust that cracks slightly – a visual cue that the interior is perfectly set.
Allow the cake to cool in the pan for 10 minutes, then invert onto a wire rack to finish cooling completely. This prevents the bottom from becoming soggy and lets steam escape, preserving that crisp crust.
That’s it — you did it. But hold on, I’ve got a few more tricks that’ll take this to another level…
Insider Tricks for Flawless Results
The Temperature Rule Nobody Follows
Always bring your butter, eggs, sour cream, and milk to room temperature before you start. Cold ingredients cause the batter to seize, leading to a lumpy texture. I once tried a shortcut by using straight‑from‑the‑fridge butter and the cake turned out dense as a brick. Letting everything sit for 30 minutes is a tiny time investment for a massive payoff.
Why Your Nose Knows Best
When the cake is about 20 minutes into baking, give your kitchen a quick sniff. If you catch a sweet, buttery aroma with a faint citrus edge, you’re on track. If the scent leans too heavily toward sugar, the cake might be browning too fast; rotate the pan 180° to even out the heat. Trusting your nose can save you from a burnt top and a raw center.
The 5‑Minute Rest That Changes Everything
After the cake has cooled on the rack, let it sit untouched for an additional five minutes before slicing. This short rest allows the crumb to set fully, preventing it from crumbling when you cut. I’ve seen novice bakers slice too early and end up with a gummy interior – a simple five‑minute pause eliminates that problem.
Glaze Timing is Everything
If you decide to drizzle a lime glaze, do it while the cake is still slightly warm. The glaze will seep into the surface, creating a glossy, flavorful crust. If the cake is completely cold, the glaze will sit on top and harden, losing that melt‑in‑your‑mouth quality.
The Secret of the Parchment Lift
When you line the pan with parchment, cut a long strip that extends beyond the pan’s edges. After the cake cools, lift it out using the parchment strip for a clean, undamaged release. This trick prevents the dreaded “stuck‑to‑the‑pan” disaster that can ruin the presentation.
Creative Twists and Variations
This recipe is a playground. Here are some of my favorite ways to switch things up:
Coconut Lime Fusion
Replace half the milk with coconut milk and sprinkle toasted coconut flakes on top before baking. The result is a tropical duet where coconut’s buttery richness amplifies the lime’s zing, perfect for a beach‑themed party.
Spiced Lime Surprise
Add a teaspoon of ground ginger and a pinch of cayenne to the dry ingredients. The subtle heat pairs with the citrus, creating a flavor profile that’s both comforting and adventurous – ideal for cooler evenings.
Berry‑Burst Lime
Fold in a cup of fresh raspberries or blueberries after the batter is mixed. The berries burst during baking, leaving pockets of juicy sweetness that contrast beautifully with the tart lime.
Chocolate Lime Indulgence
Stir in ½ cup of dark chocolate chips and drizzle a dark chocolate ganache over the cooled cake. The bitterness of the chocolate balances the bright lime, delivering a sophisticated dessert for chocolate lovers.
Gluten‑Free Adaptation
Swap the all‑purpose flour for a 1‑to‑1 gluten‑free blend that includes rice flour and potato starch. The texture stays tender, and the lime flavor remains front‑and‑center, proving that everyone can enjoy this treat.
Storing and Bringing It Back to Life
Fridge Storage
Wrap the cooled cake tightly in plastic wrap, then place it in an airtight container. It will stay fresh for up to five days, with the lime flavor mellowing slightly but never fading. If you notice the crust drying out, lightly brush the top with a mixture of milk and lime juice before re‑wrapping.
Freezer Friendly
Slice the cake into individual servings, wrap each slice in parchment, then foil, and store in a zip‑top freezer bag. It freezes beautifully for up to three months. When you’re ready to enjoy, let a slice thaw at room temperature for 30 minutes, then give it a quick microwave zap (10‑15 seconds) to revive the softness.
Best Reheating Method
To bring the cake back to life, preheat your oven to 300°F (150°C), place the whole loaf (or slices) on a baking sheet, and add a tiny splash of water to the pan’s edge. Cover loosely with foil and heat for 10‑12 minutes. The steam created by the water revives the crumb, making it feel freshly baked.