Picture this: it’s a rainy Saturday afternoon, the kind where the clouds look like a giant cotton candy machine that’s gone rogue, and you’re stuck inside with nothing but a half‑finished crossword and a gnawing craving for something that feels like a hug for your taste buds. I was in that exact spot last week, scrolling through endless dessert videos, when a friend dared me to create the ultimate Snickers‑inspired brownie. I laughed, I scoffed, and then I thought, “Why not?” The result? A brownie so decadent, so gooey, and so packed with that classic Snickers crunch that I’m pretty sure the universe gave me a high‑five.
The moment the batter hit the bowl, the kitchen was flooded with the sweet scent of chocolate mingling with the buttery aroma of peanuts. I could hear the faint crackle of the marshmallow fluff as it folded in, like a tiny fireworks show in a glass bowl. My hands felt the silky smoothness of the peanut butter as it swirled, coating everything like a glossy, nutty veil. When the batter finally poured into the pan, it spread out with a glossy sheen that promised a fudgy interior and a crisp, caramelized edge. And then, the oven door swung shut, and the entire house filled with a perfume that made my neighbor’s dog start drooling.
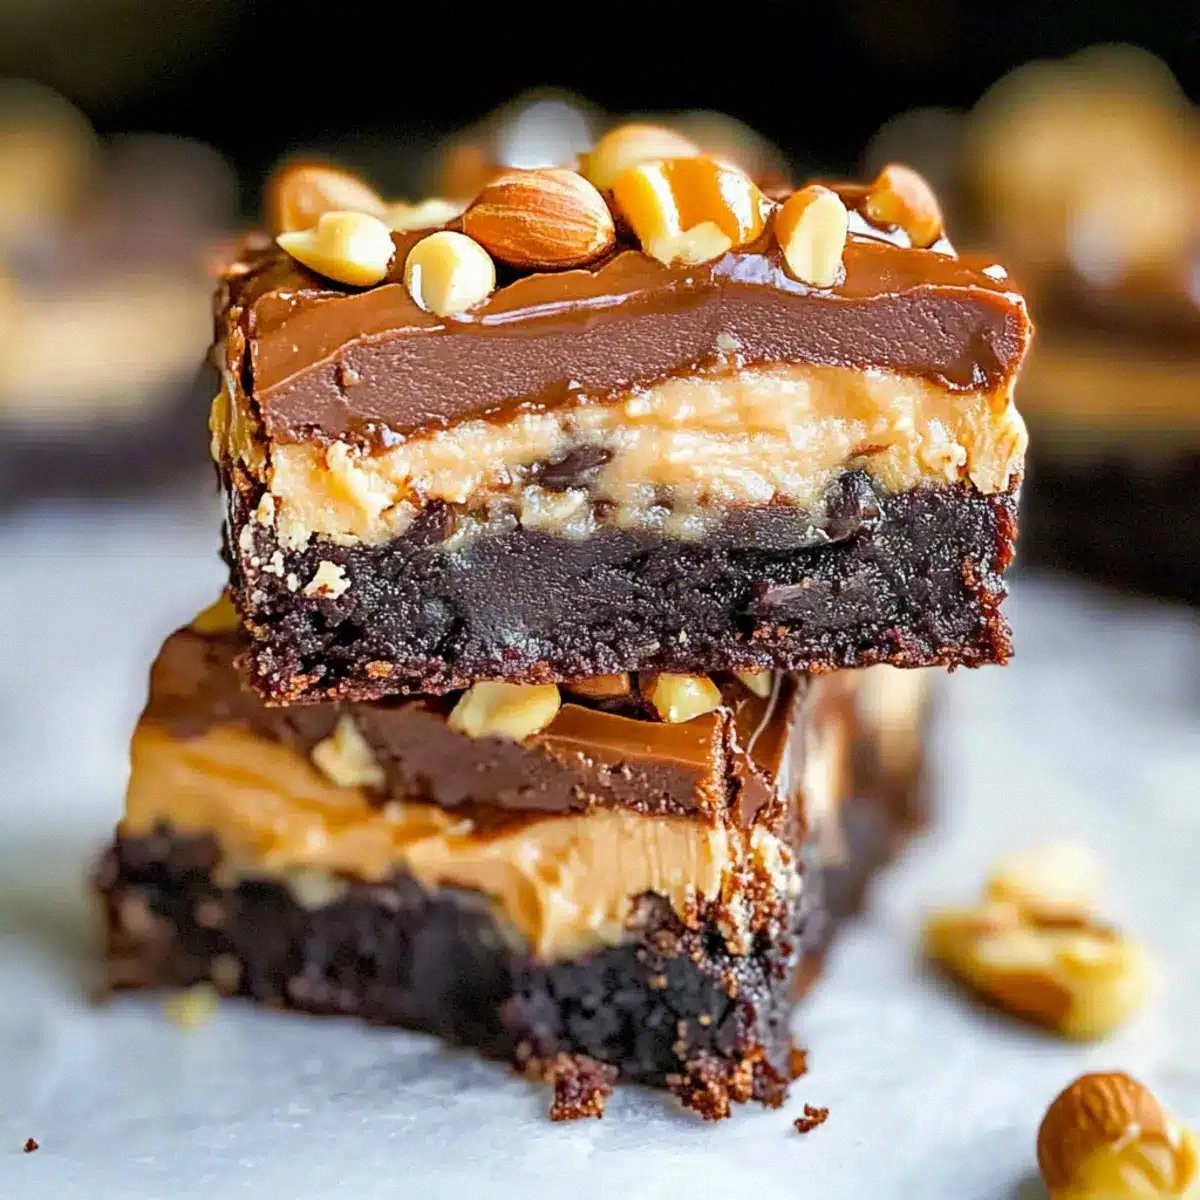
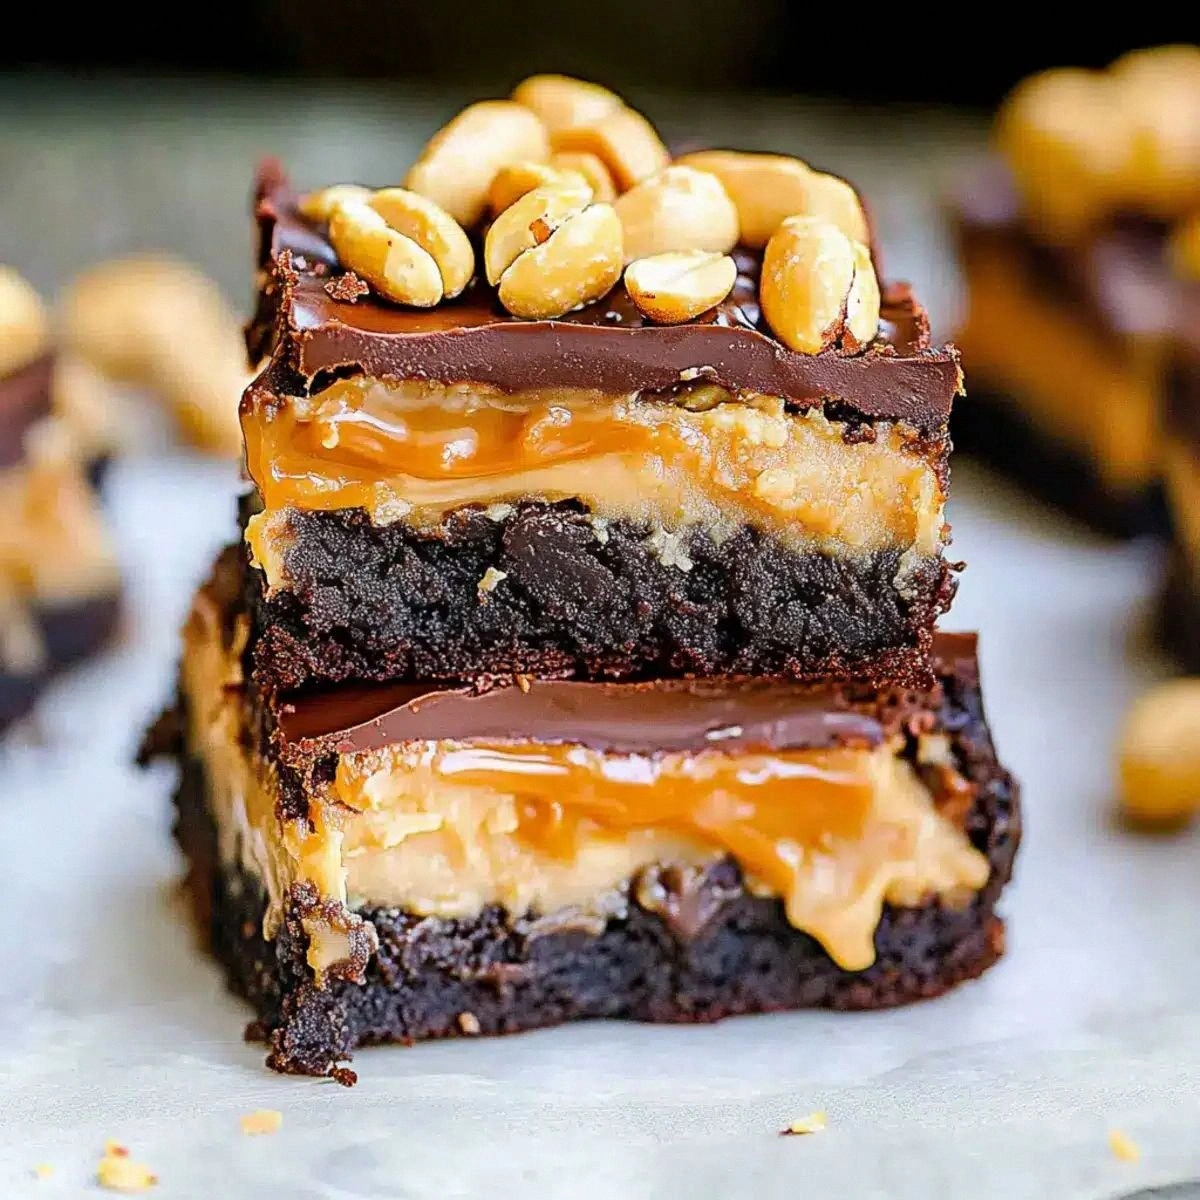
Now, most Snickers brownie recipes out there either skimp on the peanuts, drown everything in chocolate, or forget the marshmallow fluff that gives that signature chewiness. This version, however, is a meticulously balanced orchestra of flavors and textures. I dared to layer caramel bits, dry‑roasted peanuts, and chocolate chips in a way that each bite delivers a surprise—first the rich brownie, then a burst of caramel, followed by the satisfying crunch of peanuts, and finally a lingering sweet‑salty finish. It’s like a roller coaster for your palate, and trust me, you’ll want to ride it again and again.
But here’s the kicker: the secret ingredient isn’t a secret at all—it’s the technique. I’m talking about a two‑stage mixing method that ensures the peanut butter stays in distinct ribbons, while the marshmallow fluff creates pockets of airy bliss. I’ll also reveal a quick tip for achieving that perfect, crack‑the‑top‑of‑the‑pan edge that shatters like thin ice when you slice into it. Let me walk you through every single step — by the end, you’ll wonder how you ever made it any other way.
What Makes This Version Stand Out
- Unmatched Texture: The combination of fudgy brownie, airy marshmallow fluff, and crunchy peanuts creates a multi‑dimensional bite that feels like a dessert symphony.
- Flavor Depth: Caramel bits and a splash of heavy cream amplify the sweet‑salty balance, making each mouthful richer than the last.
- Simplicity Meets Luxury: You only need a box of brownie mix and a handful of pantry staples to achieve a gourmet‑level treat.
- Visual Appeal: Swirls of peanut butter and specks of chocolate chips give the brownies a speckled, Instagram‑ready look.
- Crowd‑Pleaser: Whether it’s a family gathering or a midnight snack, this recipe has earned a reputation for disappearing in seconds.
- Ingredient Quality: Using real caramel bits and dry‑roasted peanuts elevates the flavor far beyond generic store‑bought versions.
- Cooking Method: The two‑stage mixing ensures the fluff stays light, while the final bake locks in moisture.
- Make‑Ahead Potential: These brownies freeze beautifully, so you can prep ahead for parties or holidays.
Inside the Ingredient List
The Flavor Base
1 box Brownie Mix: This is the backbone of our brownies, providing that classic chocolatey foundation. I recommend a high‑cocoa, low‑sugar mix for a richer taste. Skipping it means you lose the structural integrity that holds everything together.
1 cup Milk (or Heavy Cream): Milk keeps the batter smooth, while heavy cream adds a velvety richness that makes the brownies melt in your mouth. If you’re dairy‑free, almond milk works, but expect a slightly thinner texture.
1 cup Marshmallow Fluff: The fluff is the secret to those airy pockets that surprise you mid‑bite. It’s essentially sugar, egg whites, and corn syrup whipped into a cloud. If you substitute with whipped cream, you’ll get a softer, less stable result.
The Texture Crew
½ cup Creamy Peanut Butter: This creates those indulgent ribbons that run through the brownie like chocolate rivers. Opt for natural peanut butter without added sugar for a deeper nutty flavor. Using a chunky variety will add extra crunch, but we want smooth ribbons.
1 cup Caramel Bits: These little golden nuggets burst with buttery sweetness, mimicking the caramel layer in a Snickers bar. If you can’t find bits, melt caramel candy and drizzle it in, but the bits give you that perfect bite‑size pop.
1 cup Dry Roasted Peanuts: The peanuts give that signature Snickers crunch. Choose unsalted, dry‑roasted peanuts for the purest flavor; salted ones can overwhelm the sweet balance.
The Unexpected Star
1 cup Chocolate Chips: They melt into pockets of molten chocolate that contrast the fudgy base. Use semi‑sweet chips for a balanced sweetness. Dark chocolate chips add a sophisticated bitter edge, but we’re aiming for classic comfort.
¼ cup Peanut Butter (or Almond Butter): This extra spoonful is folded in at the end to create a final layer of nutty richness. Almond butter offers a subtle, fruity note that pairs beautifully with caramel.
Everything's prepped? Good. Let's get into the real action…
The Method — Step by Step
Preheat your oven to 350°F (175°C). While the oven warms up, grease a 9×13‑inch baking pan with butter or line it with parchment paper. This ensures a clean release and helps the edges crisp up just right. The moment the pan is ready, you’ll hear that faint sizzle as the butter hits the metal—pure anticipation.
In a large mixing bowl, combine the brownie mix, milk (or heavy cream), and the entire box of marshmallow fluff. Using a handheld mixer on low speed, blend until just combined—don’t overmix, or you’ll deflate the fluff. The batter should look glossy and slightly airy, like a chocolate mousse waiting to be set.
Now, melt the creamy peanut butter in the microwave for about 20 seconds, just until it’s pourable. Drizzle half of it into the batter and fold gently, creating swirls. This step is the first layer of peanut‑butter magic—those ribbons will stay distinct after baking.
Stir in the caramel bits, dry roasted peanuts, and chocolate chips. Each addition should be folded in with a slow, deliberate motion, allowing the nuts and chips to distribute evenly without breaking the batter’s airy structure. That sizzle when the caramel bits hit the warm batter? Absolute perfection.
Pour the batter into the prepared pan, spreading it evenly with a spatula. Then, dollop the remaining ¼ cup of peanut butter in random spots across the surface. Using a knife or skewer, swirl the peanut butter through the batter, creating a marbled effect. This visual cue tells you that the brownies are about to become a work of art.
Slide the pan into the preheated oven. Bake for 25‑30 minutes, but start checking at the 22‑minute mark. The edges should start pulling away from the sides of the pan, and a toothpick inserted into the center should come out with a few moist crumbs—not wet batter. This is the moment of truth.
Once baked, remove the pan and let the brownies cool in the pan for at least 15 minutes. This resting period allows the interior to set, making it easier to cut clean squares. While you wait, the kitchen will be filled with a lingering aroma that makes you want to taste before the cooling even finishes.
After cooling, lift the brownies out using the parchment (if you used it) and place them on a cutting board. Slice into generous squares—don’t be shy; these are meant to be shared, but I’ll be honest — I ate half the batch before anyone else got to try it. Serve warm for maximum gooeyness, or at room temperature for a firmer bite.
That's it — you did it. But hold on, I've got a few more tricks that'll take this to another level…
Insider Tricks for Flawless Results
The Temperature Rule Nobody Follows
Most bakers recommend a hot oven, but for these brownies, a steady 350°F is key. If your oven runs hot, lower it by 10‑15 degrees; if it’s on the cool side, add an extra 5 minutes to the bake time. I once tried cranking the heat to 400°F to speed things up, and the result was a burnt crust with a raw center—lesson learned.
Why Your Nose Knows Best
Instead of relying solely on a timer, trust your senses. When the edges start to pull away and you catch that caramel‑nut aroma, you’re close. I’ve found that the moment the kitchen smells like a candy store, the brownies are ready for a quick check.
The 5‑Minute Rest That Changes Everything
After you pull the pan out, let the brownies rest for exactly five minutes before cutting. This short pause allows the caramel bits to firm up slightly, preventing them from oozing out all over the plate. Skipping this step is like trying to run a marathon without stretching—your results will be messy.
Swirl Timing is Everything
If you love the marbled effect, do the swirl just before the batter goes into the oven. Swirling too early can cause the peanut butter to sink, while swirling too late can create uneven pockets. I once swirled after the first 10 minutes of baking; the result was a lopsided, overly dense brownie.
Cool‑Down Trick for Perfect Slices
Place the pan on a wire rack after the initial 15‑minute cooling period. The airflow helps the top set evenly, making clean cuts. A friend tried cooling on a solid countertop and ended up with gummy, stuck-together squares.
Creative Twists and Variations
This recipe is a playground. Here are some of my favorite ways to switch things up:
Salted Caramel Explosion
Swap the caramel bits for homemade salted caramel sauce, drizzling it over the batter before baking. The extra salt heightens the chocolate’s depth, and the sauce creates a glossy top layer that looks as good as it tastes.
Double‑Nut Delight
Replace half of the dry roasted peanuts with toasted almonds or cashews. The different nut oils bring a subtle earthiness, and the visual contrast of light and dark nuts makes each bite interesting.
White Chocolate Dream
Use white chocolate chips instead of regular ones, and add a teaspoon of vanilla extract to the batter. The creamy sweetness pairs beautifully with the peanut butter, creating a dessert that feels like a celebration.
Espresso Kick
Stir in a tablespoon of instant espresso powder with the brownie mix. The coffee notes amplify the chocolate flavor, turning the brownies into a sophisticated after‑dinner treat.
Vegan Version
Swap the milk for oat milk, use a vegan marshmallow fluff, and replace peanut butter with almond butter. The result is just as indulgent, and it’s perfect for guests with dietary restrictions.
Mini Brownie Bites
Divide the batter among a muffin tin, creating bite‑size portions perfect for parties. Bake for 12‑15 minutes, and you’ll have a handheld version that’s just as gooey but easier to serve.
Storing and Bringing It Back to Life
Fridge Storage
Place the cooled brownies in an airtight container and store them in the refrigerator for up to five days. The chilled environment keeps the caramel bits from melting and maintains the crumb structure.
Freezer Friendly
Wrap the brownies tightly in plastic wrap, then foil, and freeze for up to three months. When you’re ready to enjoy, let them thaw in the fridge overnight, then warm them in a 300°F oven for 8‑10 minutes.
Best Reheating Method
To revive that fresh‑out‑the‑oven gooeyness, sprinkle a tiny splash of water over each piece before microwaving for 20‑30 seconds. The steam generated restores the fudgy interior without turning the edges rubbery.