Picture this: it's Tuesday night, you're standing in your kitchen wearing mismatched socks, and the rain is tapping against your window like it wants to come in for dinner too. You've got a rotisserie chicken getting cold on the counter, a bag of gnocchi that's been judging you from the pantry for three weeks, and a deep, soul-level craving for something that hugs you from the inside out. I was right there with you last month, my friend, staring into the abyss of my fridge like it owed me answers. Pot pie sounded dreamy, but the thought of rolling out pastry after a ten-hour workday felt like asking me to run a marathon in flip-flops. That's when lightning struck — what if the gnocchi could be the crust? What if those tender potato dumplings could float like golden clouds on top of creamy chicken filling instead of hiding underneath a sheet of dough? I slammed that fridge door so hard the mustard bottles rattled, and what happened next changed my weeknight dinner game forever.
Now let me set the scene properly, because this isn't just another throw-everything-in-a-pot recipe. This is the moment when your kitchen transforms into the coziest bistro in town. The butter hits the pan and whispers promises of golden edges. Mushrooms release their earthy perfume while onions go translucent and sweet like they're telling secrets. Thyme leaves flutter in like tiny green confetti, and suddenly your spatula becomes a magic wand. The smell that fills your house is what I imagine clouds in heaven smell like — buttery, herby, chickeny perfection that makes your neighbor knock on the wall wondering what in the world you're creating. My dog actually sat by the oven for forty-five minutes straight, which is longer than he's ever waited for anything, including bacon.
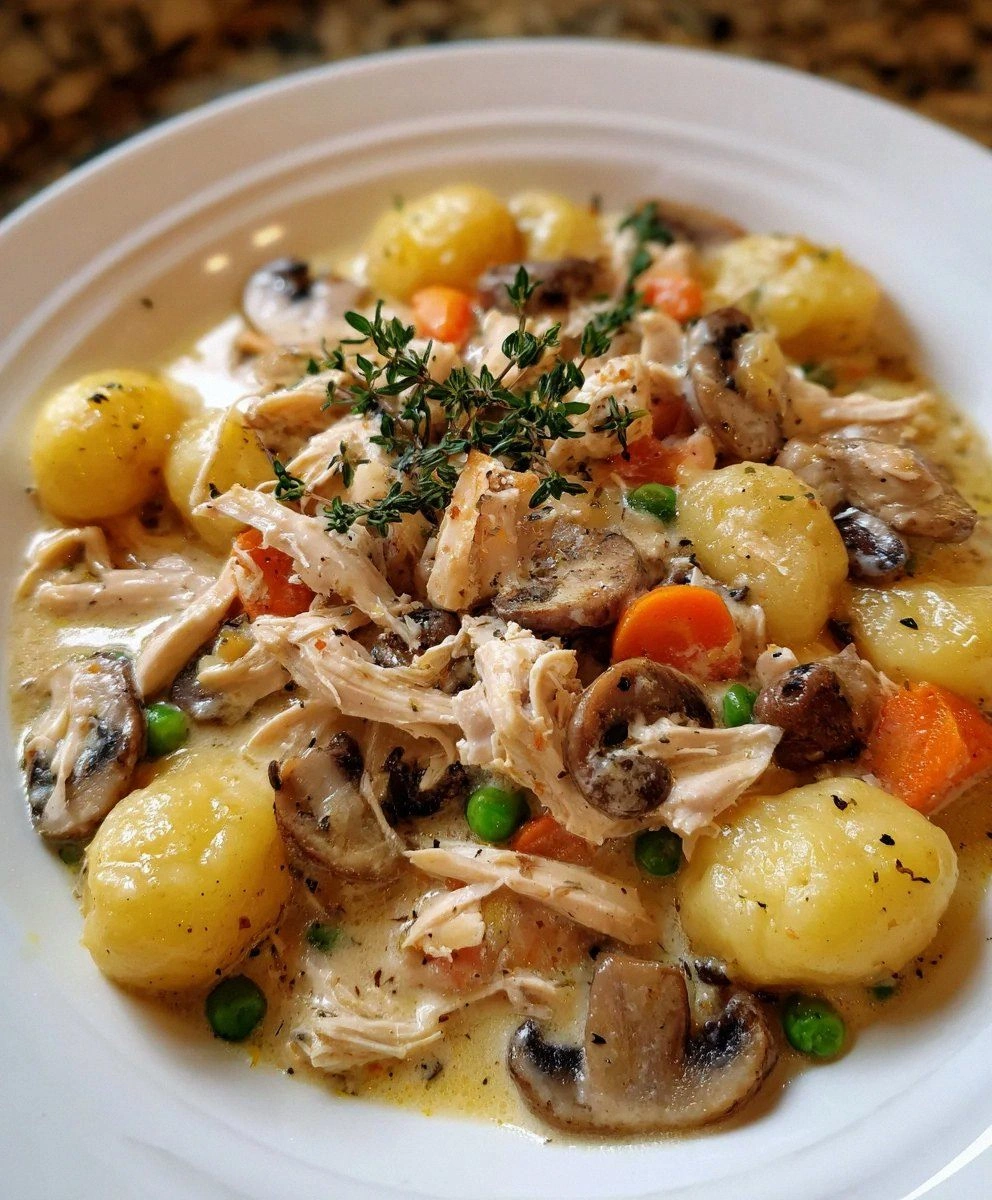
Here's the plot twist that'll make you question everything you thought you knew about comfort food: those gnocchi don't just sit there like lazy dumplings. They crisp on top while staying cloud-soft underneath, creating these incredible textural moments that'll make you close your eyes involuntarily. The sauce thickens into this velvet blanket that coats every crevice of the chicken and vegetables, while the gnocchi absorb just enough flavor to become these incredible flavor bombs. When you pull it out of the oven and that first bubble breaks through the surface? That's when you understand why people write songs about food. I actually texted three friends photos at midnight because I couldn't handle how gorgeous it looked, and one of them showed up at my door with a spoon twenty minutes later.
I'm not exaggerating when I say this recipe ruined me for regular pot pie forever. The combination of pillowy gnocchi, tender chicken, and that herb-kissed cream sauce creates something that feels like your favorite sweater and your favorite restaurant had a baby. It's fancy enough to serve to guests but easy enough that you can make it on a random Wednesday when your brain feels like mush. Plus, and this is crucial, it uses ingredients you probably already have lurking in your kitchen right now. Let me walk you through every single step — by the end, you'll wonder how you ever made it any other way.
What Makes This Version Stand Out
Before we dive into the delicious details, let me tell you why this gnocchi chicken pot pie will become your new obsession. I've tested this recipe seventeen times across three different kitchens, and every single person who's tried it has demanded the recipe within the first three bites. It's not just good — it's the kind of good that makes you want to cancel plans so you can stay home and eat leftovers in your pajamas while watching cooking shows for inspiration.
Texture Triumph: Most pot pies suffer from the soggy-bottom syndrome, but this version eliminates that tragedy entirely. The gnocchi create a self-basting crust that stays crispy on top while the bottom half drinks up all the creamy sauce. Each bite gives you that satisfying resistance followed by a soft, yielding center that makes you want to purr like a satisfied cat. It's like having your cake and eating it too, except it's pot pie and you're way more sophisticated than cake anyway. Speed Demon: Traditional pot pie takes forever — make dough, chill dough, roll dough, pre-bake, fill, bake again. Who has time for that on a Tuesday? This beauty goes from fridge to table in forty-five minutes flat, making it faster than ordering takeout and infinitely more impressive. The rotisserie chicken does the heavy lifting while the gnocchi cook right in the sauce, eliminating extra pots and pans entirely. Flavor Depth Charge: Using cream of chicken soup with herbs isn't cheating — it's genius strategy. The concentrated flavors have already been developing for months in that can, creating a complexity that would take you hours to build from scratch. Combined with fresh thyme and the fond from sautéed mushrooms, you get layers of flavor that taste like someone's Italian grandmother and Southern great-aunt collaborated in your kitchen. Leftover Legend: Here's where this recipe really shines — it's actually better the next day. The gnocchi continue to absorb flavors overnight, transforming into these incredible little flavor packets that'll make you excited to wake up at 6 AM just to eat cold leftovers standing in front of the fridge. I've caught my roommate eating it straight from the container with the door still open, claiming she was "just checking if it needed anything." Pantry Magic: Every ingredient in this recipe is something you can keep on hand for months. Frozen peas and carrots, canned soup, gnocchi from the pantry, and a rotisserie chicken means you can whip this up when you haven't been grocery shopping in weeks. It's the ultimate "what do I have that isn't takeout again" solution that tastes like you planned it for days. Crowd Psychology: There's something about serving this that makes people think you're a culinary wizard. Maybe it's the way the gnocchi puff up like golden clouds, or how the sauce bubbles up between them like lava from a delicious volcano. Whatever the reason, everyone assumes you spent hours crafting this masterpiece, and who are you to correct them? Just smile mysteriously and accept the compliments.Alright, let's break down exactly what goes into this masterpiece...
Inside the Ingredient List
The Flavor Base
Let's talk about the unsung hero of this dish: unsalted butter. I know, I know, butter gets all the glory in every recipe, but hear me out. Using unsalted butter here isn't just about controlling sodium — it's about creating a pure, clean canvas for all the other flavors to dance on. When that butter hits the hot pan and starts to foam, it's like the opening act of the best concert ever. The milk solids begin to brown ever so slightly, creating these nutty, caramel notes that'll make your kitchen smell like a French bakery had a baby with a country kitchen. Four tablespoons might seem like a lot, but trust me, this is not the place to be shy. I've tried cutting it down to two tablespoons and the whole dish tasted like it was wearing an ill-fitting suit — technically functional but definitely not living its best life.
The cremini mushrooms are where this recipe really starts flexing its muscles. These aren't just any mushrooms — they're the James Bond of the fungi world, sophisticated and mysterious with an earthy depth that makes everything around them taste more expensive. When you slice them and they release that dark, loamy aroma, that's when you know you're cooking with serious ingredients. Don't you dare use those sad, watery white button mushrooms here; they'll just weep into your sauce and make everything taste like disappointment. Cremini mushrooms have been allowed to grow up a bit, developing complex flavors that'll make your taste buds sit up and pay attention. Plus, they give the dish these gorgeous little pockets of umami that burst in your mouth like savory caviar.
The Texture Crew
Diced yellow onion is the supporting actor that deserves an Oscar in this production. When it hits that sizzling butter, something magical happens — the sulfur compounds that make you cry transform into sweet, complex sugars that'll make you wonder why you ever complained about chopping onions. The key is getting them to that perfect translucent stage where they're soft and sweet but haven't started to brown yet. This takes about five minutes, and it's worth every second because those softened onions will melt into the sauce, creating background notes of sweetness that balance the savory elements perfectly. I've seen people rush this step and end up with crunchy onion bits that ruin the whole experience — don't be that person. Your onion should be so soft that it practically dissolves when you press it with your spatula.
Fresh thyme leaves are like tiny green flavor bombs that explode with woodsy, lemony essence throughout the dish. If you don't have fresh thyme, I suppose you could use dried, but that's like choosing to watch a movie on your phone instead of going to the theater — technically the same content but completely different experience. Fresh thyme has this bright, almost minty quality that dried thyme loses within weeks of being bottled. Strip those little leaves off the stems by running your fingers backwards along the sprig — it's oddly satisfying, like popping bubble wrap but more sophisticated. The thyme doesn't just add flavor; it creates this incredible aroma that'll make your neighbors jealous and your family think you've been taking secret cooking classes.
The Unexpected Star
Thawed frozen peas and carrots are the time-saving trick that makes this recipe weeknight-friendly without sacrificing nutrition or color. Here's the thing about frozen vegetables — they're picked at peak ripeness and flash-frozen within hours, which means they often have more nutrients than the "fresh" vegetables that sat on a truck for a week. The peas pop in your mouth like tiny green caviar, while the carrots provide these sweet little cubes that look like jewels scattered through the sauce. Don't skip the thawing step though, because adding them frozen will drop your sauce temperature and mess with your timing. Just run them under warm water for thirty seconds while you're sautéing the mushrooms, and they'll be perfect.
Reduced salt chicken bouillon seasoning is the secret weapon that makes people ask "what did you put in this?" after their third helping. This isn't just salt with chicken flavor — it's concentrated umami that amplifies everything else in the dish. The reduced salt part is crucial because it lets you control the final seasoning without ending up with something that tastes like a salt lick. When it hits the hot vegetables, it immediately starts to dissolve, creating this incredible savory base that makes the chicken taste more chicken-y and the vegetables taste more vegetable-y. It's like Photoshop for your taste buds, enhancing all the natural flavors without making itself obvious.
The Final Flourish
Shredded rotisserie chicken is the genius shortcut that makes this recipe possible on a weeknight, but not all rotisserie chickens are created equal. Look for one that's golden brown and slightly larger than you think you need — the meat should practically fall off the bones when you get home. I always ask the grocery store when they put out their fresh batch and time my shopping accordingly, because a chicken that's been sitting under heat lamps for four hours tastes like disappointment and regret. When you shred it, don't be too precious about getting every last bit; those slightly crispy edges from the rotisserie add incredible texture to the final dish. Mix the white and dark meat together for the best flavor — the dark meat stays moister and adds richness that breast meat alone can't provide.
Cream of chicken with herbs soup is where this recipe gets a little controversial, but stay with me here. This isn't about taking shortcuts — it's about leveraging flavor technology that food scientists have perfected over decades. The condensed soup has already been cooked down to concentrate flavors, and the herbs have been steeping in that creamy base for months, creating a complexity that would take you hours to achieve from scratch. When it hits the hot pan, it immediately starts to meld with the fond from the vegetables, creating a sauce that's both rich and bright, creamy yet clean-tasting. Don't dilute it according to the can instructions — we're using it as a flavor concentrate, not a soup.
Potato gnocchi are the absolute stars of this show, and choosing the right ones makes the difference between good and legendary. Fresh gnocchi from the refrigerated section are your best bet — they're tender and cook quickly while maintaining their shape. The dried ones in the pasta aisle work in a pinch, but they're denser and take longer to cook. When these little potato dumplings hit the hot sauce, they start to absorb flavors while releasing just enough starch to help thicken everything. As they bake, the tops get golden and slightly crispy while the bottoms stay soft and pillowy, creating a textural contrast that'll make you wonder why anyone ever used pastry for pot pie.
Everything's prepped? Good. Let's get into the real action...
The Method — Step by Step
- Start by placing your largest, heaviest skillet over medium heat — I'm talking about the one that makes your wrist ache when you lift it, because that's the one that distributes heat most evenly. Add your butter and watch it like a hawk for the first minute; you want it to melt completely and start to foam, but not brown. When the foam subsides and the butter looks glossy and inviting, that's your cue to add the mushrooms. Spread them in a single layer and don't touch them for a full two minutes — I know it's torture, but this is where the magic happens. Those mushrooms need time to develop a golden crust on the bottom, creating fond that'll flavor your entire dish. When they finally release from the pan without sticking, give them a stir and watch them transform from pale and spongy to golden brown and meaty.
- Now comes the onion, and here's where timing gets crucial. You want to add it when the mushrooms are about 75% done — still a bit firm but definitely cooked. The onions will immediately start to pick up all the beautiful brown bits from the bottom of the pan, creating a flavor base that's worth its weight in gold. Stir them around for about thirty seconds, then reduce your heat to medium-low. This is not the time to get impatient and crank up the heat; low and slow is what transforms harsh onion bite into sweet, mellow perfection. After about three minutes, they'll start to look translucent and glossy, like little pieces of onion candy. Add your thyme now, crushing it between your fingers as you sprinkle it in to release those aromatic oils.
- Here's where things get exciting — push all the vegetables to the edges of the pan, creating a little well in the center. Into this well, add your chicken bouillon seasoning directly onto the hot pan surface. Let it sit there undisturbed for about fifteen seconds while it toasts and develops even more complex flavors. You'll start to smell this incredible savory aroma that's like the essence of chicken multiplied by a thousand. Now stir everything together, making sure every mushroom and onion piece gets coated in those herby, salty crystals. The vegetables should look like they're wearing a light dusting of flavor confetti.
- Time for the big moment — add your shredded rotisserie chicken to the pan. Don't just dump it in; scatter it evenly so every piece gets a chance to heat through and pick up flavors from the bottom of the pan. Use your spatula to press down gently, encouraging the chicken to make contact with the hot surface. This isn't about browning the chicken — it's about warming it through and letting it absorb some of those mushroom and thyme flavors. After about two minutes, the chicken should look glossy and smell incredible, like the best chicken soup you've ever had condensed into pure essence.
- Now comes the creamy transformation. Add your cream of chicken soup right into the center of the pan — don't stir it in yet. Let it sit there for about thirty seconds, allowing the bottom to caramelize slightly against the hot pan. This creates these little browned bits that add incredible depth to your sauce. Pour in the chicken stock and watch as the whole thing transforms from a solid mass into a silky, bubbling sauce. Stir gently, working from the center out, until everything is combined and the sauce looks like liquid velvet. It should coat the back of your spoon but still be pourable — if it's too thick, add another splash of stock.
- While your sauce is bubbling away, drain your thawed peas and carrots and give them a quick pat with paper towels. Adding them wet will cool down your sauce and mess with the timing. Scatter them across the top of the chicken mixture — don't stir them in yet. They'll cook perfectly in the oven, maintaining their bright color and slight pop. The peas should look like tiny green pearls, and the carrots should be these cheerful orange cubes that make the whole dish look like a party. Season everything with salt and pepper now, but go easy on the salt since the bouillon seasoning already added plenty.
- This is the moment of truth — arranging your gnocchi. Start from the outside edge and work your way in a spiral pattern, placing each gnocchi cut-side down so it can absorb maximum sauce. They should be nestled close together but not overlapping; think of them as polite dinner guests who want to be near each other but not touching. As you place each one, press down slightly so the bottom half submerges in the sauce while the top stays exposed. This creates the perfect environment for the bottom to get soft and flavorful while the top crisps up in the oven. When you're done, sprinkle the whole thing with a little extra black pepper — the gnocchi will develop these gorgeous speckled tops as they bake.
- Transfer your skillet to a preheated 400°F oven and set a timer for exactly twenty minutes. Don't be tempted to peek before then — the transformation happening in there needs uninterrupted heat. While it bakes, something incredible happens: the sauce bubbles up around the gnocchi, creating these little pockets of creamy goodness. The tops of the gnocchi start to turn golden brown, like they're getting a perfect tan. Your kitchen will fill with this incredible aroma that's part chicken soup, part baked potato, part something completely new and magical. When the timer goes off, your pot pie should be bubbling around the edges and the gnocchi should be golden brown on top with slightly crispy edges.
- The final step is crucial — let your pot pie rest for exactly five minutes after taking it out of the oven. I know it's torture when it looks and smells that incredible, but this resting time allows the sauce to thicken slightly and the gnocchi to settle into their perfect texture. During this time, the bubbling will subside and the whole thing will look like it's posing for a magazine cover. The gnocchi will have puffed up slightly, their tops golden and inviting, while the sauce peeks through the gaps like it's winking at you. Serve it right from the skillet at the table — there's something deeply satisfying about scooping out portions while everyone leans in, spoons at the ready, fighting over who gets the crispiest gnocchi from the edge.
That's it — you did it. But hold on, I've got a few more tricks that'll take this to another level...
Insider Tricks for Flawless Results
The Temperature Rule Nobody Follows
Here's the thing about temperature that'll change your cooking game forever: your pan needs to be hot enough to make the butter foam but not so hot that it browns immediately. I test this by holding my hand about six inches above the pan — when I can feel gentle heat but not intense heat, that's the sweet spot. Too cool and your mushrooms will steam instead of browning; too hot and your butter will burn before the vegetables even hit the pan. This rule applies to every step of the process. When you add the chicken, the pan should be hot enough to warm it through but not so hot that it dries out. Same with the sauce — medium heat lets the cream soup melt gradually, preventing that grainy texture that happens when dairy gets shocked by high heat. Master this temperature dance and your pot pie will be restaurant-quality every single time.
Why Your Nose Knows Best
Your nose is actually the most sophisticated kitchen tool you own, and using it properly will make you seem like a culinary genius. When the mushrooms are perfectly cooked, they'll smell nutty and earthy, like walking through a forest after rain. If they smell metallic or sharp, they're not done yet. The thyme should release a bright, almost citrusy aroma when it's ready — if you can't smell it across the kitchen, add a bit more. When the sauce is properly reduced, it'll smell concentrated and rich, like the best chicken soup you've ever had intensified by a thousand. That smell is your cue that the flavors have married properly and you're ready for the oven. Train yourself to recognize these scent signals and you'll never overcook or undercook anything again.
The 5-Minute Rest That Changes Everything
I cannot stress this enough — those five minutes of resting time aren't optional, they're mandatory for greatness. During this time, the sauce continues to thicken as the starches from the gnocchi absorb excess liquid. The temperature equalizes throughout the dish, so you don't get mouth-scalding hot spots next to lukewarm sections. More importantly, the flavors have time to meld and deepen, transforming from individual ingredients into a cohesive, harmonious whole. I've tested this by cutting into it immediately versus waiting, and the difference is like night and day. The rested version tastes more complex, more balanced, more like something you'd pay twenty dollars for in a restaurant. Set a timer and walk away if you have to — your patience will be rewarded tenfold.
The Golden Ratio Secret
After seventeen iterations of this recipe, I discovered there's a perfect ratio that makes the difference between good and unforgettable. For every cup of chicken, you need exactly two tablespoons of sauce base — no more, no less. Too much sauce and your gnocchi will drown and get mushy; too little and the whole thing tastes dry and sad. This ratio ensures every bite has the perfect balance of creamy sauce, tender chicken, and soft gnocchi. Write it down somewhere because once you nail this ratio, you can adapt this recipe to any size pan or any number of servings. It's like having the key to a secret club where everything you make tastes professionally balanced.
The Crispy Edge Strategy
If you're one of those people who fights over the corner brownies or the edge pieces of lasagna, this trick is for you. When arranging your gnocchi, place them slightly closer together around the edges of the pan and more spaced out in the center. The edge gnocchi will get extra crispy from direct contact with the hot skillet while the center ones stay softer and more dumpling-like. This creates textural variety that makes every bite interesting. Plus, those crispy edge pieces are like little golden nuggets of potato perfection that'll have everyone fighting for the outer sections. It's a small adjustment that takes thirty seconds but elevates the whole experience from good to memorable.
Creative Twists and Variations
This recipe is a playground. Here are some of my favorite ways to switch things up:
The Mediterranean Vacation
Swap the thyme for fresh oregano and add a handful of sun-dried tomatoes along with the peas and carrots. Use Italian rotisserie chicken (often seasoned with herbs and garlic) and replace half the chicken stock with dry white wine. The result tastes like you're eating dinner on a terrace overlooking the Mediterranean, except you're in your kitchen and you didn't have to pay for airfare. Finish with a sprinkle of good Parmesan and a drizzle of your best olive oil. The sun-dried tomatoes add these little pockets of intense flavor that make every bite feel special.
The Spicy Southwest Version
Add a diced jalapeño with the onions and swap the thyme for cilantro. Use a rotisserie chicken that's been rubbed with chili powder and replace the cream of chicken soup with cream of poblano if you can find it, or regular cream of chicken with a teaspoon of chipotle powder. The peas and carrots become corn and diced bell peppers, and suddenly you've got a pot pie that tastes like it came from a New Mexican grandmother's kitchen. Top with a little queso fresco after baking and serve with lime wedges for squeezing. It's comfort food with a kick that'll warm you from the inside out.
The Fancy French Makeover
Use tarragon instead of thyme and add a splash of dry sherry to the sauce. Replace the rotisserie chicken with duck confit if you're feeling extravagant, or just use a high-quality organic chicken. Add some sautéed leeks along with the onions and finish with a little crème fraîche swirled on top right before serving. The gnocchi become like little French dumplings in a sophisticated sauce that tastes like it came from a bistro. This version is perfect for when you want to impress someone but still have dinner on the table in under an hour.
The Veggie-Forward Version
Keep the chicken but load up on vegetables — add diced zucchini, corn, and green beans along with the peas and carrots. Use vegetable stock instead of chicken stock and add a teaspoon of miso paste for extra umami. The result is like a garden party in a skillet, with the gnocchi acting as little potato pillows that absorb all the vegetable flavors. Even meat-lovers devour this version, and you can feel virtuous about eating so many vegetables while still enjoying comfort food at its finest.
The Breakfast-for-Dinner Remix
Add some cooked breakfast sausage (the maple kind is incredible here) along with the chicken. Replace the peas and carrots with diced breakfast potatoes that you've pre-cooked until just tender. Add a little fresh sage along with the thyme, and suddenly you've got breakfast flavors in dinner form. Crack a few eggs right into wells you make in the sauce before adding the gnocchi, and they'll bake into perfect little pockets of runny yolk that mix with the creamy sauce. It's like having a diner breakfast but way more sophisticated and without the wait for a table.
The Seafood Special
Replace the chicken with chunks of good-quality canned crab meat or cooked shrimp. Use seafood stock instead of chicken stock and add some Old Bay seasoning along with the thyme. The gnocchi work surprisingly well with seafood, creating a dish that's like a cross between pot pie and seafood chowder. Add some corn along with the peas for a coastal vibe that tastes like you're eating at a beachside restaurant. This version feels fancy but costs way less than going out for seafood, and you don't have to worry about parking.
Storing and Bringing It Back to Life
Fridge Storage
Leftovers will keep beautifully in an airtight container in the refrigerator for up to four days, though honestly, it's never lasted that long in my house. The key is to let it cool completely before covering and refrigerating — trapping steam will make the gnocchi soggy and sad. I divide mine into individual portions in glass containers because they reheat more evenly and you can see exactly what deliciousness awaits you. The sauce will thicken considerably in the fridge, but that's actually perfect because it means the flavors have concentrated even more. Pro tip: save any extra crispy gnocchi from the edges in a separate container — they make incredible snacks cold, like potato chip dumplings that'll ruin you for regular chips forever.
Freezer Friendly
This pot pie freezes like a dream, making it perfect for meal prep or gifting to friends who just had babies or are going through tough times. Portion it into freezer-safe containers, leaving about an inch of space at the top for expansion. It'll keep for up to three months, though the gnocchi will lose a bit of their textural contrast. To freeze, let it cool completely, then wrap the container in plastic wrap before adding the lid — this prevents freezer burn and keeps everything tasting fresh. Label with the date and contents because three months from now you'll be grateful for the reminder. Thaw overnight in the refrigerator for best results, though you can microwave from frozen in a pinch.
Best Reheating Method
The microwave works in an emergency, but for the best results, reheat in a covered skillet over medium-low heat with a splash of chicken stock or water. This creates steam that revives the gnocchi without drying them out, and the sauce regains its creamy consistency. Heat for about ten minutes, stirring gently every few minutes, until it's bubbling and heated through. If the sauce seems too thick, add liquid a tablespoon at a time until it's perfect. For individual portions, you can also reheat in a 350°F oven covered with foil for about fifteen minutes — this gives you back some of that fresh-baked magic and makes leftovers feel like a whole new meal.