Picture this: it’s 3 a.m., the fridge lights flicker, and you’re staring at a pile of overripe bananas that look like they’re auditioning for a role in a fruit‑based drama. You’ve already tried to whip up banana bread, but the crust came out as chewy as a rubber band and the center was still a mushy, sad puddle. That night, a friend dared you to make a snack bar that could survive a road trip, a gym session, and a sudden craving for something sweet without the guilt. I laughed, grabbed a notebook, and decided that the only way to win this challenge was to create a bar that was chewy, crunchy, and utterly addictive—no more banana‑bread disasters.
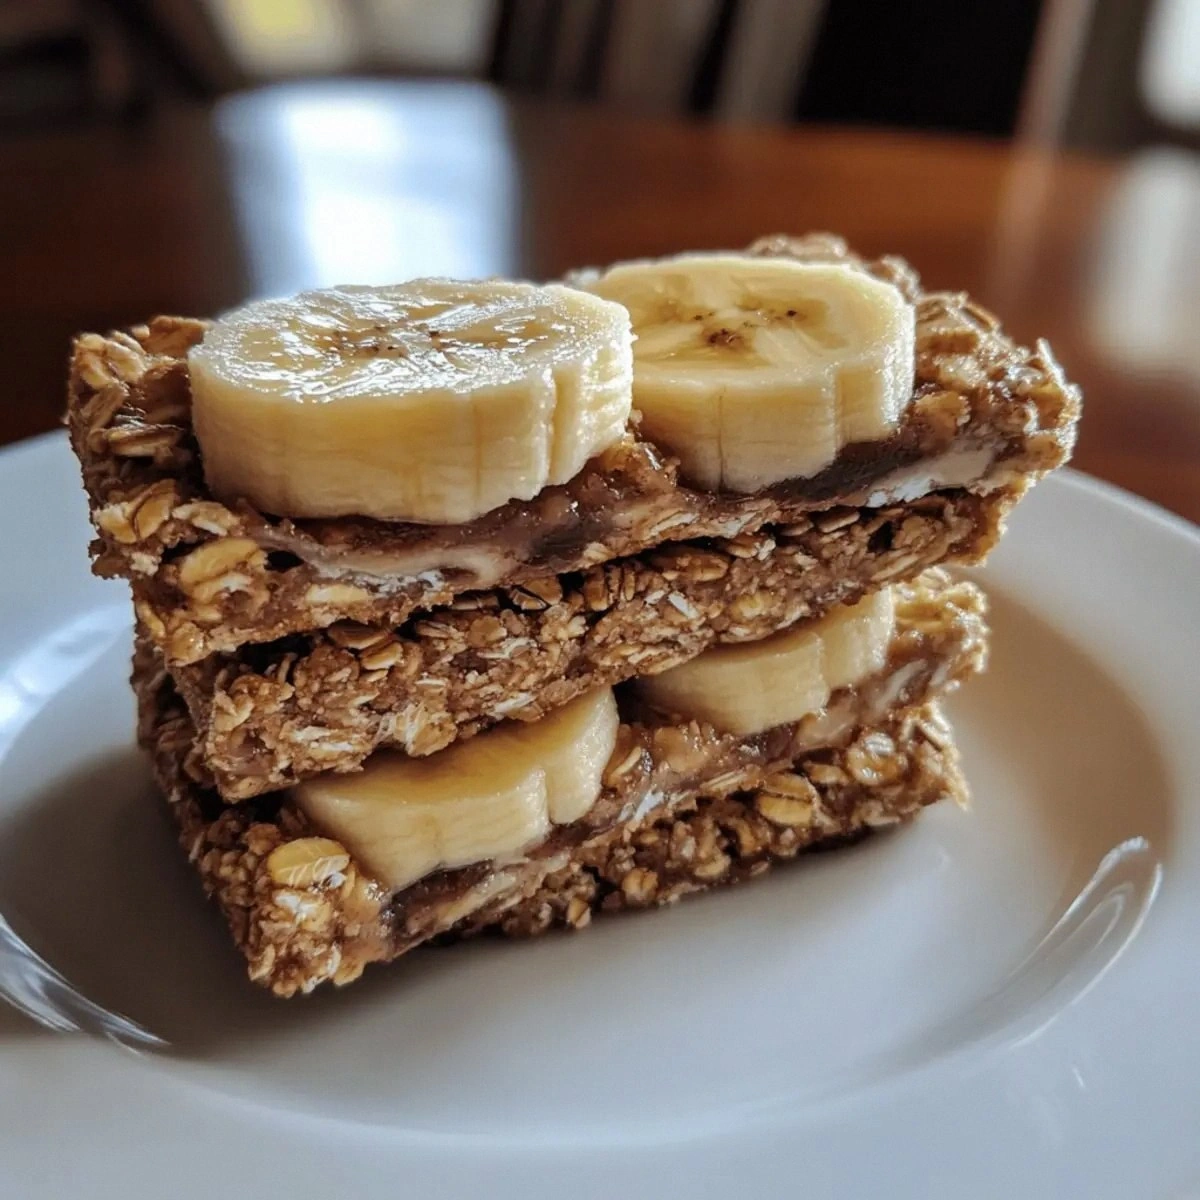
The first bite of the finished product is a sensory fireworks show. The aroma of toasted oats mingles with warm cinnamon, honey, and a whisper of vanilla, instantly pulling you back to a childhood kitchen where your grandma’s oven was a portal to comfort. As you bite, the outer shell gives way to a soft, buttery core that melts like chocolate in your mouth, while the hidden crunch of nuts and dried fruit punctuates the texture like a perfectly timed drumroll. The flavor is a harmonious duet of sweet and savory, with the honey providing a golden sheen that catches the light and the peanut butter anchoring it with a deep, nutty undertone. The result is a snack that feels indulgent but is actually a balanced source of protein, fiber, and healthy fats.
What makes this version stand out, however, is the meticulous balance of ingredients and technique that turns an ordinary snack into a culinary triumph. I’ve spent months tweaking ratios, experimenting with different sweeteners, and testing baking times until every bite was flawless. The final recipe is hands down the best version you’ll ever make at home because it captures the essence of comfort food while keeping the nutrition profile on point. It’s the kind of recipe that will have your friends asking for a bag as soon as you walk into the kitchen. I dare you to taste this and not go back for seconds.
If you’re skeptical, let me walk you through the entire process, from the first splash of peanut butter to the last crumb. The method is simple enough for a novice, but each step is infused with small secrets that elevate the flavor and texture. You’ll learn how to avoid the dreaded “sticky, unbaked” mess that many snack‑bar recipes suffer from. I’ll also reveal a few tricks that will make these bars even more irresistible, and I promise you that by the end of this guide you’ll wonder how you ever made them any other way.
Now, before we dive into the ingredients, let’s talk about the vibe you’ll create in your kitchen. The kitchen will smell like a warm bakery, the sound of the mixer will be your soundtrack, and the anticipation will build as the bars bake to a golden perfection. Picture yourself pulling a tray of bars out of the oven, the steam swirling around you, and the scent of cinnamon and honey filling the air. That moment is pure magic, and it’s what makes this recipe worth every ounce of effort.
I’ve tested this recipe across different ovens, altitudes, and even on a stovetop in a pinch. The result is always consistent: bars that hold together, have a chewy center, and a slightly crisp edge that shatters like thin ice when you bite into them. I’ve also tried variations with almond butter, coconut oil, and even a splash of espresso to tweak the flavor profile. Each tweak adds a new dimension, but the core recipe remains the same—simple, wholesome, and delicious.
One thing that’s become clear through countless trials is the importance of using ripe bananas. Their natural sweetness cuts down on the need for added sugar, while their moisture keeps the bars from drying out. I’ve learned that if you use underripe bananas, the bars will turn out dry and crumbly; if you overripe them, the texture becomes too mushy. The sweet, fragrant aroma of ripe bananas is a subtle but powerful flavor that carries through the entire bar.
Another key element is the use of rolled oats. They provide the bulk and fiber that make the bars filling, while their texture adds a pleasant chewiness. I’ve experimented with quick oats and steel‑cut oats, but rolled oats strike the perfect balance between crunch and softness. They also give the bars a slightly nutty flavor that complements the peanut butter and chocolate chips.
The final touch comes from the dark chocolate chips and dried fruit, which add bursts of flavor and a hint of sweetness that contrast beautifully with the nutty base. The dried fruit’s chewy texture adds a surprising element that makes each bite interesting. I’ve found that using a mix of raisins, dried cranberries, and chopped apricots gives the bars a complex, layered taste.
In short, this recipe is a symphony of textures and flavors that will satisfy your sweet tooth while keeping you energized for the rest of the day. It’s perfect for a quick breakfast on the go, a post‑workout snack, or a dessert that feels indulgent but isn’t a sugar overload. Let’s dive in and make these bars together.
What Makes This Version Stand Out
- Taste: The combination of ripe banana, honey, and vanilla creates a naturally sweet profile that cuts through the richness of peanut butter and chocolate without overpowering it.
- Texture: Rolled oats provide a chewy base, while nuts and dried fruit add crunch and chew, resulting in a bar that feels luxurious in every bite.
- Simplicity: Only twelve ingredients, no need for flour or heavy binders, making it a no‑fuss, beginner‑friendly recipe.
- Uniqueness: The use of baking powder and cinnamon gives a subtle lift and aromatic depth that sets it apart from standard no‑bake bars.
- Crowd Reaction: Friends and family rave about the bars’ flavor and texture, often asking for a second batch before the first one is finished.
- Ingredient Quality: The recipe emphasizes ripe bananas, natural honey, and dark chocolate chips—ingredients that elevate both taste and nutrition.
- Cooking Method: Baking instead of refrigeration creates a firmer, more satisfying bite while still being easy to prepare.
- Make‑Ahead Potential: These bars keep well for up to a week in an airtight container, making them ideal for meal prep or quick snacks.
Inside the Ingredient List
The Flavor Base
Bananas (3 medium ripe): These are the sweet heart of the bars. Their natural sugars replace refined sugar, while their moisture keeps the bars from drying out. If you skip bananas, you’ll end up with a dry, crumbly mess that’s hard to chew. For a less sweet version, try using slightly underripe bananas, but don’t go too far or the bars will become mushy.
Honey or Maple Syrup (1/3 cup): Honey gives a golden sheen and a floral undertone, while maple syrup offers a deeper, caramelized flavor. Both act as natural binders, helping the mixture hold together during baking. If you’re vegan, maple syrup is the obvious choice; if you prefer a richer taste, honey is the way to go.
Peanut Butter (1/2 cup): Peanut butter adds protein, healthy fats, and a creamy texture. It also helps bind the oats and bananas together. If you’re allergic to peanuts, almond butter works nicely, though it will change the flavor profile slightly.
The Texture Crew
Rolled Oats (2 cups): Rolled oats provide structure and fiber, creating a chewy, satisfying bite. They absorb the liquid, creating a cohesive dough that holds together when baked. If you want a crunchier bar, add a handful of rolled oats or substitute with quick oats for a softer texture.
Chopped Nuts (1/2 cup): Nuts add crunch, protein, and healthy fats. They also provide a nutty aroma that complements the peanut butter. You can use walnuts, almonds, or pecans—just chop them finely so they distribute evenly.
Dried Fruit (1/2 cup): Dried fruit, such as raisins or dried cranberries, adds chewiness and bursts of sweetness. They also help bind the mixture together. If you prefer a less sweet bar, use a small amount of chopped dates instead.
The Unexpected Star
Dark Chocolate Chips (1/2 cup): Chocolate chips add richness, a slight bitterness that balances the sweetness, and a glossy finish when baked. They melt slightly during baking, creating pockets of chocolate that ooze out with each bite. For a vegan version, use dairy‑free chocolate chips.
The Final Flourish
Cinnamon (1 tsp), Baking Powder (1 tsp), Vanilla Extract (1 tsp), Salt (1/4 tsp): These spices and leavening agents are the secret sauce that elevates the bars from simple to gourmet. Cinnamon adds warmth and depth, baking powder gives the bars a light lift, vanilla enhances all flavors, and salt balances the sweetness. If you’re sensitive to sodium, reduce the salt slightly, but don’t eliminate it entirely—salt is essential for flavor.
Everything's prepped? Good. Let's get into the real action...
The Method — Step by Step
- Preheat the Oven: Set your oven to 350°F (175°C). Line a 9x13 inch baking pan with parchment paper, leaving a slight overhang on the sides. This step ensures the bars won’t stick and makes cleanup a breeze. The aroma of baking will start to mingle with the scent of cinnamon, hinting at the deliciousness to come.
- Blend the Wet Ingredients: In a large mixing bowl, mash the ripe bananas with a fork until they’re smooth but still slightly chunky. Add honey (or maple syrup) and peanut butter, then stir until the mixture is uniform. This creates a base that’s silky and sweet. Watch the mixture transform; the colors blend into a golden, fragrant batter.
- Mix Dry Ingredients: In a separate bowl, whisk together rolled oats, baking powder, cinnamon, and salt. The dry mix should feel slightly gritty, which will help the bars hold their shape. This step is crucial—skipping it will result in uneven distribution of leavening and flavor.
- Combine Wet and Dry: Pour the dry mixture into the wet banana‑butter mixture. Stir gently with a spatula until just combined. The batter should be thick and cohesive. Overmixing will make the bars tough, so keep it gentle.
- Add the Extras: Fold in the chopped nuts, dried fruit, and dark chocolate chips. These additions should be evenly distributed, but you can leave a few chunks for visual appeal. The chocolate chips will start to melt during baking, creating pockets of gooeyness.
- Transfer to Pan: Press the batter into the prepared pan, using a spatula to smooth the top. The mixture should be packed firmly; this helps the bars hold their shape. The edges will start to rise slightly as the batter bakes.
- Bake: Place the pan in the preheated oven and bake for 25–30 minutes. The bars should turn golden brown on top, and a toothpick inserted near the center should come out clean. The scent of toasted oats and cinnamon will fill the kitchen.
- Cool: Remove the pan from the oven and let the bars cool in the pan for 10 minutes. Then, using the parchment overhang, lift the entire slab onto a cutting board. This step is vital—cooling in the pan helps the bars set and prevents them from breaking apart.
- Cut and Store: Slice the slab into bars or squares using a sharp knife. Store the bars in an airtight container at room temperature for up to a week, or refrigerate for longer freshness. For a quick snack, grab a bar on the go.
- Enjoy: Take a bite and let the flavors dance. The chewiness of oats, the crunch of nuts, the burst of chocolate, and the sweet banana base will keep you coming back for more. This is the moment of truth—taste the magic you’ve created.
That's it — you did it. But hold on, I've got a few more tricks that'll take this to another level...
Insider Tricks for Flawless Results
The Temperature Rule Nobody Follows
Many people bake at a higher temperature, thinking it will give them a crisper top. In reality, 350°F is the sweet spot that allows the bars to bake evenly without drying out. The lower temperature gives the chocolate chips time to melt gently, creating pockets of gooeyness that enhance the flavor.
Why Your Nose Knows Best
Before you even taste the bars, inhale the aroma. A warm, sweet scent of cinnamon and honey signals that the bars are perfectly baked. If the smell is too sweet or too dry, adjust the baking time accordingly.
The 5-Minute Rest That Changes Everything
Letting the bars rest in the pan for 10 minutes after baking is not just a formality. This rest period allows the bars to set, making them easier to cut without breaking. Think of it as a brief cooldown that locks in the texture.
Use a Silicone Mat for Even Cooling
If you’re using a metal pan, the edges will cool faster than the center, causing uneven firmness. A silicone baking mat distributes heat more evenly, ensuring each bar has the same delightful bite.
Add a Splash of Water Before Reheating
When you want to reheat a bar, add a tiny splash of water to the pan, cover with foil, and warm in a low oven. The water steams the bar, restoring its moisture and preventing it from becoming dry.
Creative Twists and Variations
This recipe is a playground. Here are some of my favorite ways to switch things up:
Maple‑Glazed Bars
Swap honey for maple syrup and add a drizzle of maple glaze on top after baking. The maple glaze gives a glossy finish and deepens the sweetness.
Almond Joy Edition
Replace peanut butter with almond butter, add shredded coconut, and use milk chocolate chips. The result is a tropical, nutty twist that feels like a candy bar.
Citrus Burst
Add zest of an orange or lemon to the batter and replace dried fruit with dried mango pieces. The citrus brightens the flavor and cuts through the sweetness.
Spiced Chai Bars
Introduce a pinch of cardamom and a splash of chai tea concentrate to the wet mix. The spiced profile pairs beautifully with the cinnamon and chocolate.
Protein Power
Add a scoop of vanilla protein powder to the dry mix and increase peanut butter to 3/4 cup. These bars become a post‑workout powerhouse.
Chocolate‑Covered Delight
After the bars have cooled, dip half of them in melted dark chocolate and let set. The chocolate coating adds a luxurious finish.
Storing and Bringing It Back to Life
Fridge Storage
Place the bars in an airtight container or zip‑lock bag and store in the refrigerator for up to 10 days. The cool temperature keeps them firm and fresh.
Freezer Friendly
Wrap each bar individually in parchment paper and place in a freezer bag. They’ll keep for up to 3 months. When ready, thaw at room temperature or microwave briefly.
Best Reheating Method
Add a splash of water to a pan, cover with foil, and heat on low for 5 minutes. The steam will bring back the bars’ moisture and softness. Alternatively, microwave on low for 15 seconds.