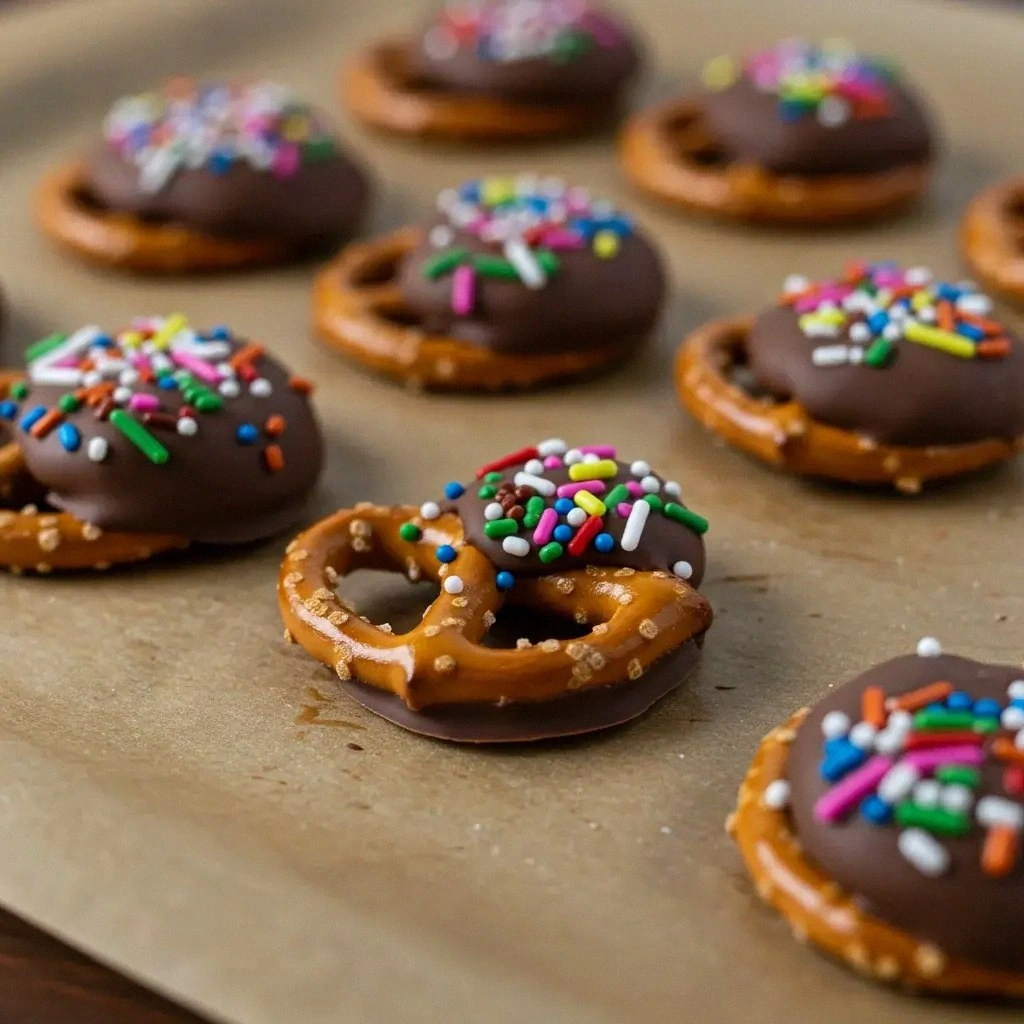
It all began on a rainy Sunday when I was scrambling to salvage a batch of stale pretzels that had been sitting in the pantry for weeks. I tossed them into a pan with melted chocolate, hoping the sweet coating would rescue them, only to end up with a sticky, uneven mess that clung to the pan like a bad habit. That disastrous experiment sparked a mission: to create a chocolate‑dipped pretzel that would turn every kitchen disaster into a crowd‑pleaser. I experimented with tempering chocolate, adding a splash of cream, and sprinkling sea salt for that perfect contrast, and the result was a treat that shatters expectations. Now, I’m ready to share the secret recipe that turns ordinary pretzels into a glossy, crunchy, chocolate‑kissed delight that will have your guests begging for more.
Picture yourself in a kitchen that smells of warm chocolate, the sound of pretzels sizzling against the pan, and the sight of glossy, dark chocolate coating each stick like a velvet glove. The first bite delivers a satisfying crunch that gives way to a melt‑in‑your‑mouth chocolate finish, while a hint of sea salt dances on your palate, creating a flavor profile that feels both indulgent and sophisticated. This isn’t just another chocolate treat; it’s a sensory experience that balances sweet, salty, and the subtle bitterness of dark chocolate, all wrapped around a humble pretzel. I dare you to taste this and not go back for seconds, because once you’ve had one, the craving will be relentless. That’s the power of a well‑executed chocolate coating that turns a snack into a dessert, and a dessert into a conversation starter.
What sets this version apart is the meticulous attention to detail that most recipes gloss over. From the exact ratio of chocolate to cream for a silky glaze to the precise timing of when to toss the pretzels into the chocolate, each step is engineered to produce a perfect finish. I’ve spent countless hours testing variations, tweaking the heat, and even experimenting with different types of chocolate until I found the combination that delivers both depth of flavor and a flawless texture. The result is a pretzel that is crisp on the outside, tender inside, and coated in a glossy, dark chocolate shell that cracks delightfully with every bite. It’s hands down the best version you’ll ever make at home, and it’s designed to be as simple as it is spectacular.
If you’ve ever struggled with chocolate coating, you’re not alone — and I’ve got the fix. I’ve learned that the key lies in the temperature of the chocolate and the moisture content of the pretzels, and that a dash of vanilla extract can elevate the flavor profile without overpowering the chocolate. Most recipes get this completely wrong, but here’s what actually works: temper the chocolate, keep the pretzels dry, and add just enough butter to create a glossy finish. The result? A pretzel that looks like it was made by a professional confectioner, but that you can make in your own kitchen. Picture yourself pulling this out of the oven, the whole kitchen smelling incredible, and the anticipation building as each pretzel glistens under the kitchen lights.
Let me walk you through every single step — by the end, you’ll wonder how you ever made it any other way. This recipe is not just about the final product; it’s about the joy of creating something that feels both indulgent and comforting. From the first stir of chocolate to the final dusting of sea salt, every moment is a chance to refine your technique and savor the process. And when you finally taste those chocolate‑dipped pretzels, you’ll taste the culmination of careful planning, precise timing, and a dash of culinary daring. Ready to dive in? Let’s begin.
What Makes This Version Stand Out
- Taste: The combination of dark chocolate, a hint of vanilla, and sea salt creates a complex flavor that balances sweetness with a subtle briny finish. The chocolate’s natural bitterness is mellowed by the cream, making it approachable for all ages. This flavor profile is a step above the typical chocolate pretzel, which often leans too sweet or too plain.
- Texture: The pretzels remain crisp on the outside while the chocolate forms a smooth, glossy coating that cracks delightfully. The slight chewiness inside the pretzel provides a satisfying contrast to the brittle chocolate shell. This duality of textures keeps each bite interesting and prevents the snack from feeling monotonous.
- Visual Appeal: The glossy dark chocolate finish gives the pretzels a professional look, making them perfect for parties, gift baskets, or a simple dessert plate. The subtle sheen invites the eye, while a light dusting of sea salt adds a pop of color that makes the snack look gourmet. The visual impact is as important as the taste, and this recipe delivers both.
- Simplicity: All you need is a few pantry staples and a double boiler or microwave. No fancy equipment or elaborate techniques are required, making it accessible for beginners and seasoned cooks alike. The recipe’s straightforward steps mean you can whip up a batch in under an hour.
- Make‑Ahead Potential: Because the chocolate coating sets quickly, you can prepare the pretzels in advance and store them in an airtight container. They keep well for up to a week, making them an excellent option for meal prep or event planning. This convenience adds value to an already delightful treat.
- Ingredient Quality: Using high‑quality dark chocolate and fresh pretzels elevates the entire experience. The richer the chocolate, the deeper the flavor, and the fresher the pretzels, the better the crunch. The recipe encourages sourcing the best ingredients you can find.
- Unique Twist: A subtle touch of vanilla extract and a splash of heavy cream create a smooth chocolate glaze that feels luxurious. This twist sets the recipe apart from standard chocolate‑dipped snacks and adds an unexpected depth of flavor.
- Crowd Reaction: Guests often comment on how the pretzels look like a confectionery masterpiece while tasting like a simple, comforting snack. The combination of sweet, salty, and chocolate makes it a hit with both kids and adults. The reaction is a testament to the recipe’s balanced flavor profile.
Alright, let's break down exactly what goes into this masterpiece…
Inside the Ingredient List
The Flavor Base
Dark chocolate chips are the cornerstone of this recipe, offering a deep, robust flavor that balances the sweet pretzel. Choosing a chocolate with at least 70% cacao ensures a rich, slightly bitter profile that pairs beautifully with sea salt. Skipping the chocolate or using a low‑cacao bar would dilute the intensity, resulting in a pretzel that tastes more like a candy bar than a gourmet snack. For an even richer experience, consider using a single‑origin chocolate from a reputable mill.
Heavy cream adds a silky texture to the chocolate coating, creating a glossy finish that’s both visually appealing and palate‑loving. The cream’s fat content helps to temper the chocolate, preventing it from becoming too brittle or dull. If you don’t have heavy cream, a splash of milk or even a dairy‑free alternative can work, but the result may be slightly less luxurious. The cream also helps to keep the pretzels from absorbing moisture, preserving their crispness.
Unsalted butter is another key player, contributing both flavor and a smooth mouthfeel to the glaze. It acts as a stabilizer, ensuring the chocolate doesn’t separate during the dipping process. Adding butter also gives the coating a subtle sheen that enhances the pretzels’ visual appeal. If you’re watching calories, you can reduce the butter by a tablespoon, but be prepared for a slightly less glossy finish.
Vanilla extract is a subtle but powerful addition that rounds out the chocolate’s bitterness with a warm, aromatic note. Even a teaspoon of pure vanilla can elevate the entire flavor profile, making the pretzels feel more sophisticated. If you prefer a fruitier twist, try adding a splash of almond extract instead. The key is to use a high‑quality extract to avoid any off‑flavors.
The Texture Crew
Pretzel sticks are the canvas for this chocolate masterpiece. Their slightly salty, yeasty flavor provides a perfect backdrop for the sweet coating. Choosing fresh, lightly salted pretzels ensures that the chocolate doesn’t taste too sweet. If you can’t find pretzels, you can use pretzel rods or even mini pretzel twists; the result will still be delicious.
Sea salt is the finishing touch that brings everything together. A pinch of fine sea salt on each pretzel after dipping adds a burst of flavor that contrasts beautifully with the chocolate. It also enhances the chocolate’s natural sweetness, creating a more balanced taste. If you’re sensitive to sodium, a light sprinkle of flaky salt will still deliver the same effect without overwhelming the palate.
Optional crushed almonds add a nutty crunch that complements the pretzel’s crispness. The almonds also introduce a subtle nuttiness that pairs well with the chocolate. If you’re allergic or simply don’t have almonds on hand, you can substitute with pistachios, walnuts, or even toasted coconut flakes. Each variation offers a unique flavor profile.
Powdered sugar is an optional dusting that gives the pretzels a sweet finish and a subtle crunch. A light dusting after the chocolate has set creates a sweet contrast to the sea salt. If you prefer a less sweet treat, you can skip the sugar entirely and still enjoy the chocolate’s richness. This optional step allows you to tailor the flavor to your preference.
The Unexpected Star
Optional dried cherries or cranberries add a burst of tartness that cuts through the chocolate’s richness. Their natural sweetness and bright color make the pretzels look festive and add a surprising flavor dimension. If you’re looking for a seasonal twist, try using candied orange peel for a citrusy note. The key is to keep the fruit pieces dry so they don’t melt into the chocolate.
Optional chili flakes or a touch of cayenne pepper bring a subtle heat that pairs unexpectedly well with dark chocolate. The pepper’s warmth creates a complex flavor profile that satisfies both sweet and savory cravings. If you’re not a fan of spice, you can simply omit this ingredient or use a pinch of smoked paprika for a smoky undertone. The result is a pretzel that feels adventurous yet approachable.
Optional espresso powder enhances the chocolate’s depth, giving the pretzels a subtle coffee undertone. The espresso’s bitterness complements the dark chocolate’s natural flavor, creating a layered taste experience. If you don’t have espresso powder, a small amount of instant coffee will do the trick. The key is to use a high‑quality coffee for the best flavor.
The Final Flourish
Optional sprinkles or colored sugar add a playful pop of color that’s perfect for parties or gifting. The bright colors make the pretzels visually appealing and add a festive touch. If you’re aiming for a more sophisticated look, skip the sprinkles and let the glossy chocolate shine. The choice is yours, and the result will still be delightful.
Optional flavored liqueur, such as Grand Marnier or Amaretto, can be added to the chocolate mixture for an adult twist. The liqueur infuses the chocolate with subtle citrus or almond notes, elevating the pretzels to a cocktail‑inspired treat. If you prefer a non‑alcoholic version, a splash of vanilla or almond extract will work just as well. The addition of liqueur is entirely optional but highly recommended for a special occasion.
Everything's prepped? Good. Let's get into the real action…
The Method — Step by Step
- Begin by melting the dark chocolate chips over a double boiler, stirring constantly until smooth. The chocolate should be bright, glossy, and free of lumps; if it looks dull, give it a quick stir. Keep the heat low to avoid scorching the chocolate, which would ruin the finish. This step sets the foundation for a flawless coating.
- Add the heavy cream to the melted chocolate, stirring until the mixture is silky and well‑combined. The cream’s fat content will give the glaze a glossy sheen and a smooth mouthfeel. Watch the mixture closely; it should remain a uniform, translucent liquid. This is the moment where the texture begins to take shape.
- Introduce the unsalted butter to the chocolate‑cream blend, whisking until the butter is fully incorporated and the mixture is glossy. The butter acts as a stabilizer, preventing the chocolate from separating. A fully integrated butter will give the pretzels a buttery finish that feels indulgent. The mixture should now have a velvety sheen.
- Stir in the vanilla extract, which will round out the chocolate’s bitterness with a warm, aromatic note. A teaspoon of pure vanilla is enough to elevate the flavor profile without overpowering the chocolate. The vanilla’s aroma should fill the kitchen, creating a welcoming atmosphere. This subtle addition is a game‑changer.
- Place the pretzel sticks onto a wire rack or parchment paper, ensuring they’re spaced apart to avoid clumping. This step is crucial for achieving an even chocolate coating. If the pretzels touch, the chocolate may pool and create uneven thickness. Proper spacing also allows the chocolate to set properly on each stick.
- Dip each pretzel into the chocolate mixture, swirling to coat completely, then place it back onto the parchment paper or wire rack. The chocolate should cling to the pretzel, forming a smooth shell. If you notice any gaps, dip the pretzel again to ensure an even coating. This step is where the pretzels transform from plain to gourmet.
- While the chocolate is still wet, sprinkle a pinch of sea salt over each pretzel. The salt should be fine enough to dissolve quickly, providing a burst of flavor with each bite. The contrast between the salty and sweet creates a sophisticated taste experience. The salt also enhances the chocolate’s natural sweetness.
- Allow the pretzels to set at room temperature for about 15 minutes, or until the chocolate has hardened to a glossy, firm finish. The pretzels should feel firm to the touch and should not be sticky. This setting time ensures that the chocolate coats each stick perfectly. Once set, the pretzels are ready to be enjoyed.
That's it — you did it. But hold on, I've got a few more tricks that'll take this to another level…
Insider Tricks for Flawless Results
The Temperature Rule Nobody Follows
Chocolate is temperamental; if it’s too hot, it will become dull and soft; if it’s too cold, it will crack and become uneven. The ideal temperature range for dark chocolate is 110–115°F (43–46°C). Maintaining this temperature ensures a glossy finish that snaps when you bite. A simple thermometer saves you from a sticky, uneven coating.
Why Your Nose Knows Best
Before dipping, inhale the aroma of the melted chocolate; it should smell nutty and slightly bitter. If it smells too sweet or metallic, it’s likely over‑heated or contaminated. Your nose is a reliable indicator of chocolate quality, and a good aroma means a better final product. Trust your senses to guide the process.
The 5-Minute Rest That Changes Everything
After dipping, let the pretzels rest on a wire rack for five minutes before adding sea salt. This brief pause allows the chocolate to firm up slightly, making the salt easier to distribute evenly. Skipping this step can result in uneven salt distribution and a clumpy coating. A quick rest ensures a flawless finish.
Keep Your Pretzels Dry
Any moisture on the pretzels will cause the chocolate to seize and become lumpy. Before dipping, pat the pretzels dry with a paper towel if they appear damp. This simple step keeps the coating smooth and prevents the chocolate from sticking to the pan. A dry surface is essential for a professional result.
Use a Light Dusting of Powdered Sugar
If you prefer a sweeter finish, dust the pretzels with powdered sugar immediately after the chocolate sets. The sugar will add a subtle crunch and a sweet contrast to the sea salt. Be careful not to over‑dust, or the sugar will melt into the chocolate. A light dusting gives a finished look and a sweet bite.
Store in an Airtight Container
To keep the pretzels crisp, store them in a tightly sealed container at room temperature. The airtight environment prevents moisture from seeping in, which would soften the pretzels. If you plan to keep them for more than a few days, consider adding a piece of parchment paper between layers to absorb any excess moisture. Proper storage preserves the crunch and chocolate sheen.
Creative Twists and Variations
This recipe is a playground. Here are some of my favorite ways to switch things up:
Nutty Crunch
Swap the sea salt for a sprinkle of crushed pistachios after the chocolate sets. The pistachios add a nutty flavor and a satisfying crunch that pairs well with the sweet coating. This variation is perfect for a brunch or a snack for kids who love nuts.
Spicy Heat
After dipping, dust the pretzels with a pinch of cayenne pepper or smoked paprika. The subtle heat contrasts with the sweet chocolate, creating a flavor profile that’s both bold and balanced. This version is great for guests who enjoy a little spice in their desserts.
Citrus Zest
Add a dash of orange zest to the chocolate mixture before dipping. The citrus aroma brightens the chocolate, giving the pretzels a fresh, vibrant twist. This variation is especially festive during the holiday season.
Mocha Magic
Mix a teaspoon of espresso powder into the chocolate blend for an espresso‑infused glaze. The coffee undertone deepens the chocolate’s flavor and adds a sophisticated edge. This version is ideal for coffee lovers and makes a great gift.
Garnished Delight
> Use edible gold leaf or silver dust over the set chocolate for a luxurious finish. The metallic sheen adds a touch of glamour that’s perfect for a special celebration or a gift basket. This variation is all about visual impact.Gluten‑Free Variation
Swap the pretzels for gluten‑free pretzel sticks or use a homemade gluten‑free pretzel recipe. The flavor profile remains the same, but the texture may be slightly different. This version is inclusive for those with dietary restrictions.
Storing and Bringing It Back to Life
Fridge Storage
Place the pretzels in an airtight container and refrigerate for up to one week. The cold environment keeps the chocolate firm and prevents the pretzels from absorbing moisture. When you’re ready to serve, let them sit at room temperature for 10 minutes to bring back the chocolate’s glossy finish.
Freezer Friendly
Freeze the pretzels in a single layer on a parchment paper sheet before transferring them to a freezer‑safe container. They will keep for up to three months without losing flavor or texture. Thaw at room temperature for 30 minutes before serving to restore the chocolate’s shine.
Best Reheating Method
To revive the chocolate, place the pretzels in a microwave-safe bowl and heat on low for 10–15 seconds. Add a tiny splash of water before reheating to create steam, which will restore the chocolate’s smoothness. Be careful not to over‑heat, or the chocolate will melt into a gooey mess.