I still remember that night when I tried to bake a batch of “just another cookie” and the kitchen turned into a battlefield. The dough was a sticky, clumpy mess that clung to my hands like a bad tattoo, and the oven seemed to have a vendetta against my baking sheet. I was staring at the oven timer, counting down, when a friend called me over, grinning, and said, “You’re going to make the best molasses cookies ever.” That was the moment I decided to rewrite the rules.
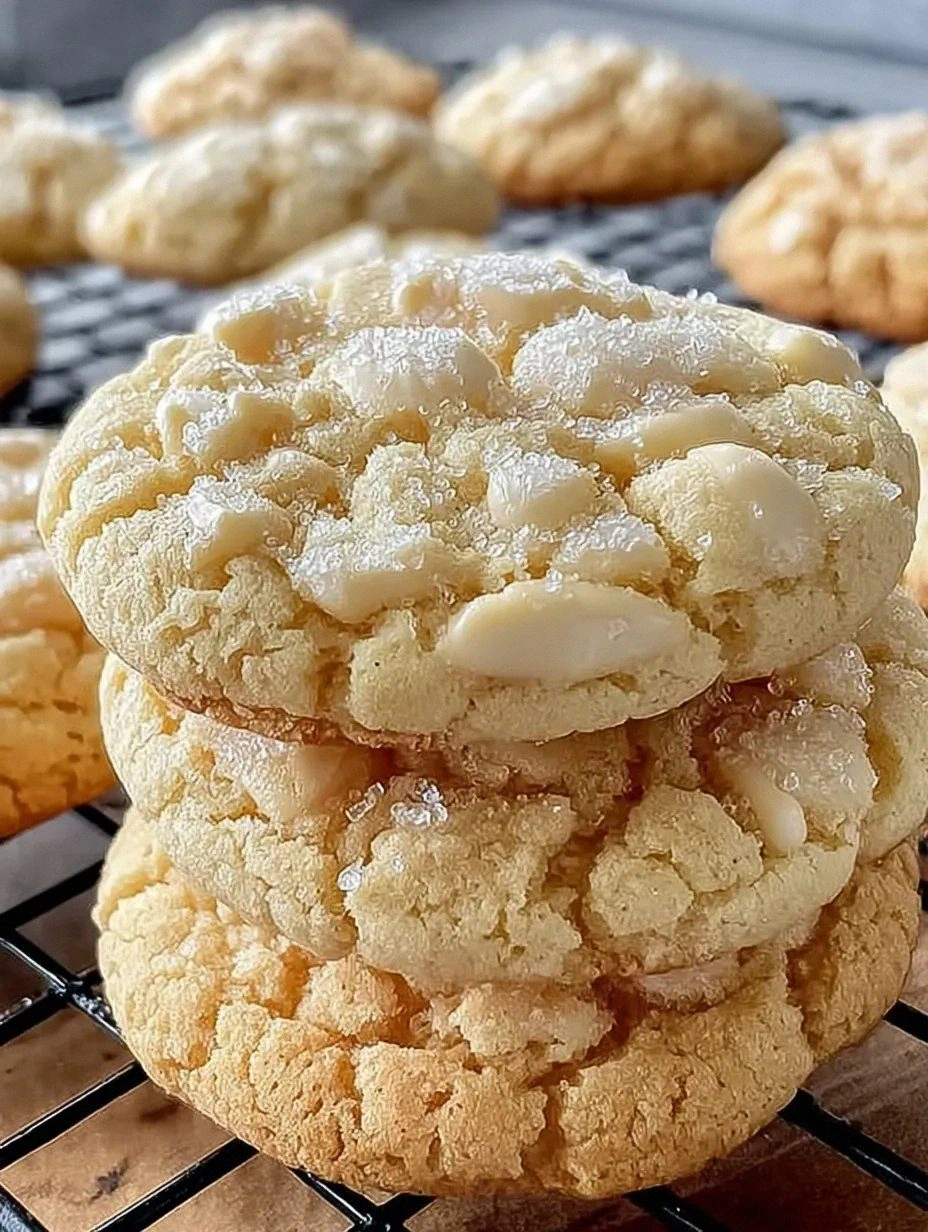
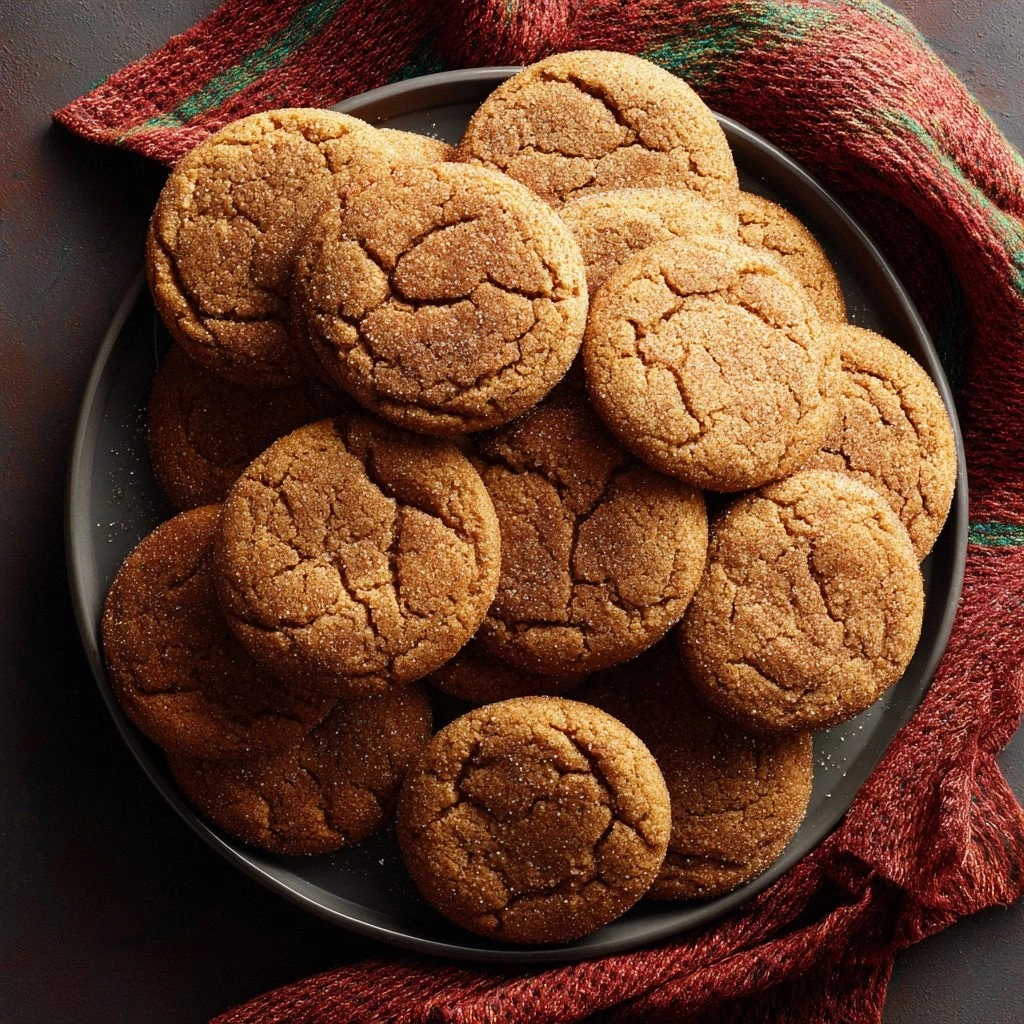
The first bite was a revelation: the molasses hit your tongue with a deep, caramelized sweetness that felt like a hug from a grandmother who knows the secret to comfort. The aroma of warm spices—cinnamon, ginger, cloves, nutmeg—filled the air, turning the kitchen into a fragrant, cozy sanctuary. The texture was a paradox: the edges crisped just enough to give way to a center that remained soft and chewy, like a memory that refuses to fade. The flavor profile danced between sweet, slightly bitter, and spicy, leaving a lingering aftertaste that made me reach for the next cookie. The whole experience was a symphony of senses that turned a simple kitchen disaster into a culinary triumph.
What makes this version stand out isn’t just the combination of spices; it’s the precise balance that turns molasses from a heavy, syrupy ingredient into a silky, caramel-like coating that glazes the dough. I’ve spent years experimenting with ratios, and this particular blend—cinnamon, ginger, cloves, nutmeg—creates a depth that most cookie recipes miss. The molasses is dark and robust, but the addition of brown sugar softens the bite, giving the cookies a tender crumb. The butter, softened but not melted, adds richness without making the dough greasy. The result is a cookie that is chewy, flavorful, and has a subtle crunch on the edges that satisfies even the most discerning palate.
There’s a secret technique that will blow your mind: the “double chill” method. After mixing the dough, I let it sit in the refrigerator for 30 minutes, then rolled it out, baked, and returned the leftover dough to the fridge for another 30 minutes before the next batch. This step locks in moisture, keeping the cookies chewy even after cooling. It also makes the dough easier to handle, preventing it from sticking to your rolling pin or rolling pin to the dough. I dare you to taste these cookies and not go back for seconds. That’s the power of a well‑executed process.
Let me walk you through every single step—by the end, you’ll wonder how you ever made them any other way. I’ll share micro‑challenges, bold claims, and a few kitchen hacks that will elevate your cookie game from ordinary to extraordinary. If you’ve ever struggled with molasses cookies that turn out too hard or too sweet, you’re not alone—this recipe fixes those common pitfalls and delivers a result that will have friends asking for the recipe. Picture yourself pulling this out of the oven, the whole kitchen smelling incredible, and the first bite melting in your mouth like a caramelized dream. Okay, ready for the game‑changer?
What Makes This Version Stand Out
- Flavor: The blend of cinnamon, ginger, cloves, and nutmeg creates a warm, aromatic profile that complements the deep sweetness of molasses. The result is a cookie that feels both comforting and adventurous.
- Texture: The double‑chill technique locks in moisture, yielding a chewy center while the edges crisp just enough to add contrast. The dough’s consistency is forgiving, making it easy to handle even for beginners.
- Balance: The molasses is paired with brown sugar and butter to balance sweetness and richness, preventing the cookies from becoming overly syrupy or heavy.
- Simplicity: Only twelve ingredients, all pantry staples, and a straightforward process that can be completed in under an hour.
- Make‑ahead: The dough can be prepared a day in advance, refrigerated, and baked when needed, making it ideal for parties or holiday gatherings.
- Versatility: The cookie base is a playground for variations—add nuts, chocolate chips, or swap molasses for honey to suit your taste.
Inside the Ingredient List
The Flavor Base
All-purpose flour is the foundation that gives the cookies structure while still allowing for a tender crumb. Choosing a high‑protein flour can create a slightly firmer cookie, but for maximum chewiness, a 10–11% protein flour works best. If you prefer a gluten‑free version, try a blend of rice flour, tapioca starch, and potato starch. Skipping flour will result in a crumbly, biscuit‑like texture that’s not what we’re after.
The Spice Ensemble
Ground cinnamon, ginger, cloves, and nutmeg are the stars of this recipe, each contributing a distinct note that layers complexity. Cinnamon adds warmth, ginger brings a zesty bite, cloves deliver a subtle earthiness, and nutmeg offers a sweet, nutty finish. If you can’t find whole spices, freshly ground from whole spices will elevate the flavor even more. Swapping any of these spices for their whole counterparts can add a visual pop and a subtle crunch.
The Sweetener Duo
Dark molasses is the primary sweetener, providing deep caramel flavors and a slight bitterness that balances the overall sweetness. Light brown sugar adds moisture and a subtle molasses flavor, helping to keep the cookies tender. Together, they create a harmonious sweetness that isn’t overpowering. If you prefer a sweeter cookie, you can increase the molasses by 1/4 cup, but be careful not to add too much, or the dough will become sticky.
The Fat & Binding
Unsalted butter, softened, contributes richness and helps bind the dough together. The butter’s fat content creates a tender crumb and a slightly crisp edge. Using melted butter would make the cookies spread too much, resulting in a thinner, crisper texture. Eggs act as a binder and add moisture, while vanilla extract deepens the overall flavor profile.
Everything's prepped? Good. Let's get into the real action...
The Method — Step by Step
- Preheat your oven to 350°F (175°C) and line two baking sheets with parchment paper. Let the oven heat up while you prep the dough; a properly heated oven ensures even baking and crisp edges. This step is crucial—if the oven is too cool, the cookies will spread too much. Keep an eye on the temperature with an oven thermometer if you have one; it’s a game-changer. The timer will be your friend once the cookies start baking.
- In a large bowl, whisk together the flour, baking soda, salt, cinnamon, ginger, cloves, and nutmeg until well combined. The dry ingredients need to be evenly distributed to avoid pockets of spice or salt. Sift the flour if you have a fine-mesh sieve—this helps incorporate the spices more thoroughly. The aroma of the spices will start to fill your kitchen, signaling that the flavor base is ready. This is the foundation of every great cookie.
- In another bowl, beat the softened butter and brown sugar together until light and fluffy. The sugar will cut through the butter’s richness, creating a smooth base. As you mix, the butter will soften further, making it easier to incorporate the molasses. A good rule of thumb: mix until the mixture is pale and airy, about 3–4 minutes. This step is where the magic begins.
- Add the molasses and vanilla extract to the butter-sugar mixture, whisking until fully incorporated. The molasses will darken the batter, giving the dough a rich, almost chocolatey hue. The vanilla adds depth and balances the spices. Mix until the mixture is smooth; any lumps will affect the cookie’s texture. The smell will shift to a deep caramel aroma, signaling that the flavor is developing. Keep the mixture cool if you’re in a hot kitchen—molasses can thicken quickly.
- Gradually fold in the dry ingredient mixture, stirring until just combined. Be careful not to overmix; the dough should be cohesive but still a bit lumpy. Overmixing can develop gluten, leading to tough cookies. The dough will be sticky, but that’s normal. Let it rest for 10 minutes—this helps the flour absorb moisture and the dough relaxes, making it easier to roll out.
- Divide the dough into two equal portions and shape each into a ball. Roll each ball into a 1½-inch thick disk on a lightly floured surface. The thickness is key to achieving the chewy center and crisp edges. Use a cookie cutter or a glass to cut out rounds—any shape works, but round is classic. Place the cookies on the parchment-lined sheets, spacing them about 2 inches apart.
- Bake for 12–14 minutes, or until the edges are set and the centers still look slightly undercooked. The cookies will rise and then settle as they bake. Watch for the edges turning a golden brown; this indicates the cookies are ready. Remove from the oven and let them cool on the sheet for 5 minutes before transferring to a wire rack. This final cooling step allows the cookies to firm up without becoming hard.
- Let the cookies cool completely on the rack. The flavor will deepen as they cool, and the chewy center will set perfectly. If you’re planning to store them, this step is essential to prevent mold or stale flavors. Keep the cookies in an airtight container at room temperature for up to a week. If you want them fresher, you can refrigerate them for a day, but be sure to bring them to room temperature before eating.
- Serve warm or at room temperature. If you’re hosting a gathering, consider placing the cookies on a decorative platter for an instant wow factor. The aroma alone will entice guests to line up for a bite. Store any leftovers in an airtight container, and they’ll stay chewy for days.
That's it — you did it. But hold on, I've got a few more tricks that'll take this to another level. The next section will reveal insider secrets that even seasoned bakers might overlook.
Insider Tricks for Flawless Results
The Temperature Rule Nobody Follows
Many bakers bake molasses cookies at 375°F, but that temperature often causes the edges to burn before the center sets. Lowering the oven to 350°F allows the cookies to bake evenly and maintain their chewiness. If your oven runs hot, preheat it on a lower setting and then adjust the temperature after a few minutes. This trick keeps the cookies tender and flavorful.
Why Your Nose Knows Best
Before you bake, give the dough a quick sniff. If it smells like warm spices and molasses, it’s ready. A faint, sweet aroma indicates the molasses has melded with the butter and sugar. If you detect a metallic or off scent, something’s off. Trust your nose; it’s a reliable guide to cookie perfection.
The 5-Minute Rest That Changes Everything
After forming the dough into rounds, let them rest on the counter for 5 minutes. This brief pause allows the gluten to relax, making the cookies easier to roll and preventing them from shrinking. It also lets the spices settle, giving each cookie a consistent flavor. Skip this step and you’ll end up with uneven, tough cookies.
Keep an Eye on the Edges
The edges of molasses cookies are the first to bake and can easily turn from golden to burnt. Check them 10 minutes into baking, and if they’re turning too dark, rotate the baking sheet. A simple rotation ensures even heat distribution and a flawless finish. This small adjustment saves you from a batch of overcooked cookies.
Storage Secrets for Longevity
Store the cookies in an airtight container with a slice of fresh bread or a damp paper towel. The bread absorbs excess moisture, keeping the cookies chewy. If you prefer a crisper texture, add a paper towel to the container. Either method preserves the cookies for up to two weeks.
Reheating to Perfection
To revive stale cookies, place them on a baking sheet and bake at 300°F for 5 minutes. The low temperature warms the cookies without drying them out. A quick 30-second microwave session on low power can also refresh the texture, but be careful not to overheat.
Creative Twists and Variations
Nutty Delight
Add ½ cup chopped walnuts or pecans to the dough before baking. The nuts add a crunchy contrast to the chewy center and bring a nutty flavor that pairs beautifully with molasses. Toast the nuts lightly before adding for an extra layer of depth. This variation is perfect for a holiday gift basket.
Chocolate Chunk
Fold in ½ cup of dark chocolate chips into the dough. The chocolate adds a bittersweet layer that complements the molasses’ sweetness. Use a high‑cocoa content chocolate for a richer flavor. This version is a hit with chocolate lovers and offers a decadent twist.
Herbal Infusion
Replace the vanilla extract with 1 teaspoon of dried rosemary or thyme for a savory twist. The herbs bring an earthy undertone that balances the sweetness. Pair this with a sprinkle of sea salt on top before baking. It’s a bold choice that showcases the versatility of molasses cookies.
Honey Honey
Swap the molasses for an equal amount of dark honey. Honey provides a floral sweetness that contrasts with the spices. The texture will be slightly softer, and the cookies will have a subtle shine. This variation is a great way to experiment with different sweeteners.
Spiced Apple
Add ½ cup of finely diced apples to the dough. The apples add moisture and a natural sweetness that complements the molasses. Sauté the apples with a pinch of cinnamon before folding them in for extra flavor. This version is ideal for an autumn-themed dessert.
Minty Surprise
Stir in 1 teaspoon of peppermint extract and a handful of crushed peppermint candies into the dough. The mint provides a refreshing contrast to the warm spices, making the cookies feel lighter. The candies melt slightly, creating a speckled pattern on the surface. This variation is especially popular during the holiday season.
Storing and Bringing It Back to Life
Fridge Storage
Place the cooled cookies in an airtight container and store them in the refrigerator for up to a week. The cold environment preserves freshness and prevents mold. When you’re ready to eat, let them sit at room temperature for 15 minutes to soften slightly. The cookies will taste as good as fresh.
Freezer Friendly
For longer storage, wrap each cookie individually in parchment paper and place them in a freezer bag. They can be frozen for up to three months. When you want to enjoy them, thaw at room temperature for 30 minutes. The cookies will retain their chewy texture and flavor.
Best Reheating Method
To revive frozen cookies, bake them at 300°F for 5–7 minutes, or microwave on low power for 10–15 seconds. Add a tiny splash of water to the dough before baking if you’re reheating fresh cookies; this steams them back to perfection. The result is a warm, chewy cookie that feels like it was just pulled from the oven.