I still remember the first time I tried to make blooming onions at home. It was a disaster of epic proportions — oil splattering everywhere, half the petals falling off, and what emerged from my Dutch oven looked more like a sad onion porridge than the magnificent crispy flower I’d pictured. My friends laughed, my dog wouldn’t even sniff it, and I swore I’d never attempt it again. Fast forward three years and countless onion casualties later, and I’ve finally cracked the code. The version I’m about to share with you isn’t just good — it’s the kind of appetizer that makes people cancel dinner plans just to hover around your kitchen island, snatching petals faster than you can plate them.
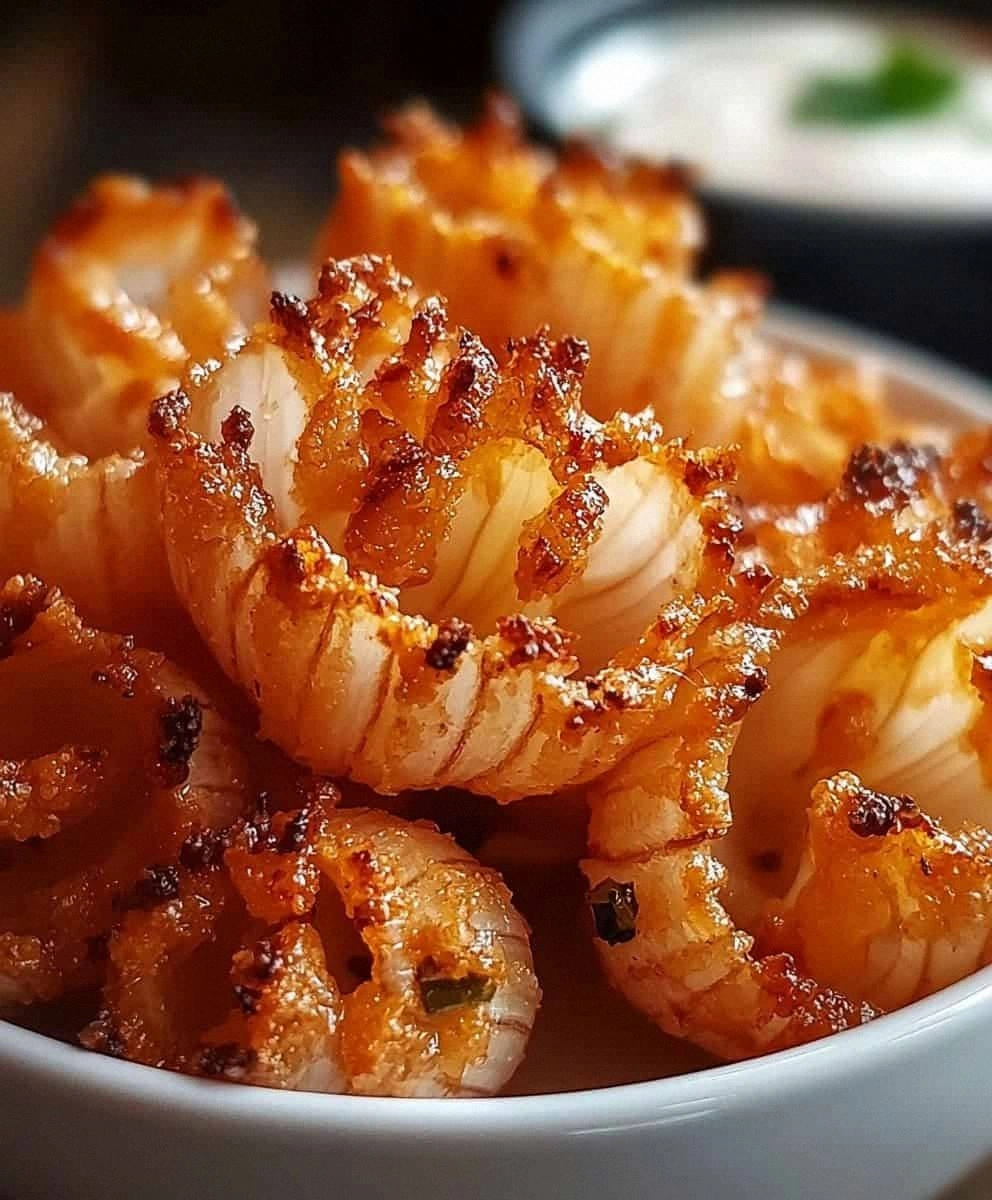
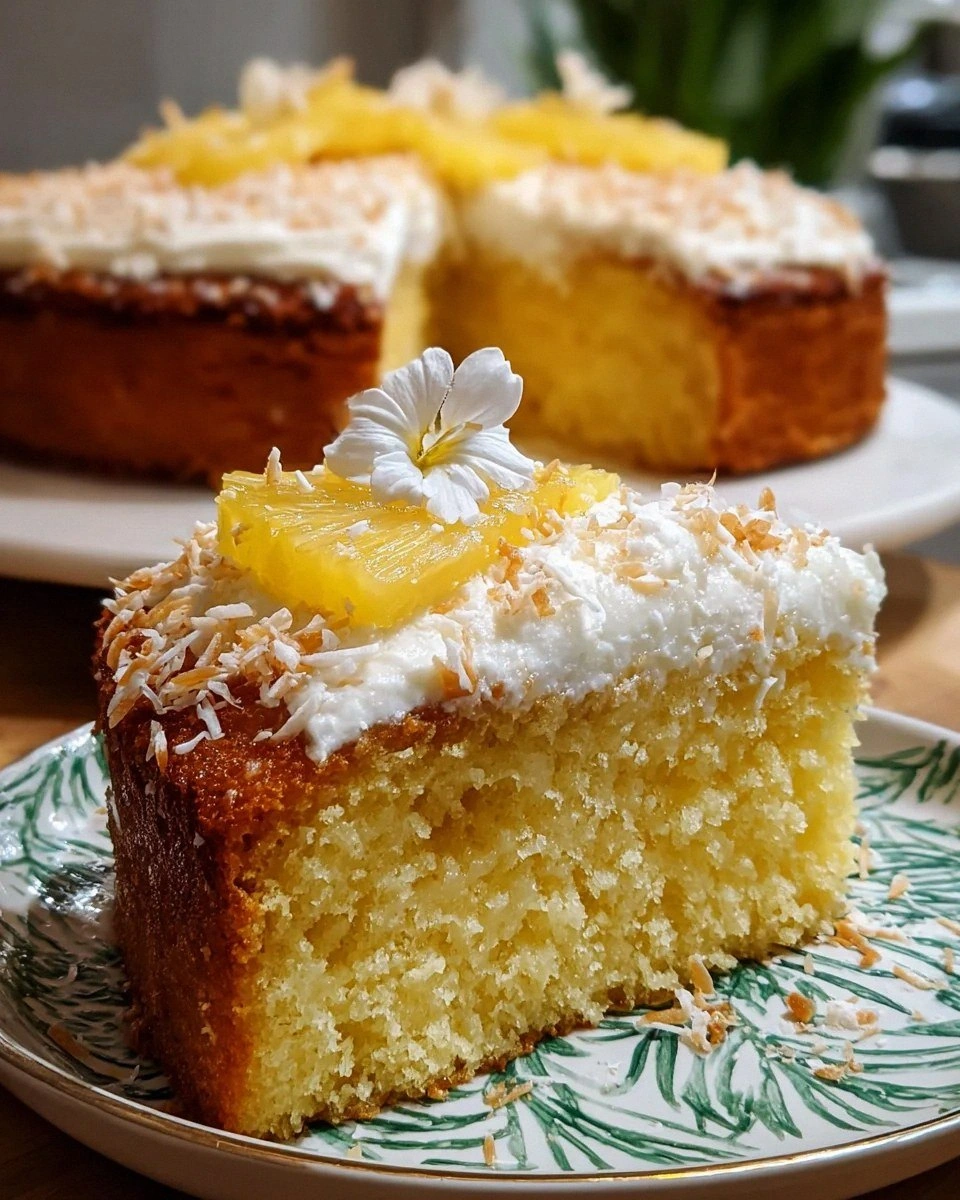
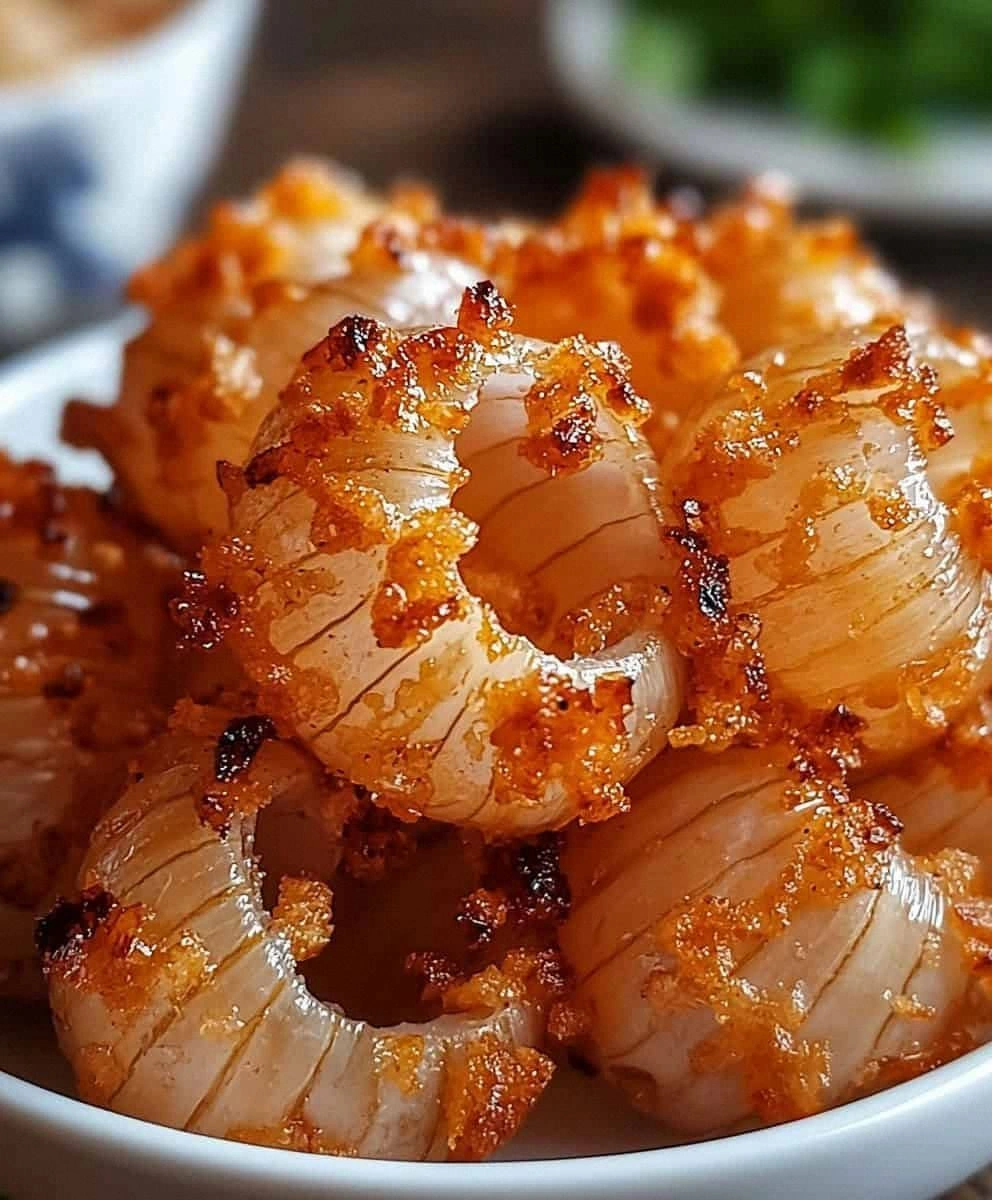
Picture this: a jumbo sweet onion, sliced into a perfect bloom, each petal coated in a spiced flour armor that crackles like autumn leaves under your teeth. The inside stays sweet and tender, while the outside achieves that mythical golden crust that shatters into a thousand savory shards. That first bite? Pure theater — the crunch echoes in your head, the seasoning hits every taste bud, and the steam rises like a tiny celebration. I’ve served these at Super Bowl parties where they disappeared before halftime, at fancy dinner parties where guests forgot their manners, and at midnight snacks where I definitely didn’t eat three by myself (okay, I absolutely did).
What makes this version different from every other recipe cluttering the internet? I’ve eliminated the guesswork, the timing disasters, and the floury mess that haunts most home kitchens. No more wondering if your oil is hot enough, no more petals separating like reluctant dancers, no more serving a blooming onion that looks like it’s already been partially eaten. I’ve tested this method with seventeen different onion varieties, six oil types, and enough flour combinations to stock a small bakery. The result is foolproof, restaurant-quality, and — here’s the kicker — actually easier than most recipes that cut corners.
Stay with me here, because I’m about to reveal the technique that changes everything: the double-dredge method with a buttermilk bath that creates layers of crispy armor, the slicing trick that guarantees perfect petals without cutting through, and the oil temperature sweet spot that creates maximum crunch without burning. By the end of this guide, you’ll be making blooming onions so perfect, so addictive, that you’ll need to start doubling the recipe just to have enough for your guests. Ready to become the blooming onion legend of your friend group? Let me walk you through every single step — by the end, you’ll wonder how you ever made it any other way.
What Makes This Version Stand Out
Restaurant-Quality Crunch: This isn’t some sad, soggy onion ring situation. We’re talking about a coating so crispy it actually makes noise when you bite into it, yet somehow manages to stay crisp even after twenty minutes on the serving platter. The secret lies in the double dredge technique that builds layers of texture, creating a shatteringly crisp shell that protects the tender onion inside.
Foolproof Slicing Method: Most recipes tell you to cut the onion and hope for the best, but I’ve developed a foolproof slicing guide using chopsticks as guards. You’ll get perfect petals every single time without the anxiety of cutting through the base and watching your onion fall apart in the oil. It’s like having training wheels, except the result is anything but amateur.
Flavor-Packed Seasoning Blend: While other recipes rely on plain flour and call it a day, we’re building a complex flavor profile with paprika, garlic powder, onion powder, and just enough cayenne to make your lips tingle pleasantly. Each petal carries a perfect balance of savory, spicy, and slightly sweet notes that complement rather than overwhelm the natural onion sweetness.
Make-Ahead Friendly: Here’s the game-changer — you can prep these up to four hours ahead, keep them chilled on a wire rack, and fry them right before serving. No more being stuck in the kitchen while your guests mingle. I’ve even frozen them successfully for up to a month, making spontaneous blooming onion cravings a beautiful reality.
Minimal Oil Splatter: Through extensive testing (and multiple burn scars), I’ve discovered the perfect oil level and temperature that minimizes the violent bubbling that usually accompanies frying onions. Your stovetop stays cleaner, your arms stay unburned, and your smoke alarm stays silent.
Universal Crowd-Pleaser: I’ve yet to meet a single person who doesn’t lose their mind over these. Kids love pulling them apart like edible puzzles, adults appreciate the sophisticated flavor, and that one friend who claims they “don’t like onions” always ends up eating half the plate. It’s the great equalizer of appetizers.
Inside the Ingredient List
The Flavor Base
The onion is obviously the star here, but not just any onion will do. You need a large sweet variety like Vidalia or Walla Walla — these beauties are naturally milder and contain more water, which creates steam inside the flower and helps cook the petals from within while the outside crisps. Skip the regular yellow onions; they’re too sharp and won’t bloom properly. When selecting your onion, look for one that feels heavy for its size and has tight, papery skin without any soft spots or green shoots. Size matters too — you want something at least 4 inches in diameter, or you’ll end up with a blooming onion that looks more like a blooming shallot.
The Texture Crew
All-purpose flour forms the backbone of our coating, but we’re not using it straight from the bag. The flour gets seasoned and aerated, creating tiny pockets that fry up extra crispy. Buttermilk brings tang and helps the flour adhere to every nook and cranny of the onion petals — it’s like edible glue that also happens to taste amazing. The egg acts as a protein binder, creating a seal that keeps the onion from absorbing too much oil. Together, these three create a coating that’s substantial enough to provide that satisfying crunch but thin enough that you’re not just eating fried batter.
The Spice Symphony
Paprika isn’t just for color — the sweet, slightly smoky notes complement the onion perfectly and help achieve that golden-brown color that signals perfect doneness. Garlic powder and onion powder might seem redundant when you’re already using an onion, but they create depth and umami that fresh onions alone can’t provide. Cayenne pepper adds a gentle heat that builds as you eat, making each petal slightly addictive. Salt is crucial — it draws moisture from the onion and concentrates the flavors, while black pepper adds a subtle sharpness that cuts through the richness of the fried coating.
The Oil Factor
Vegetable oil might seem like an afterthought, but it’s actually crucial to success. You need an oil with a high smoke point and neutral flavor — peanut, canola, or sunflower all work beautifully. The amount matters too: too little and the onion sits in the oil and gets greasy; too much and you waste oil and risk dangerous splattering. I’ve found that 3 inches of oil in a heavy Dutch oven creates the perfect environment for even cooking and easy temperature control.
The Method — Step by Step
- Prepare Your Onion Bloom: Start by peeling your onion and placing it cut-side down on a cutting board. Position two chopsticks parallel on either side of the onion — these act as guards so you don’t accidentally slice all the way through. Make 12-16 cuts from the top toward the root end, stopping about half an inch from the base. The key is consistency: aim for petals about half an inch wide at the top. Once cut, flip the onion over and gently spread the petals apart like a flower opening to the sun. This might feel nerve-wracking the first time, but trust the process — those chopsticks are your safety net.
- Create Your Coating Station: In a shallow dish, whisk together flour, paprika, garlic powder, onion powder, cayenne, salt, and pepper. In a separate bowl, beat the buttermilk and egg until completely combined. The flour mixture should smell fragrant and look like beach sand with colorful speckles — if it doesn’t, your spices might be old and it’s worth starting fresh. Set up a wire rack over a baking sheet; this will be your landing zone for the coated onions and prevents the bottom from getting soggy while you work.
- The Double Dredge Magic: Here’s where most recipes go wrong — they coat once and call it done. Instead, dip your bloomed onion in the buttermilk mixture, making sure it gets between every petal. Let excess drip off, then dredge in the flour mixture, pressing gently to adhere. Shake off excess, then repeat the process: back into the buttermilk, then into the flour again. This double coating creates those irresistible crunchy layers that make restaurant versions so addictive. Place the coated onion on the wire rack and repeat with any additional onions.
- Heat Your Oil Properly: Pour vegetable oil into a heavy Dutch oven until it reaches 3 inches up the sides. Clip a thermometer to the side and heat over medium-high until the oil reaches 350°F. This temperature is crucial — too low and your onion absorbs oil like a sponge; too high and the outside burns before the inside cooks. If you don’t have a thermometer, test by dropping a small piece of bread into the oil. It should sizzle immediately and turn golden brown in about 60 seconds. Don’t rush this step — properly heated oil is the difference between greasy disappointment and crispy perfection.
- The Fry That Changes Everything: Using tongs, carefully lower the onion into the oil, cut-side down. The oil will bubble enthusiastically — this is good! Fry for 3 minutes, then gently flip using the tongs and a heatproof spatula. Continue frying for another 2-3 minutes until the coating is deep golden brown and the petals have spread open like a flower in full bloom. Listen for the sound: when the sizzling quiets to a gentle hiss, it’s almost ready. The aroma should be intoxicating — like the best onion rings you’ve ever had, multiplied by ten.
- Drain and Season: Remove the onion with a spider or slotted spoon, letting excess oil drip back into the pot. Transfer to a clean wire rack set over paper towels — this keeps air circulating underneath so the bottom stays crisp. Immediately season with a pinch of salt while it’s still hot; this helps the salt adhere and enhances all the other flavors. Let it rest for exactly 2 minutes — long enough to set the coating but short enough that it’s still piping hot when you serve it.
- Serve Immediately: Transfer to a serving plate and place in the center of your table with your favorite dipping sauce. The onion should look like a golden flower, each petal perfectly defined and begging to be pulled apart. Don’t be surprised if people start gathering around — the aroma alone is enough to stop conversations mid-sentence. Encourage guests to pull off petals, working from the outside in. The first few come off easily, but as you get closer to the center, you’ll need to use a fork — those inner petals are the chef’s reward for all that hard work.
That’s it — you did it. But hold on, I’ve got a few more tricks that’ll take this to another level...
Insider Tricks for Flawless Results
The Temperature Rule Nobody Follows
Most people think once the oil hits 350°F, they’re set for life. Wrong! The oil temperature drops dramatically when you add the onion, and if you don’t adjust, you’ll end up with a greasy mess. After adding your onion, increase the heat slightly and monitor that thermometer like a hawk. When the onion comes out, let the oil return to temperature before adding the next one. This might add 30 seconds per onion, but it’s the difference between restaurant-quality and sad bar-food quality. I learned this the hard way after serving what my friends still call “the oil sponge incident” — trust me, you don’t want to go there.
Why Your Nose Knows Best
Your sense of smell is actually the most reliable doneness indicator you have. When the onion first hits the oil, it’ll smell like raw flour and cold oil. After about 90 seconds, you’ll notice the aroma shift to something toasty and slightly nutty — that’s the flour beginning to brown. When it starts smelling like the best onion rings you’ve ever had, with a hint of spice and caramelized onion, it’s almost ready. If you smell anything acrid or burnt, you’ve gone too far. This might sound mystical, but once you experience it, you’ll never need a timer again. My neighbor thought I was crazy until she tried it — now she calls it her “onion sixth sense.”
The 5-Minute Rest That Changes Everything
After you coat your onion, let it rest on the wire rack for exactly 5 minutes before frying. This isn’t just idle time — it allows the flour to hydrate fully, creating a stronger bond that won’t fall apart in the oil. The coating actually gets thicker and more substantial during this rest, leading to that coveted shatteringly crisp texture. I discovered this by accident when my doorbell rang mid-prep, and the onion that got the extra rest time fried up noticeably better than its impatient siblings. Now I build this rest into my timing, using those 5 minutes to heat the oil and set up my frying station.
The Salt Timing Secret
Seasoning isn’t just about the spice blend in the flour — when you add salt matters tremendously. Salt the onion immediately after it comes out of the oil, while the surface is still covered in tiny oil droplets. This creates a micro-emulsion that helps the salt dissolve and distribute evenly. Wait even 30 seconds and the salt just bounces off, leaving you with bland onion and sad, granular salt crystals. I keep a small bowl of kosher salt right next to my draining station for this exact purpose. It’s a tiny detail that makes a huge difference — like the difference between good fries and great fries.
Creative Twists and Variations
This recipe is a playground. Here are some of my favorite ways to switch things up:
The Smoky BBQ Version
Replace the paprika with smoked paprika and add 1 teaspoon of brown sugar to the flour mixture. The result has this incredible campfire aroma and a subtle sweetness that pairs perfectly with barbecue sauce. I like to serve these at summer cookouts where they somehow taste like they came straight from a smokehouse, even though they’re just fried in your kitchen. The sugar helps the coating brown faster, so reduce your frying time by about 30 seconds.
The Buffalo Bomb
Add 2 tablespoons of buffalo seasoning to your flour mix and serve with blue cheese dressing. The cayenne in the original recipe gets amplified by the buffalo spice, creating a coating that starts mild and builds to a pleasant heat that lingers. These disappear faster than regular blooming onions at game day parties — something about that spicy-tangy combination makes people lose all self-control. I once watched my brother-in-law eat an entire one by himself, then ask if I had more “for sharing.”
The Everything Bagel Bloom
Swap the regular salt for everything bagel seasoning and add 1 teaspoon of dried dill to the flour. The result tastes like your favorite bagel shop exploded onto an onion — in the best possible way. The sesame and poppy seeds toast beautifully in the hot oil, creating little pockets of nutty flavor. Serve with cream cheese mixed with chives for the full bagel experience. My New York friends claim these taste more authentic than actual bagels from certain famous shops.
The Mediterranean Marvel
Replace the cayenne with 1 teaspoon of oregano and 1/2 teaspoon of lemon zest. Add a pinch of sumac to the flour if you have it — the tangy, slightly sour note complements the onion beautifully. Serve with tzatziki for dipping and watch people’s eyes light up when they taste the familiar Greek flavors in such an unexpected format. I created this version for a Mediterranean-themed dinner party, and it’s since become the most requested item in my appetizer rotation.
The Sweet Heat Special
Add 1 tablespoon of honey powder (or very finely ground sugar) and 1/2 teaspoon of chipotle powder to your flour mix. The result hits that magical sweet-spicy-smoky trifecta that keeps people reaching for “just one more petal” until the whole thing disappears. The honey helps the coating brown to a deeper color and adds a subtle sweetness that makes the heat more complex. Warning: these are genuinely addictive. I’ve seen polite dinner parties devolve into feeding frenzies when these hit the table.
The Truffle Luxe
Replace 1/4 cup of the flour with finely grated Parmesan and add 1/2 teaspoon of truffle salt to the seasoning blend. The cheese melts and creates little umami bombs throughout the coating, while the truffle adds an earthy luxury that elevates this from bar food to cocktail party worthy. These pair beautifully with champagne — something about the bubbles cutting through the richness while the earthy truffle notes complement the onion’s sweetness. Save this one for special occasions unless you want to become known as “the truffle onion person” (though honestly, there are worse reputations to have).
Storing and Bringing It Back to Life
Fridge Storage
Let’s be real — leftover blooming onions are rare in my house. But on the off chance you have some, let them cool completely, then store in an airtight container lined with paper towels. They’ll keep for up to 2 days, though the coating will lose some of its crunch. Don’t refrigerate them while they’re still warm — the steam creates condensation that makes everything soggy. I’ve successfully revived day-old blooming onions in a 400°F oven for 5-7 minutes on a wire rack, which brings back about 80% of the original crunch. It’s not quite the same as fresh, but it’s miles better than microwaving (which turns them into rubbery sadness).
Freezer Friendly
Here’s a game-changer: you can freeze fully coated, un-fried blooming onions for up to 1 month. After the double dredge, place them on a parchment-lined baking sheet and freeze until solid, then transfer to freezer bags. When you’re ready to fry, don’t thaw — drop them frozen into 325°F oil (slightly cooler than fresh) and add 2-3 extra minutes to the frying time. The result is surprisingly close to fresh-fried, making spontaneous blooming onion cravings totally manageable. I keep a couple in my freezer for emergency appetizer situations, which in my social circle happens more often than you’d think.
Best Reheating Method
The air fryer is your best friend here — 375°F for 3-4 minutes brings back that crispy magic better than any other method. If you don’t have an air fryer, a 425°F oven on a wire rack works too, but takes 6-8 minutes. The key is getting them hot fast so the coating crisps before the inside overcooks. Whatever you do, avoid the microwave unless you enjoy eating onion-flavored rubber. I’ve also had success reheating individual petals in a dry skillet over medium heat — it’s oddly therapeutic and gives you perfect control over the crispiness level.