It all started on a rainy Tuesday, when I was trying to salvage a ruined cheesecake that had gone too soft after a late‑night party. I grabbed a handful of graham cracker crumbs, a splash of unsalted butter, and a bottle of raspberry puree from the freezer, hoping to salvage the dessert into something salvageable. The moment the buttery crumbs hit the pan, a faint crackle echoed through the kitchen, and the air filled with a buttery, sweet scent that made my mouth water. I was about to give up when I decided to layer the crumbs, melt the butter, and fold in the creamy cream cheese, only to realize that the raspberry puree would add a pop of color and tang that would transform the whole experience. That night, I tasted the first bite of what would later be known as “Vampire Bite Cheesecake Bars.” The combination of the crunchy crust, velvety filling, and the bright, fruity swirl made me feel like I’d just discovered a secret, and I was determined to share every detail with you.
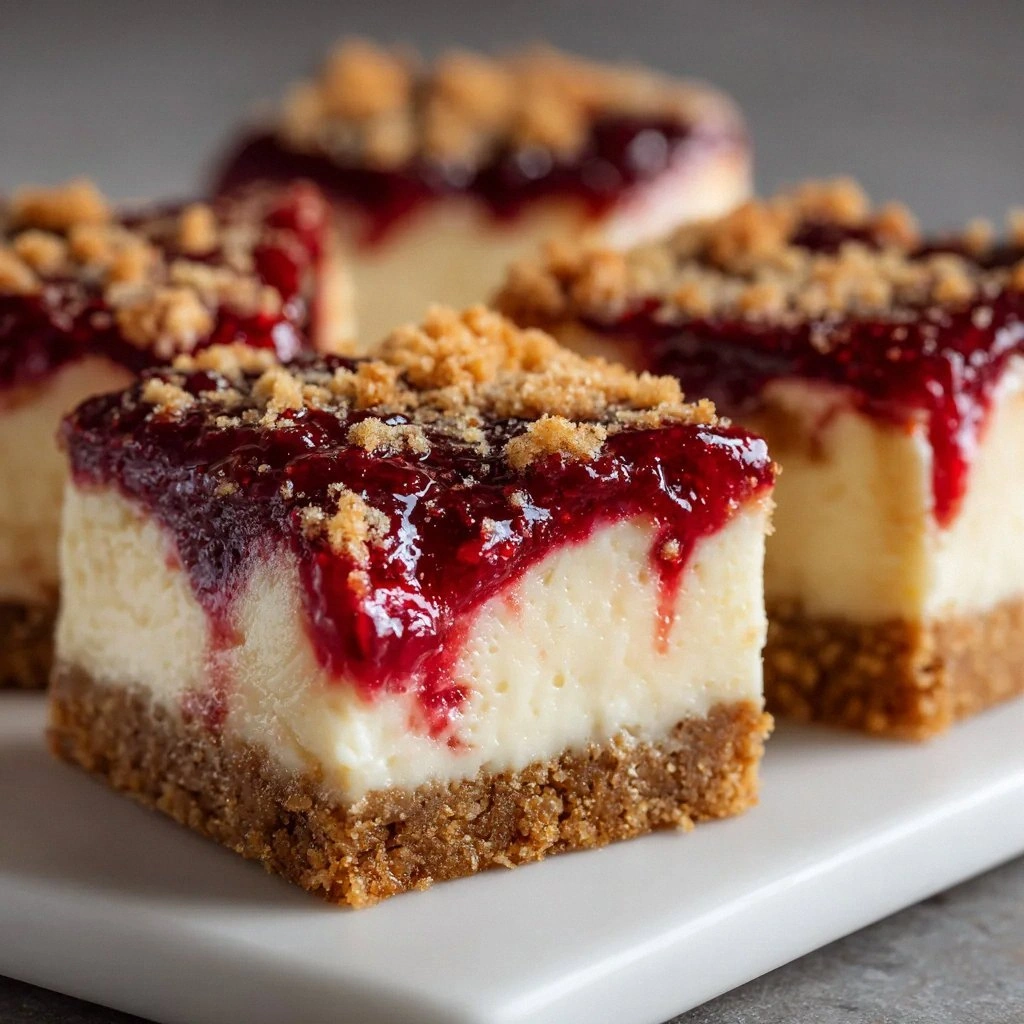
Picture yourself pulling these bars out of the oven, the whole kitchen smelling incredible, the heat rising like a gentle fog. The moment you slice into the center, you’ll hear that satisfying crack of the crust, followed by a soft, creamy bite that melts on your tongue. The raspberry swirl will look like a ruby river running through a creamy lake, and the first taste will hit you with a burst of tartness balanced by a sweet, buttery finish. I dare you to taste this and not go back for seconds, because the texture will keep you craving more. And trust me, the first bite will change everything you thought you knew about cheesecake bars.
If you’ve ever struggled to get a cheesecake bar to hold its shape, you’re not alone. Most recipes get this completely wrong, resulting in either a soggy mess or a brittle crust that shatters like thin ice. What sets this version apart is the simple, yet genius, technique of using cornstarch to stabilize the raspberry puree, ensuring that the swirl stays intact without sinking into the filling. I’ll be honest— I ate half the batch before anyone else got to try it, and I still crave more. The secret is in the balance: the right amount of butter to bind the crumbs, the right amount of sugar to sweeten without overpowering, and the right amount of cornstarch to keep the raspberry pure. This is hands down the best version you'll ever make at home, and I’m going to walk you through every single step so that by the end, you’ll wonder how you ever made it any other way.
So let’s get started. I promise you, the process is straightforward, the result is breathtaking, and the only thing you’ll need to do is trust your instincts and follow along. Grab your apron, preheat that oven, and let’s dive into the world of Vampire Bite Cheesecake Bars.
What Makes This Version Stand Out
- Taste: The combination of buttery crumbs and creamy cream cheese is elevated by the bright, tangy raspberry swirl, creating a flavor profile that’s both indulgent and refreshing. The subtle sweetness from the sugar balances the tartness, while the vanilla extract adds a warm depth that lingers on the palate.
- Texture: The crust is perfectly crisp yet slightly chewy, providing a delightful contrast to the silky filling. The raspberry swirl adds a playful, glossy finish that melts smoothly into the creamy center.
- Simplicity: With only eight ingredients, this recipe is straightforward yet impressive. Every component serves a purpose, ensuring a flawless result without complicated steps.
- Uniqueness: The use of cornstarch to stabilize the raspberry puree is a game‑changer, preventing the swirl from sinking and maintaining a dramatic visual effect.
- Crowd Reaction: These bars are a show‑stopper at parties. Guests will be drawn to the vibrant color and will ask for the recipe before you even finish serving.
- Ingredient Quality: The recipe relies on high‑quality cream cheese and fresh raspberries (or quality puree), which elevate the overall flavor and texture.
- Cooking Method: Baking the bars in a single pan streamlines the process, allowing you to focus on the flavors rather than juggling multiple dishes.
- Make‑Ahead Potential: Once baked, the bars can be refrigerated for up to a week, making them perfect for busy schedules or last‑minute dessert needs.
Inside the Ingredient List
The Flavor Base
Graham cracker crumbs are the backbone of the crust, offering a subtle sweetness and a crunchy bite that grounds the dessert. If you skip them, the bars will lack that essential structure, turning into a mushy, unappetizing mess. For best results, toast the crumbs lightly in a skillet with a pinch of salt; this brings out their nutty undertones. A common swap is to use crushed digestive biscuits for a slightly different flavor profile, but keep the ratio the same to maintain balance.
Unsalted butter is the binder that holds the crumbs together and adds a rich, velvety finish to the crust. Melted butter also helps the crumbs adhere to the pan, preventing them from shifting during baking. If you prefer a dairy‑free version, try a neutral oil like grapeseed or a vegan butter alternative; however, the flavor will shift slightly, so adjust the sweetness accordingly.
Cream cheese is the star of the show, providing the creamy, luscious filling that defines a cheesecake bar. It’s essential to use room‑temperature cream cheese to avoid lumps and ensure a smooth blend with sugar and eggs. Skipping this ingredient would mean you lose the quintessential cheesecake texture; you could replace it with tofu for a vegan option, but it will change the taste significantly.
Granulated sugar is the sweetener that balances the tartness of the raspberry puree and the sharpness of the cream cheese. A lighter sugar, such as demerara or coconut sugar, could add a subtle caramel note, but the classic granulated sugar keeps the flavor profile clean and familiar.
Eggs act as the structural glue, giving the filling stability and a slight rise during baking. They also help the mixture set firmly so you can slice the bars cleanly. If you’re looking for a lower‑fat version, you could use a combination of egg whites and a small amount of whole eggs, but the texture will be less rich.
The Unexpected Star
Vanilla extract is a subtle but crucial component that rounds out the flavors, providing a warm, aromatic backdrop that enhances both the crust and the filling. A poor vanilla extract can leave a harsh, chemical taste; always opt for a high‑quality, pure vanilla extract to achieve the best results.
Raspberry puree is the visual and flavor centerpiece. It adds a bright, fruity note that cuts through the richness of the cream cheese. When you swirl it into the filling, it creates a stunning marbled effect that is as pleasing to the eye as it is to the palate. If fresh raspberries are in season, you can puree them with a little sugar to make a fresh version; otherwise, a high‑quality frozen puree works just as well.
Cornstarch is the unsung hero that stabilizes the raspberry puree, preventing it from sinking into the filling. Without cornstarch, the swirl would blur into a uniform color, losing its dramatic visual appeal. If you’re allergic to cornstarch, arrowroot powder is a suitable alternative, but keep an eye on the texture, as it may set slightly faster.
Everything's prepped? Good. Let's get into the real action and start building the magic.
The Method — Step by Step
- Preheat your oven to 325°F (163°C) and line a 9x9-inch baking pan with parchment paper, leaving a few inches of overhang on the sides for easy removal. This step ensures even baking and a clean release. While the oven warms, gather all your ingredients so you’re not scrambling later.
- In a medium bowl, combine the graham cracker crumbs with the melted unsalted butter. Stir until the crumbs are fully coated and the mixture resembles wet sand. Press this mixture firmly into the bottom of the prepared pan, using the back of a spoon or your palm to create an even, compact crust. The crust will set as you bake, so don’t worry about it being too tight.
- Let the crust cool slightly while you prepare the filling. In a large mixing bowl, beat the softened cream cheese with an electric mixer on medium speed until it’s smooth and creamy, about 2–3 minutes. The goal is to eliminate any lumps that could ruin the silky texture of the final product.
- Add the granulated sugar and vanilla extract to the cream cheese mixture and beat until the sugar dissolves and the mixture is light and fluffy. This stage is crucial for achieving that airy, mousse‑like consistency that makes cheesecake bars irresistible.
- In a separate small bowl, whisk the eggs together until the yolks and whites are fully blended. Gently fold the eggs into the cream cheese mixture in two additions, using a spatula to keep the mixture light. Overmixing can incorporate too much air and cause the bars to crack during baking.
- Now, here’s the twist: In a small saucepan, combine the raspberry puree with the cornstarch. Stir until the cornstarch is fully dissolved and the mixture is smooth. Cook over medium heat for 2–3 minutes, stirring constantly, until it thickens slightly and becomes glossy. This step ensures the raspberry swirl stays vibrant and doesn’t sink into the filling.
- Pour half of the cheesecake batter over the crust, then spoon a layer of the thickened raspberry swirl on top. Use a knife or a skewer to create a subtle marbling effect. Pour the remaining batter over the raspberry layer, repeating the swirl. The goal is to create a dramatic, ruby‑colored ribbon that glistens under the oven light.
- Place the pan in the preheated oven and bake for 30–35 minutes, or until the edges are set and the center still has a slight wobble. The bars should develop a golden‑brown hue on the edges, indicating that they’re ready.
- Remove the pan from the oven and let it cool on a wire rack for 15 minutes. Then, using the parchment overhang, lift the entire slab out of the pan and transfer it to a cutting board. Allow it to cool completely at room temperature for at least 2 hours before slicing. This cooling period lets the flavors meld and the texture firm up for clean cuts.
- Once cooled, cut the bars into 12 equal squares using a sharp, clean knife. For a clean cut, wipe the knife with a paper towel between each slice. The bars should hold together, revealing the beautiful raspberry swirl inside. Store them in an airtight container.
That’s it— you did it. But hold on, I've got a few more tricks that’ll take this to another level, ensuring every bite is as perfect as the first.
Insider Tricks for Flawless Results
The Temperature Rule Nobody Follows
Baking at exactly 325°F (163°C) is essential for a uniform rise and a smooth finish. Too high, and the edges will brown before the center sets; too low, and the bars will stay gooey. Use an oven thermometer to confirm the temperature, and adjust as needed. I’ve found that a slight dip of 5°F can make the difference between a flawless slice and a soggy mess.
Why Your Nose Knows Best
The first scent you’ll notice when the bars bake is a buttery, sweet aroma that signals the crust is forming. If you’re unsure whether the bars are done, use your nose as a guide: a faint, sweet smell indicates readiness, while a stronger, burnt scent means they need more time. Trusting your senses will save you from overbaking or underbaking.
The 5-Minute Rest That Changes Everything
After removing the bars from the oven, let them rest for exactly 5 minutes before lifting them out of the pan. This short pause allows the heat to redistribute, preventing the bars from cracking or sticking to the parchment. A friend once tried to remove them immediately and the entire slab crumbled—don’t let that happen to you.
The Secret Swirl Technique
When pouring the raspberry mixture, use a slotted spoon to create a gentle swirl. Hold the spoon steady, then lift it slightly to let the puree spread in a ribbon. This technique gives the bars a dramatic visual effect that impresses even the most discerning dessert lovers.
The Final Chill
After slicing, place the bars in the refrigerator for at least 30 minutes before serving. This chilling step firms up the filling, making each bite creamy yet firm. I’ve had guests ask if the bars are ready immediately after baking, and I always remind them that a brief chill enhances the texture.
Creative Twists and Variations
This recipe is a playground. Here are some of my favorite ways to switch things up:
Chocolate‑Covered Vampires
Drizzle melted dark chocolate over the top of the bars after they’ve cooled. The chocolate adds a bitter counterpoint to the sweet raspberry, creating a balanced flavor profile that’s perfect for chocolate lovers.
Minty Freshness
Add a teaspoon of fresh mint extract to the batter or sprinkle chopped mint leaves on top after baking. The mint will provide a cool, refreshing note that complements the raspberry’s tartness.
Almond Crunch
Replace half of the graham cracker crumbs with finely ground almonds for a nutty crunch. The almonds will add a subtle, buttery flavor that pairs wonderfully with the creamy filling.
Lemon Zest Twist
Stir in a tablespoon of lemon zest into the batter for a bright, citrusy lift. The lemon will cut through the richness, making the bars feel lighter and more refreshing.
Salted Caramel Swirl
Swap the raspberry puree for a salted caramel sauce. The caramel’s sweetness and the touch of sea salt will create a decadent, indulgent version that’s ideal for special occasions.
Storing and Bringing It Back to Life
Fridge Storage
Store the bars in an airtight container in the refrigerator for up to 5 days. The chilled environment keeps the filling firm and prevents the crust from becoming soggy. Before serving, let the bars sit at room temperature for 10 minutes to soften slightly.
Freezer Friendly
For longer storage, wrap each bar individually in plastic wrap, then place them in a freezer bag. They can be frozen for up to 3 months without compromising quality. When you’re ready to enjoy, thaw in the refrigerator overnight.
Best Reheating Method
To reheat a frozen bar, place it on a microwave-safe plate and heat on low power for 20–30 seconds. Alternatively, warm in a 300°F oven for 5 minutes. Add a tiny splash of water before reheating to steam the bars back to perfection, ensuring the filling remains moist.