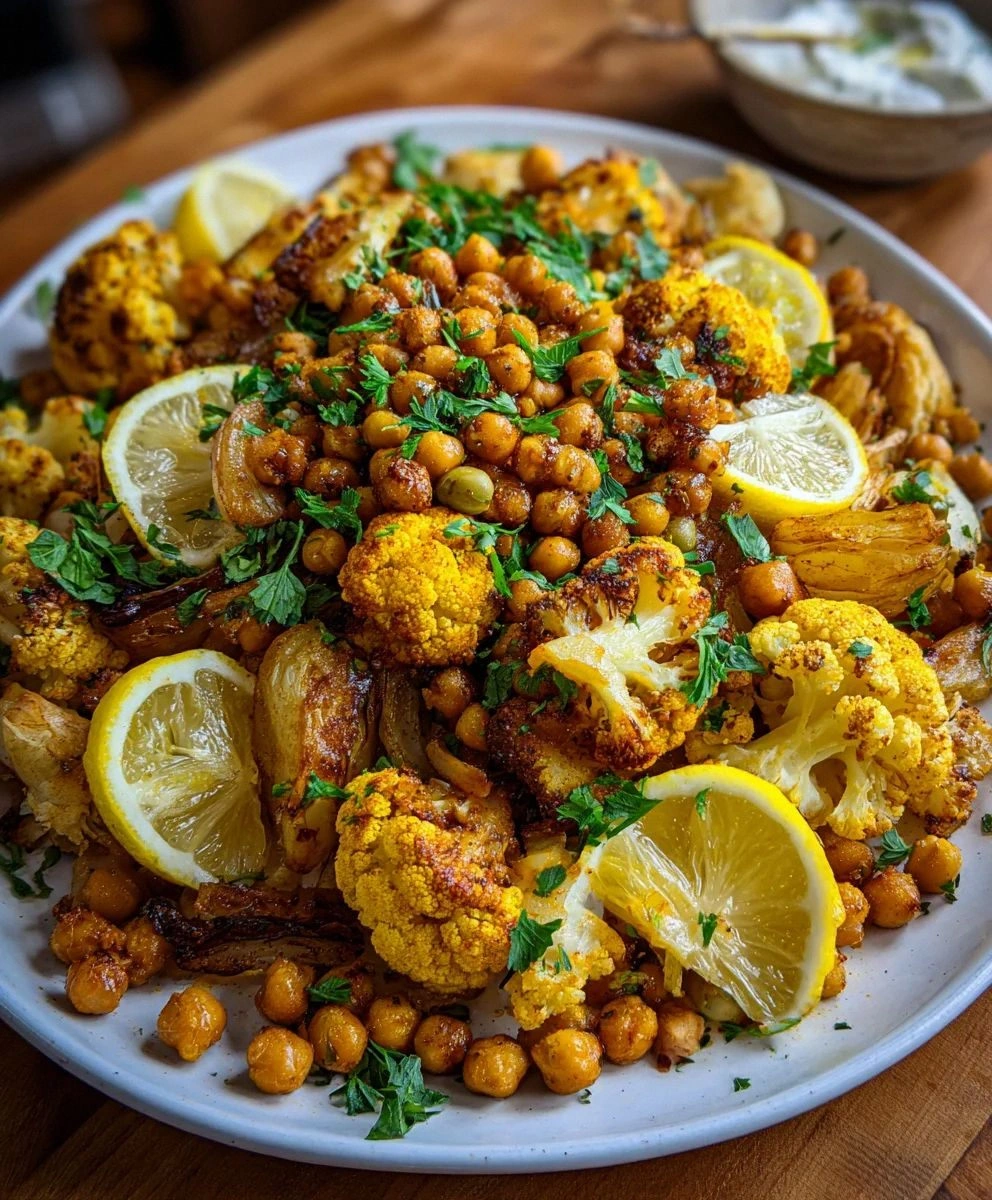
I burned dinner so badly last week that the smoke alarm became my kitchen soundtrack. There I stood, waving a dish towel like a frantic orchestra conductor, while a sad pan of mushy vegetables mocked me from the stove. Fast forward three days and I'm dancing around the same kitchen, scooping up golden-crusted potatoes and caramelized cauliflower with my fingers because this Turmeric Cauliflower Chickpea Potatoes situation is so ridiculously good that civilized utensils feel like an insult. The transformation happened because I finally cracked the code on roasted vegetable alchemy, and now I'm practically evangelizing about it from my countertop pulpit.
Picture this: it's raining outside, you've got that restless hungry feeling that no takeout menu can fix, and your body is craving something that tastes like sunshine and comfort had a beautiful baby. You pull out a sheet pan, fling some humble vegetables on it with a reckless abandon that would make your grandmother clutch her pearls, and then the magic happens. The turmeric stains your wooden spoon like a badge of honor, the garlic perfumes your hair in the best possible way, and when those potatoes emerge with their edges shattered into crispy golden shards, you'll understand why I'm writing a 3000-word love letter to what is essentially dinner on a tray.
Most recipes get this completely wrong. They treat roasted vegetables like an afterthought, tossing everything together like some sad salad bar situation and wondering why dinner tastes like disappointment with a side of mushy regret. Here's what actually works: strategic timing, bold seasoning that would make a spice merchant weep with joy, and a technique so simple you'll wonder why every vegetable recipe doesn't use it. I dare you to taste this and not go back for thirds — yes, thirds, because seconds are a given and thirds are where we separate the enthusiasts from the truly committed.
The secret isn't just in what goes on that pan, but when and how it meets the heat. I'll show you exactly how to achieve those potato edges that shatter like thin ice under your fork, cauliflower florets that transform into nutty caramelized clouds, and chickpeas that develop the kind of crispy shell that makes you question why you ever settled for soggy beans. Stay with me here — this is worth it. Let me walk you through every single step — by the end, you'll wonder how you ever made it any other way.
What Makes This Version Stand Out
Flavor Bomb: This isn't your sad, steamed vegetable situation. We're talking about a turmeric-garlic-lemon coating that seeps into every crevice of the cauliflower, creating golden flavor pockets that explode in your mouth like tiny savory fireworks. The combination of earthy turmeric, bright citrus, and aromatic garlic creates a taste profile so complex that people will swear you spent hours building layers of flavor.
Texture Paradise: Most roasted vegetable dishes end up with everything cooked to the same mushy consistency, but not here. The potatoes develop those coveted crispy edges while staying cloud-soft inside, the cauliflower transforms into tender-crisp nuggets with deep caramelized spots, and the chickpeas achieve the kind of crunch that makes you reach for one more handful. It's like a texture theme park where every bite offers a new ride.
One-Pan Wonder: Despite tasting like something from a trendy Mediterranean bistro, this entire masterpiece happens on a single sheet pan. No blanching, no par-boiling, no juggling multiple pots like some frantic circus act. Everything goes into the oven together, comes out together, and gets tossed together in a celebration of minimal dishwashing that would make even the most reluctant cook do a victory dance.
Meal Prep Hero: This dish tastes even better the next day when the flavors have had time to mingle and deepen, making it the ultimate meal prep champion. Pack it for lunch and watch your coworkers eye your container with envy, or transform leftovers into a breakfast hash that will make you cancel your weekend brunch reservations. It's like the gift that keeps on giving, except instead of socks, you're giving yourself delicious meals all week.
Nutrition Powerhouse: We're talking about a dish that sneaks in more vegetables than most people eat in a week, wrapped in a package so delicious you'll forget you're basically eating a multivitamin. The turmeric brings anti-inflammatory properties, the chickpeas pack plant-based protein, and the cauliflower delivers that satisfying bulk without the carb coma. It's comfort food that your doctor would high-five you for eating.
Customizable Canvas: While this version is perfect as-is, it also serves as a brilliant base for whatever's lurking in your fridge. Swap in different herbs, add a handful of spinach, throw in some cherry tomatoes — the basic technique remains foolproof while the flavor possibilities multiply like rabbits. It's the kind of recipe that makes you feel like a creative genius even when you're just cleaning out the produce drawer.
Zero Waste Champion: Those cauliflower leaves that usually get tossed? Roast them into crispy chips. Potato peels? Keep them on for extra nutrients and that rustic bistro vibe. This recipe teaches you to see vegetable parts you normally discard as opportunities for deliciousness, making both your wallet and the planet happy.
Alright, let's break down exactly what goes into this masterpiece...
Inside the Ingredient List
The Flavor Base
Cauliflower isn't just hanging out in this dish as filler — it's the transformative element that absorbs every bit of flavor like a delicious sponge while contributing its own subtle nuttiness when roasted. When selecting your cauliflower, look for heads that feel heavy for their size with tight, creamy white florets and no brown spots. The magic happens when those florets hit high heat, their edges caramelizing into deep golden-brown nuggets that taste like vegetable candy. Skip the pre-cut bags of florets here; they dry out faster and never achieve that same satisfying roast.
Potatoes provide the hearty backbone that transforms this from side dish to main event territory. I prefer Yukon Gold for their naturally buttery flavor and ability to hold their shape while still getting crispy edges, but red potatoes work beautifully if you prefer a waxier texture. The key is cutting them into the right size — too small and they'll burn before the cauliflower is done, too large and they'll stay hard in the middle while everything else turns to mush. Aim for 1-inch chunks, keeping them as uniform as possible so they cook evenly.
The Texture Crew
Chickpeas are the unexpected heroes that bring both protein and that addictive crispy exterior that makes this dish feel substantial enough for dinner. If you're using canned chickpeas, make sure to drain them thoroughly and pat them dry with paper towels — any excess moisture will steam instead of roast, leaving you with sad, soggy beans instead of crunchy golden nuggets. For the ultimate texture, I sometimes peel the chickpeas by gently rubbing them between kitchen towels; the skins slip right off and you're left with impossibly creamy centers that contrast beautifully with their crispy shells.
The pitted olives add that briny, salty punch that cuts through the earthy vegetables and brightens the entire dish. Kalamata olives bring a deeper, wine-like complexity while green olives offer a sharper, more assertive flavor. Don't even think about those flavorless canned black olives here — they bring nothing to the party except rubbery disappointment. If olives aren't your thing, capers make an excellent substitute, offering the same briny pop in a smaller package.
The Unexpected Star
Turmeric is where this dish gets its golden glow and anti-inflammatory superpowers, but it needs to be handled correctly to avoid bitterness. Fresh turmeric root, if you can find it, has a brighter, more complex flavor than the powdered version, but either works beautifully here. The key is combining it with black pepper — not for heat, but because the piperine in pepper increases your body's absorption of curcumin, turmeric's active compound, by up to 2000 percent. This isn't just delicious, it's basically edible health insurance.
Dried rosemary might seem like an odd choice in a turmeric-forward dish, but its piney, woodsy notes create an unexpected bridge between the warm spices and the roasted vegetables. Fresh rosemary can work in a pinch, but it tends to burn at high temperatures, leaving bitter black specks throughout your beautiful vegetables. Dried rosemary softens and mellows as it roasts, infusing everything with subtle herbal notes that make people ask "what is that amazing flavor?"
The Final Flourish
Fresh parsley at the end isn't just for color — its bright, slightly peppery flavor provides the perfect counterpoint to all those deep, roasted notes. Flat-leaf (Italian) parsley has more flavor than the curly variety, but either works here. The trick is to chop it just before serving so it stays vibrant and doesn't wilt into sad green specks. Some days I swap in fresh cilantro for a different flavor profile, or add a handful of baby arugula for a peppery bite that wilts slightly from the vegetables' warmth.
The lemon juice and zest are non-negotiable — they wake up all the other flavors like a splash of cold water to the face. Zest the lemon before juicing it, and make sure to only grate the yellow part — the white pith underneath is bitter enough to ruin your whole dish. If you're feeling fancy, try using Meyer lemons for a sweeter, more floral note that plays beautifully with the turmeric.
Everything's prepped? Good. Let's get into the real action...
The Method — Step by Step
- Preheat your oven to 425°F (220°C) and position a rack in the center — this high heat is crucial for achieving those crispy edges and deep caramelization that make this dish sing. While it's heating, grab your largest sheet pan and resist the urge to line it with parchment paper. Direct contact with the metal helps the vegetables develop better browning, creating those coveted crispy bottoms that would make any chef proud. This is the moment of truth where many home cooks sabotage themselves before they even start.
- Cut your cauliflower into medium florets, about the size of golf balls, keeping some of the tender inner leaves attached — they roast into crispy chips that will have you wondering why you've been throwing them away all these years. Place them in a large bowl and drizzle with just enough olive oil to coat them lightly; too much oil and they'll steam instead of roast, leaving you with sad, soggy vegetables. The cauliflower should glisten but not swim in oil, like it's been to a subtle spa treatment rather than an oil wrestling match.
- Toss the potatoes with half the oil, turmeric, salt, pepper, and rosemary until they're evenly coated and sporting a golden jacket that would make a fashion designer jealous. Spread them on the sheet pan cut-side down — this is crucial for maximum crispiness because the cut surfaces will develop that coveted caramelized crust. The sizzle when they hit the pan? Absolute perfection. Don't crowd them or they'll steam instead of roast; use two pans if necessary because crispy edges are worth dirtying extra dishes.
- Slide the potatoes into the oven and set a timer for 15 minutes — this head start ensures they cook through while the cauliflower and chickpeas get added later. While they're roasting, drain and thoroughly dry your chickpeas, removing as many skins as your patience allows. The difference between peeled and unpeeled chickpeas after roasting is like the difference between silk and sandpaper, but both will taste incredible so don't stress if you only get a few.
- After 15 minutes, quickly pull out the pan and add the cauliflower and chickpeas, tossing them with the remaining oil, garlic, and a bit more salt and pepper. The potatoes should be starting to turn golden on the bottom — resist the urge to flip them yet. Return everything to the oven for another 20-25 minutes, stirring once halfway through, until the cauliflower has deep brown spots and the chickpeas are crispy and golden. Your kitchen should smell like a Mediterranean grandmother's kitchen at this point.
- While the vegetables finish roasting, cook your quinoa according to package directions, but substitute vegetable broth for water and add a bay leaf if you have one. The quinoa provides a nutty, protein-packed base that soaks up all the flavorful juices from the roasted vegetables. Fluff it with a fork when done and season with a pinch of salt — it should taste good on its own because it's about to become the foundation for our vegetable masterpiece.
- Remove the sheet pan from the oven and immediately squeeze fresh lemon juice over everything while it's still sizzling — the acid hits the hot vegetables and creates an intoxicating aroma that will have neighbors knocking on your door. Add the lemon zest, chopped parsley, and a final drizzle of good olive oil for that restaurant-quality finish. The contrast between the hot, crispy vegetables and the bright, fresh herbs is what elevates this from good to life-changing.
- Assemble your bowls with a generous scoop of quinoa, a hearty portion of the roasted vegetables, a dollop of Greek yogurt, and extra lemon wedges on the side. The yogurt adds a cooling, creamy element that plays beautifully against the warm spices and crispy vegetables. For the full experience, let everything sit for about 5 minutes so the quinoa can absorb some of the pan juices — this is the hardest part because you'll want to dive in immediately.
- Bring the whole pan to the table if you're feeling communal, or plate it up individually for that restaurant presentation. Either way, prepare yourself for the silence that falls when people take their first bite — it's the sound of everyone being too busy experiencing pure vegetable joy to make conversation. I'll be honest — I ate half the batch before anyone else got to try it, standing at the counter in my pajamas, using my fingers like the civilized adult I pretend to be.
That's it — you did it. But hold on, I've got a few more tricks that'll take this to another level...
Insider Tricks for Flawless Results
The Temperature Rule Nobody Follows
Here's the thing about roasting vegetables: your oven thermometer is probably lying to you. Most home ovens run 25-50 degrees cooler than their display claims, which means you're essentially steaming your vegetables instead of roasting them. Invest in an oven thermometer — it's a $10 game-changer that will transform not just this dish but every roasted vegetable in your repertoire. If your vegetables are coming out pale and limp despite following the recipe exactly, crank that temperature up by 25 degrees and watch the magic happen. A friend tried skipping this step once — let's just say it didn't end well, and we still don't speak of "the mush incident" at dinner parties.
Why Your Nose Knows Best
Your sense of smell is the most reliable indicator of doneness here, more accurate than any timer. When the vegetables are perfectly roasted, your kitchen will fill with the aroma of toasted nuts and caramelized sugars. If you smell burning, you've gone too far. If you don't smell anything after 20 minutes, your temperature is too low or your pan is too crowded. This is why I always recommend staying close to the kitchen during the last 10 minutes — your nose will tell you exactly when perfection is achieved, like having a built-in kitchen timer that never needs batteries.
The 5-Minute Rest That Changes Everything
Patience, my friend, is the final ingredient in this masterpiece. When the vegetables come out of the oven, they're still actively cooking from residual heat and steam. Letting them rest for just 5 minutes allows the exterior to stay crispy while the interior finishes cooking gently, resulting in vegetables that are perfectly tender inside with maximum caramelization outside. This is also when you should add any fresh herbs or final seasonings — the residual heat blooms their flavors without cooking away their bright, fresh character. Skip this step and you'll have herbs that turn black and bitter, ruining all your hard work.
The Lemon Trick That Makes Magic
Don't just squeeze lemon juice over everything and call it a day. Instead, zest your lemon first, then cut it in half and juice it, but save a few thin slices to roast alongside the vegetables during the last 5 minutes. The heat caramelizes the lemon slices, softening their acidity and bringing out their natural sweetness. These roasted lemon slices become edible jewels that you can scatter over the finished dish, providing bursts of bright, complex flavor that regular lemon juice alone can't achieve. It's like getting two lemon experiences in one dish — the fresh zip of juice and the mellow sweetness of roasted slices.
Creative Twists and Variations
This recipe is a playground. Here are some of my favorite ways to switch things up:
The Moroccan Express
Swap the rosemary for a teaspoon each of ground cumin and coriander, add a cinnamon stick to the roasting pan, and replace the olives with dried apricots and almonds added during the last 5 minutes. The warm spices create an entirely different flavor profile that transports you straight to a Marrakech spice market. Finish with fresh mint instead of parsley and serve over couscous instead of quinoa for a North African-inspired feast that will have your dinner guests asking for the recipe before they finish their first bite.
The Greek Village Version
Replace the turmeric with a blend of dried oregano and thyme, swap the olives for cherry tomatoes and feta cheese, and add a handful of fresh dill at the end. The tomatoes burst during roasting, creating a natural sauce that coats everything in Mediterranean sunshine. The feta goes on after cooking so it stays creamy rather than melting away. This version tastes like summer in the Greek islands, even when it's snowing outside and you're eating it in your Minnesota kitchen.
The Heat Seeker's Dream
Add a tablespoon of harissa paste to the oil before tossing with the vegetables, swap the olives for oil-packed Calabrian chilies, and finish with a sprinkle of Aleppo pepper. The harissa creates a smoky, complex heat that builds slowly rather than assaulting your taste buds. If you can't find harissa, a mix of smoked paprika and your favorite hot sauce works beautifully. Serve with cooling yogurt to balance the heat, or embrace the burn and add extra chilies — I won't judge.
The Fall Harvest Edition
Replace half the cauliflower with butternut squash cubes, swap the rosemary for fresh sage, and add some toasted pumpkin seeds for crunch. The sweetness of the squash plays beautifully against the savory spices, creating a dish that tastes like autumn comfort food while still being healthy. This version is particularly stunning when you use both orange and purple cauliflower for a color palette that looks like fall leaves on your plate.
The Protein Powerhouse
Add cubes of firm tofu or halloumi cheese to the pan during the last 15 minutes of roasting. Both develop beautiful golden crusts while staying tender inside, turning this side dish into a complete meal. Halloumi has the added bonus of getting slightly melty in the center while crisping on the outside, creating little cheese pillows that are impossible not to steal off the pan. For an extra protein boost, I sometimes add a soft-boiled egg on top — the runny yolk creates a sauce that ties everything together.
The Curry Night Remix
Add a tablespoon of curry powder to the turmeric, include some diced bell peppers and onions, and finish with a handful of fresh cilantro and a drizzle of coconut milk. The vegetables take on an Indian-inspired flavor profile that's completely different from the original but equally addictive. Serve with naan bread instead of quinoa and you've got a vegetarian curry feast that happens to be roasted instead of stewed.
Storing and Bringing It Back to Life
Fridge Storage
Store leftovers in an airtight container in the refrigerator for up to 4 days, but separate the quinoa from the vegetables if possible. The vegetables stay crisper when stored without the moisture from the quinoa, and you can reheat them separately for best results. If you've already mixed everything together, add a paper towel to the container to absorb excess moisture. The flavors actually deepen and improve after a day in the fridge, making this an excellent meal prep candidate that tastes better on day two than it did fresh from the oven.
Freezer Friendly
While you can freeze the roasted vegetables, they lose their crispy magic and become more appropriate for adding to soups or stews. Freeze in single-serving portions for easy weeknight additions to other meals. The quinoa freezes beautifully — portion it into muffin tins, freeze, then pop out the quinoa "pucks" and store in freezer bags. They thaw quickly and can be reheated in minutes. I don't recommend freezing the yogurt topping, but making fresh yogurt takes seconds and is worth the minimal effort.
Best Reheating Method
The microwave is your enemy here — it turns crispy vegetables into sad, soggy shadows of their former glory. Instead, reheat in a dry skillet over medium heat, stirring occasionally until warmed through and the edges crisp up again. Add a tiny splash of water before reheating — it steams back to perfection, preventing the vegetables from drying out while the pan heat restores their crispy edges. If you're in a hurry, the toaster oven works nearly as well. Save any fresh herbs or yogurt for after reheating so they stay bright and fresh rather than turning into wilted sadness.