Picture this: you’re standing in your kitchen, the clock ticking, a sudden craving for something that feels both familiar and wildly adventurous. I was in that exact spot last Thursday, battling a half‑finished sushi roll that had turned into a sad, soggy mess, when my roommate dared me to create a “taco‑sushi hybrid” that would make our taste buds do a backflip. I laughed, I scoffed, and then I grabbed the nearest taco shells, a bag of sushi rice, and a fresh piece of spicy salmon, thinking, “What could possibly go wrong?” Spoiler alert: everything went spectacularly right.
The moment the rice hit the pan, the kitchen filled with a buttery aroma that whispered promises of umami heaven. The sizzle of the taco shells as they toasted in the oven was like a tiny applause, each crackle a reminder that we were on the brink of culinary brilliance. I could see the glistening pink of the salmon, feel the cool, slightly sticky rice between my fingertips, and hear the faint pop of furikake seasoning hitting the hot surface. My senses were doing a happy dance, and I knew I was about to discover a flavor combo that would outshine any ordinary dinner.
Most sushi‑taco experiments I’ve seen end up as a soggy, confusing mess that leaves you wondering why you even tried. This version, however, is a game‑changer: the taco shell stays crisp, the rice is perfectly seasoned, and the spicy fish provides a kick that’s balanced by the subtle crunch of furikake and the smoky heat of shichi‑mi tōgarashi. I’m daring you to taste this and not go back for seconds—trust me, the addictive crunch will have you reaching for the plate again before the first bite even settles.
What truly sets this recipe apart is a secret technique: we flash‑freeze the sushi rice for a few minutes before assembling, which locks in moisture and creates a rice‑to‑shell ratio that’s just right—neither mushy nor dry. I’ll walk you through every single step—by the end, you’ll wonder how you ever made sushi tacos any other way.
What Makes This Version Stand Out
- Flavor Explosion: The combination of spicy salmon, furikake, and shichi‑mi tōgarashi creates layers of heat, umami, and a hint of citrus that dance on the palate like a well‑choreographed salsa.
- Perfect Crunch: By toasting the taco shells just until they’re golden, you get a satisfying snap that holds up against the moist rice without getting soggy.
- Simplicity Meets Sophistication: Only five core ingredients are needed, yet the result feels like a high‑end restaurant dish that took hours to perfect.
- Visual Wow Factor: The bright orange of the salmon against the black seaweed‑infused rice and the green specks of furikake make each taco a miniature work of art.
- Crowd‑Pleaser: Whether you’re feeding sushi aficionados or taco lovers, this hybrid wins over both camps—expect applause at the dinner table.
- Ingredient Quality: Using sushi‑grade fish and authentic Japanese seasonings guarantees a clean, fresh taste that cheap substitutes can’t mimic.
- Quick Assembly: Once the components are prepped, the actual building takes under five minutes per batch, perfect for busy weeknights.
- Make‑Ahead Friendly: The rice and fish can be prepared ahead of time, letting you focus on plating just before guests arrive.
Inside the Ingredient List
The Flavor Base
Sushi Rice (1 cup): This isn’t just any rice; it’s the sticky, slightly sweet foundation that carries the seasoning. If you skip the rice, you lose the cohesive bite that holds the taco together. For the best texture, rinse the rice until the water runs clear, then let it soak for 30 minutes before cooking. A good swap is short‑grain arborio, but you’ll miss the authentic gloss that sushi rice provides.
The Texture Crew
Taco Shells (8 pieces): Choose hard corn shells for that unmistakable crunch. Soft flour shells will wilt under the weight of the rice and fish, turning your masterpiece into a soggy mess. If you’re gluten‑free, look for corn shells labeled “no added wheat.” A pro tip: lightly brush the shells with a touch of sesame oil before toasting to add a nutty depth.
The Unexpected Star
Spicy Salmon/Tuna (200 grams): This is the heart‑pounding hero of the dish. The natural oil in the fish melds with the spice, creating a buttery heat that’s unforgettable. If you’re not a fan of raw fish, you can sear the salmon briefly—just 30 seconds per side—so it stays tender inside while gaining a caramelized exterior. Remember, the fish must be sushi‑grade; anything less will compromise safety and flavor.
The Final Flourish
Furikake (1 tablespoon): This seaweed‑infused sprinkle adds a burst of umami, a hint of salt, and a delicate crunch that elevates the entire taco. Skipping it would make the dish feel flat—think of it as the confetti on a birthday cake. If you can’t find furikake, a mix of toasted sesame seeds, a dash of soy sauce, and a pinch of dried nori works in a pinch.
Shichi‑mi Tōgarashi (1 teaspoon): Also known as Japanese seven‑spice, this blend brings citrusy, peppery, and slightly sweet notes that balance the richness of the fish. It’s the secret weapon that makes the flavor pop. If you’re out of it, a combo of ground black pepper, a pinch of orange zest, and a dash of sesame seeds can mimic the profile.
Everything’s prepped? Good. Let’s get into the real action…
The Method — Step by Step
Start by rinsing the sushi rice under cold water until the runoff is clear. Drain and let it sit for 30 minutes; this resting period allows the grains to absorb water evenly, preventing uneven cooking. Transfer the rice to a rice cooker, add the appropriate amount of water (usually 1.2 × the rice volume), and set it to “cook.” While the rice is cooking, preheat your oven to 350°F (175°C). The moment the rice cooker beeps, you’ll know the base is ready for the next step.
While the rice cooks, prepare the taco shells. Lay them on a baking sheet, brush each with a light drizzle of sesame oil, and pop them into the preheated oven for 5‑7 minutes, just until they turn a golden amber and emit a toasty aroma. Keep an eye on them; you want that perfect crunch, not a burnt edge. When they’re done, let them cool on a wire rack—this ensures steam escapes and the shells stay crisp.
Once the rice is cooked, transfer it to a large bowl and season it with a splash of rice vinegar, a pinch of sugar, and a pinch of salt. Fold gently with a wooden spoon, fanning the rice as you go to cool it quickly and give it that glossy sheen. Then, spread the rice onto a parchment‑lined baking sheet and place it in the freezer for exactly 5 minutes. This quick chill firms the grains, ensuring they won’t slip out of the taco shell later.
Now, tackle the fish. If you’re using raw sushi‑grade salmon or tuna, dice it into bite‑size cubes and toss with a mixture of soy sauce, a dash of lime juice, and a drizzle of chili oil. If you prefer a lightly seared finish, heat a non‑stick pan over high heat, add a teaspoon of oil, and sear the fish for 30 seconds per side—just enough to develop a caramelized crust while keeping the interior buttery. Watch Out: Overcooking will turn the delicate flesh into a rubbery texture, ruining the whole experience.
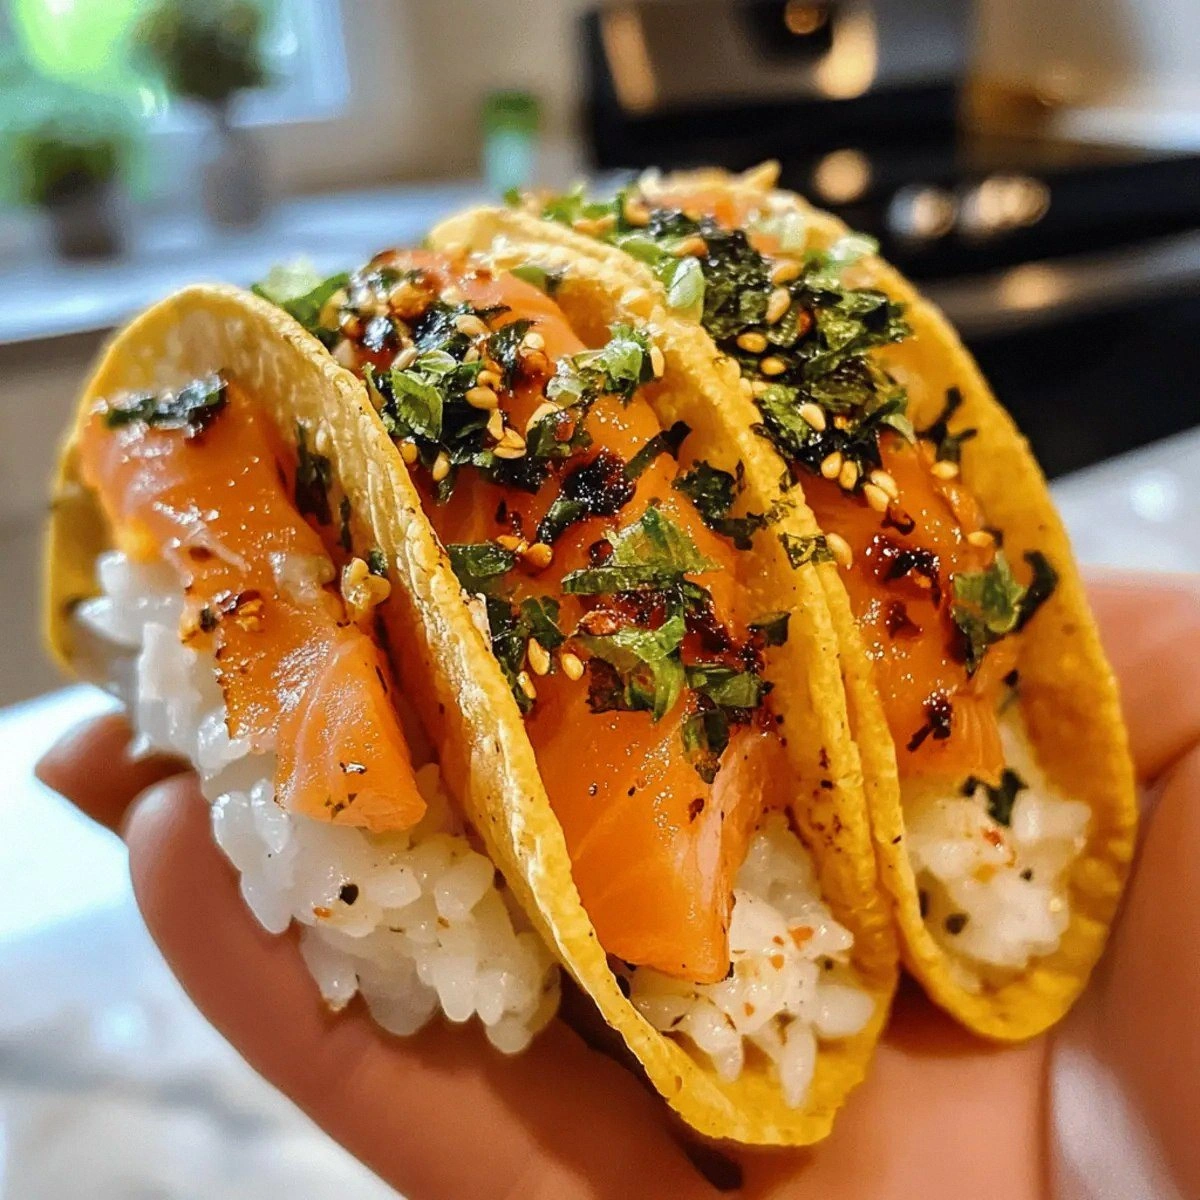
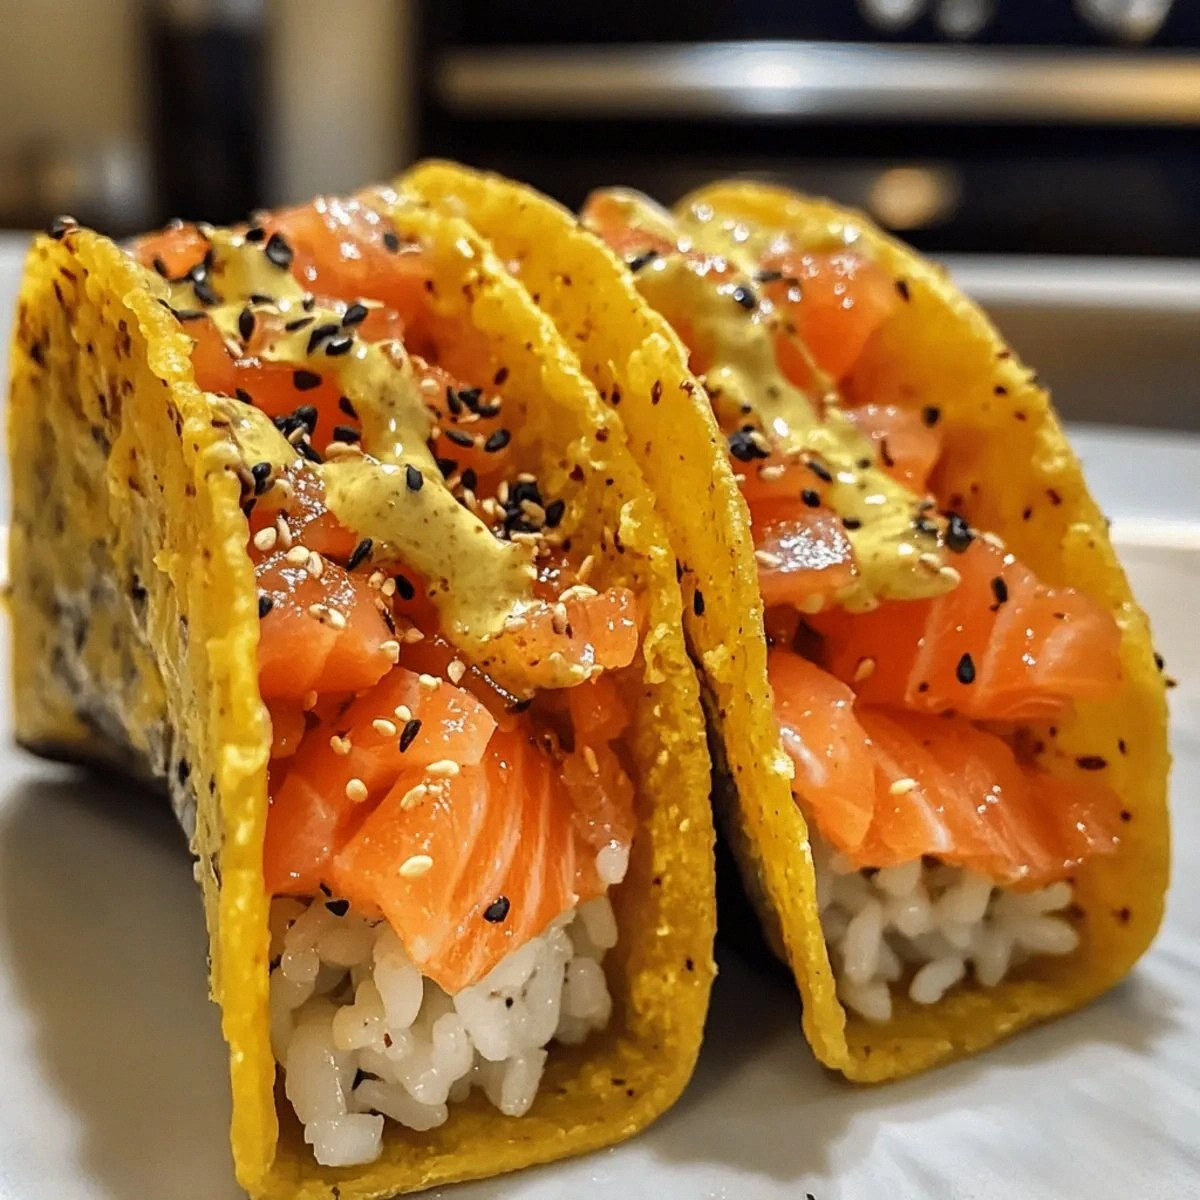
With the rice chilled and the fish ready, it’s assembly time. Take a warm taco shell, spoon a modest mound of rice onto the center—about a tablespoon per taco. Press gently with the back of a spoon to create a little “well.” Then, add a generous spoonful of the spicy fish, letting the pink hues peek out. Sprinkle furikake evenly over the top, followed by a light dusting of shichi‑mi tōgarashi for that signature heat. The visual contrast should make your mouth water before you even take a bite.
Give each taco a final quick blast in the oven—just 1‑2 minutes—to meld the flavors together. You’ll hear a faint sizzle as the furikake meets the warm rice, and the aroma will fill the kitchen like a promise of pure delight. Pull them out, let them sit for a moment to let the heat settle, then serve immediately. The moment the taco hits the plate, you’ll notice the steam rising, the colors bright, and the crunch audible.
Finally, plate the tacos on a wooden board, garnish with thin slices of cucumber, a drizzle of sriracha mayo, and a wedge of lime. The lime’s acidity will cut through the richness, while the cucumber adds a fresh crunch. Serve with a side of edamame or a simple miso soup, and you’ve got a dinner that feels both playful and sophisticated. Picture yourself pulling this out of the oven, the whole kitchen smelling incredible—this is the kind of moment that makes you want to host every weekend.
That's it — you did it. But hold on, I've got a few more tricks that'll take this to another level...
Insider Tricks for Flawless Results
The Temperature Rule Nobody Follows
Most home cooks think “room temperature” fish is fine, but the truth is a slight chill (around 50°F/10°C) keeps the flesh firm and prevents it from breaking apart when diced. I once left the salmon on the counter for an hour and ended up with mushy pieces that dissolved into the rice. Keep the fish in the fridge until the very moment you’re ready to dice, then give it a quick 5‑minute rest on the counter before cutting. This small temperature tweak preserves texture and makes each bite feel buttery.
Why Your Nose Knows Best
Before you even taste, trust the aroma. When the rice is perfectly seasoned, you’ll detect a faint sweet‑vinegar scent mingling with the nutty undertones of furikake. If the smell leans too heavily toward raw vinegar, the rice needs a bit more sugar or a pinch more salt. Your nose is a built‑in flavor sensor—use it to fine‑tune the seasoning before the fish even hits the plate.
The 5‑Minute Rest That Changes Everything
After assembling each taco, let them sit for exactly five minutes before serving. This short rest allows the heat from the fish to soften the rice just enough to meld the flavors without making the shell soggy. I once served them immediately and the rice was stubbornly cold, creating a jarring temperature contrast. The five‑minute pause is the secret that turns a good taco into a great one.
Don’t Overcrowd the Shell
It’s tempting to pile on as much rice and fish as possible, but overstuffed tacos collapse under their own weight. Aim for a balanced ratio: a tablespoon of rice, a generous spoonful of fish, and a light dusting of toppings. This ensures each bite has a harmonious texture—crunch, chew, and melt—all in one mouthful. A friend tried loading theirs with double the fish once; the result was a soggy, floppy disaster that fell apart on the plate.
Finish with a Splash of Citrus
Just before serving, squeeze a tiny wedge of lime over each taco. The acid brightens the flavors, cutting through the richness of the fish and the umami of the furikake. It’s the final brushstroke on a culinary canvas. If you’re a fan of extra zing, add a dash of yuzu juice instead of lime for an exotic twist.
Creative Twists and Variations
This recipe is a playground. Here are some of my favorite ways to switch things up:
Tempura Crunch
Swap the toasted taco shell for a tempura‑battered taco. Dip each shell in a light tempura batter, fry until airy and golden, then assemble as usual. The result is a cloud‑like crunch that pairs beautifully with the buttery fish.
Veggie‑Heavy
Replace half of the rice with finely shredded cabbage and carrot mix tossed in rice vinegar. This adds a refreshing crunch and makes the dish lighter, perfect for a summer dinner party.
Spicy Mayo Drizzle
Mix Japanese mayo with sriracha and a touch of wasabi for a creamy, fiery drizzle. Spoon it over the assembled tacos for an extra layer of heat that melts into the fish.
Quinoa Base
For a gluten‑free twist, use cooked quinoa seasoned with a splash of rice vinegar instead of sushi rice. The nutty flavor of quinoa adds depth, while still holding the toppings together.
Smoked Salmon Version
Swap the raw spicy salmon for smoked salmon, and reduce the heat by using a milder shichi‑mi blend. The smoky aroma adds a sophisticated note that pairs wonderfully with a dill‑infused cream cheese topping.
Sweet & Savory
Incorporate a thin slice of mango or pineapple under the fish for a burst of tropical sweetness. The fruit’s acidity balances the spice, creating a harmonious sweet‑savory dance.
Storing and Bringing It Back to Life
Fridge Storage
Place any leftover assembled tacos in an airtight container lined with a paper towel to absorb excess moisture. They’ll stay fresh for up to 24 hours, though the shells may lose some crispness. Re‑crisp them in a 350°F oven for 3‑4 minutes before serving.
Freezer Friendly
Separate the components: freeze the seasoned rice on a parchment sheet, the fish in a zip‑top bag, and the taco shells in a sealed container. When ready to eat, thaw the rice in the refrigerator overnight, warm the fish gently, and re‑toast the shells. This method preserves texture and flavor for up to a month.
Best Reheating Method
To revive the tacos, place them on a baking sheet, add a tiny splash of water (about a teaspoon) to the rice, and cover loosely with foil. Heat in a 350°F oven for 5‑7 minutes. The steam created by the water brings the rice back to its original fluffiness without sogging the shell.