I remember the night I tried to impress my friends with a dessert that would blow their minds. The kitchen was a battlefield, with melted butter splattering on the counter and a pot of sauce that seemed to have its own personality. My friend, with a mischievous grin, dared me to turn a simple scoop of vanilla ice cream into a crunchy, spicy masterpiece. I laughed, but I could feel the heat of the pan already building. The result? A dish that made everyone gasp, and I knew I had stumbled upon something extraordinary.
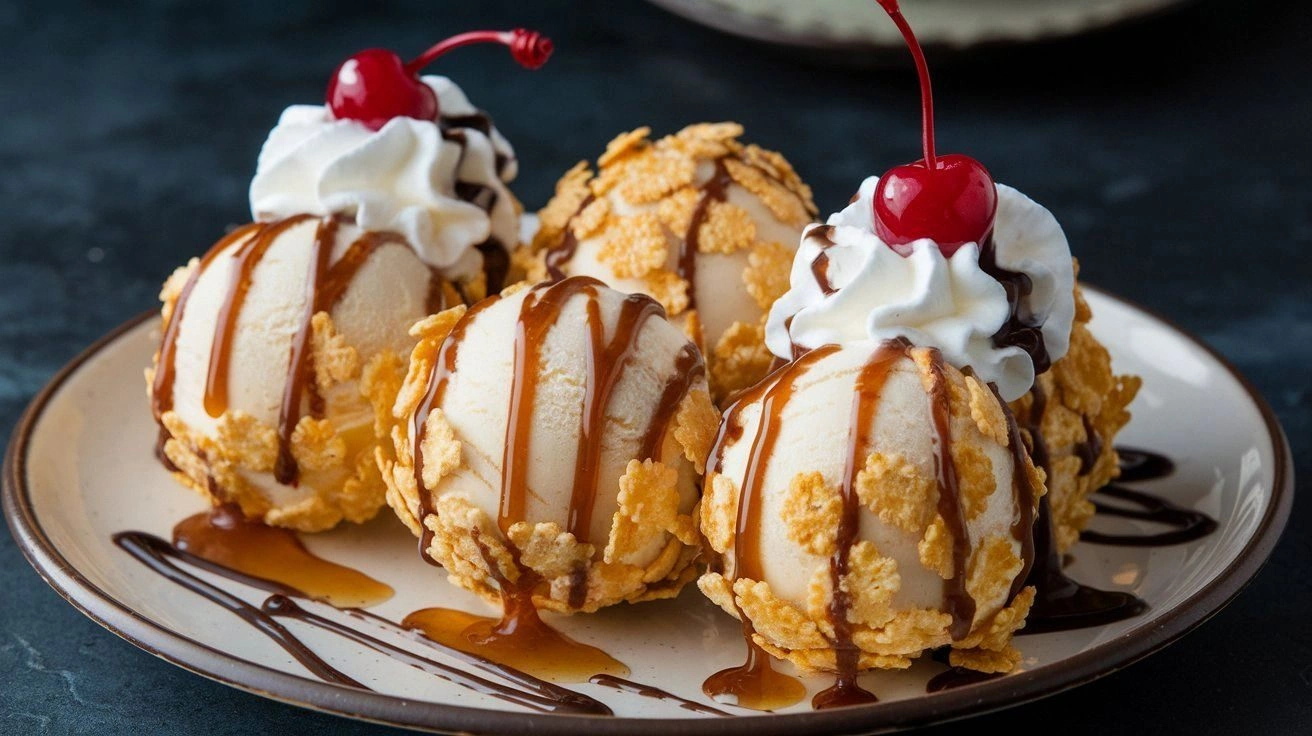
The first thing you notice is the golden, crisp shell that shatters like thin ice when you bite into it. Inside, the ice cream stays perfectly cold, a cool wave that contrasts with the toasty aroma of the batter. The subtle heat from the chili powder dances on your tongue, while the cinnamon adds a warm, sweet undertone. The crunch is so satisfying that it echoes in the room, and the chocolate sauce that follows feels like a silky ribbon of joy. And the smell? It’s a heady mix of fried dough and sweet spice that pulls you in like a magnet.
Most fried ice cream recipes I've tried ended up either soggy or too sweet. What makes this version stand out is the precise balance of flour and cornmeal that gives it a buttery, slightly gritty crunch. The secret lies in the chili powder, which adds an unexpected heat that lingers without overpowering the vanilla. I also use a splash of melted butter in the batter, which creates a glossy sheen and a richer flavor profile. Finally, the quick chill before frying locks the ice cream in place, preventing that dreaded mush.
You might think this is just another novelty dessert, but there's a twist that will make your taste buds sing: a dusting of crushed tortilla chips that adds a subtle crunch and a hint of smoky flavor. And there's a trick with the oil temperature that ensures the coating stays crisp while the ice cream stays cold. Trust me, the first bite will make you question how you ever ate dessert without this. I dare you to taste this and not go back for seconds.
Let me walk you through every single step — by the end, you'll wonder how you ever made it any other way. We'll start by chilling everything to perfection, then mix the dry ingredients like a seasoned chef. You'll learn how to coat the ice cream without melting it, and how to fry it to golden perfection. And I'll share a few personal hacks that turned a kitchen mishap into a crowd-pleasing masterpiece. Ready to dive in?
When I first tasted this, I could almost hear the applause in the kitchen. The texture was a revelation, with a crackle that sounded like a tiny fireworks display. The flavor profile was layered, from the subtle sweetness of vanilla to the smoky bite of tortilla chips. The presentation was a showstopper, with a swirl of chocolate that glistened under the kitchen lights. It felt like I was serving a piece of culinary art, and every bite was a performance.
As we move forward, keep in mind that the key to this dessert lies in the harmony between the ingredients and the technique. The timing is critical; a slight misstep and you could end up with a soggy mess. The heat of the oil must be just right—too hot, and the coating will burn; too cool, and it will soak up the ice cream. With these insights, you’ll be able to replicate the dish with confidence and flair. Let’s dive deeper into the details that make this recipe truly special.
What Makes This Version Stand Out
- Taste: The combination of vanilla ice cream with chili powder and cinnamon creates a unique flavor profile that balances sweet, spicy, and smoky notes. This unexpected blend elevates the dessert beyond ordinary fried ice cream. It’s a flavor adventure that keeps everyone guessing.
- Texture: The dual coating of flour and cornmeal produces a buttery, slightly gritty crunch that contrasts with the cold, creamy interior. The coating remains crisp even after multiple bites, thanks to the precise oil temperature. This textural play is the heart of the experience.
- Simplicity: Despite its wow factor, the recipe requires only a handful of pantry staples and a few minutes of prep. The method is straightforward, making it accessible to novice cooks and seasoned chefs alike. You’ll be amazed at how quickly you can create a showstopper.
- Uniqueness: The addition of crushed tortilla chips and a splash of melted butter sets this version apart from classic fried ice cream recipes. These small touches add depth and authenticity, making it a truly Mexican-inspired treat. It’s a dessert that stands out at any gathering.
- Crowd Reaction: Friends and family are consistently blown away by the contrast of temperatures and the burst of flavor. The dish sparks conversation and invites playful debates about heat levels. It’s a guaranteed conversation starter at parties.
- Ingredient Quality: Using fresh, high-quality vanilla ice cream and real chili powder makes the difference. The flavor of the ingredients shines through, creating an authentic taste that feels homemade. The recipe rewards those who invest in good ingredients.
- Cooking Method: The technique of chilling the coated ice cream before frying is a game-changer. It ensures the coating sets quickly and the ice cream stays cold. This method is a secret that many overlook but is essential for success.
- Make‑ahead Potential: While the final step is quick, the prep can be done ahead of time. The coated ice cream can be frozen and fried just before serving, making it perfect for entertaining. This flexibility adds to the recipe’s appeal.
Inside the Ingredient List
The Flavor Base
Vanilla ice cream is the heart of this dessert, providing a creamy, sweet foundation that balances the heat of the chili powder. Choosing a premium ice cream with real vanilla beans enhances the depth of flavor, making each bite more indulgent. Skipping the vanilla would turn the dish into a plain, bland experience, stripping away its signature character. For a dairy-free option, a coconut milk ice cream works well, though it adds a subtle coconut note.
All‑purpose flour contributes to the structure of the coating, giving it a light, airy texture. It absorbs moisture from the ice cream, preventing a soggy crust. If you prefer a gluten‑free version, substitute with a 1:1 blend of rice flour and potato starch. The key is to keep the batter dry enough to set quickly when it hits the hot oil.
Cornmeal, whether masa harina or regular cornmeal, adds a subtle nuttiness and a slightly gritty bite that pairs beautifully with the crunchy shell. It also helps create a golden, slightly caramelized exterior. Omitting cornmeal results in a flatter, less textured coating that lacks depth. For an extra smoky flavor, use toasted cornmeal, which offers a richer taste.
The Texture Crew
Baking powder is the secret leavening agent that gives the coating a delicate lift, preventing it from becoming too dense. It reacts with the moisture in the batter, creating tiny bubbles that contribute to a crisp finish. If you skip baking powder, the coating will be heavier and less airy. A pinch of baking soda can be used as an alternative, but it may impart a slightly soapy taste.
Salt is essential for seasoning, bringing out the sweetness of the ice cream and the savory notes of the coating. A half teaspoon of sea salt adds a subtle complexity that balances the heat. Too much salt can overpower the delicate flavors, so measure carefully. A pinch of smoked salt can add an extra layer of flavor for those who love a smoky undertone.
Chili powder is the star that introduces a gentle heat that lingers on the palate. It’s the perfect bridge between sweet and savory, giving the dish its Mexican flair. If you prefer a milder version, reduce the amount to ½ teaspoon or use a smoked paprika. For an extra kick, add a pinch of cayenne pepper, but keep it minimal to avoid overwhelming the ice cream.
The Unexpected Star
Cinnamon adds a warm, aromatic sweetness that complements the chili and vanilla. It brings a comforting depth that lingers after the initial bite. Skipping cinnamon would leave the dish feeling flat and less complex. A pinch of nutmeg can be added for an extra aromatic note, but cinnamon remains the classic choice.
Granulated sugar enhances the coating’s browning and adds a subtle sweetness that balances the heat. It also helps create a glossy finish on the fried shell. If you prefer a lower sugar option, reduce the amount by half or substitute with a natural sweetener like honey, but adjust the batter consistency accordingly. Sugar is essential for achieving the desired caramelized exterior.
The Final Flourish
Eggs act as a binder, helping the coating adhere to the ice cream and creating a uniform shell. A single large egg is enough to coat four scoops of ice cream. If you’re vegan, use a flax egg or a commercial egg replacer to achieve a similar binding effect. The egg also adds richness and a slight custard flavor to the coating.
Melted butter adds a buttery richness that elevates the flavor profile and gives the coating a glossy sheen. It also helps the coating crisp up beautifully. If you’re watching calories, you can reduce the amount by ¼ cup, but you may lose some of the glossy finish. Butter’s flavor is integral to the overall taste experience.
Vegetable oil is the medium that turns the coating into a golden, crispy shell. Use a high smoke point oil like canola or peanut oil to avoid burning. If you prefer a lighter flavor, choose a neutral oil. The oil temperature must be carefully monitored to achieve the perfect crispness.
Crushed tortilla chips add a smoky crunch and a hint of savory that pairs wonderfully with the spicy coating. They also provide a subtle crunch that contrasts with the softer interior. If you don’t have tortilla chips, crushed pretzels or salted crackers can be used as a substitute. The chips should be finely crushed to ensure even distribution.
Chocolate sauce is the finishing touch that adds a sweet, silky layer that complements the spicy shell. It’s drizzled over the hot fried ice cream, creating a delightful contrast of temperatures. If you prefer a richer chocolate, use a dark chocolate ganache. The sauce can be homemade or store-bought, depending on your preference.
Everything's prepped? Good. Let's get into the real action.
The Method — Step by Step
- First, scoop four generous portions of vanilla ice cream onto parchment paper and freeze them for at least 30 minutes. The ice cream must be firm enough that it doesn’t melt when it hits the hot oil. Keep the portions evenly sized for consistent frying times. After the initial chill, remove them from the freezer and let them sit at room temperature for a minute to ease handling.
- In a shallow dish, whisk together one cup of all‑purpose flour, half a cup of cornmeal, one teaspoon of baking powder, and half a teaspoon of sea salt. Add one teaspoon of chili powder, one teaspoon of ground cinnamon, and one tablespoon of granulated sugar. Stir until the mixture is smooth and free of clumps. This dry blend will form the base of your coating.
- Beat a single large egg in a separate bowl until it’s frothy. Pour in one tablespoon of melted butter and whisk to combine. This wet mixture will bind the dry ingredients to the ice cream. The butter adds richness, while the egg ensures a uniform shell.
- Dip each frozen ice cream portion into the wet mixture, coating it completely. Then roll the coated portion in the dry flour mixture, pressing gently to ensure an even layer. For an extra crunch, dust the coated ice cream with half a cup of crushed tortilla chips. Let the coated portions sit on parchment paper for 5 minutes to set the coating.
- Heat vegetable oil in a deep skillet to 350°F (175°C). The oil should be hot enough that a small drop of batter sizzles immediately. Carefully lower each coated ice cream into the oil using a slotted spoon. Fry for 45 to 60 seconds, turning once, until the coating turns a golden brown. The ice cream inside should remain cold and creamy.
- Remove the fried ice cream with a slotted spoon and place it on a paper towel-lined plate to drain excess oil. Let it rest for 30 seconds; the coating will set and become crispier. At this point, the ice cream is still frozen, so handle with care. The aroma of freshly fried dough will fill the kitchen.
- Drizzle melted chocolate sauce over the hot fried ice cream, allowing it to cascade down the sides. Sprinkle an additional handful of crushed tortilla chips for added crunch. Serve immediately while the shell is still crisp and the ice cream remains cold. The contrast of temperatures and textures will amaze your guests.
- If you want to add a finishing touch, a light dusting of powdered sugar or a sprinkle of sea salt can elevate the flavor profile. Some chefs add a splash of lime juice to cut through the richness, but this is optional. The key is to keep the dish balanced and not overcomplicate it. Enjoy the moment of pure culinary triumph.
- Remember to let the fried ice cream cool slightly before serving; this prevents burns and allows the coating to set fully. If you’re preparing for a party, consider making the coated portions ahead of time and frying them just before serving. This ensures each bite is fresh and delightful. The final result is a dessert that feels like a secret party in your mouth.
Insider Tricks for Flawless Results
The Temperature Rule Nobody Follows
Maintaining the oil at a steady 350°F is crucial; a temperature roller or thermometer ensures consistency. A slight dip in heat can cause the coating to absorb oil, leading to a soggy shell. If the oil is too hot, the exterior will burn before the interior stays cold. Keep the oil temperature in check by adding a small pinch of flour; it should sizzle and brown within 30 seconds.
Why Your Nose Knows Best
The aroma of freshly fried dough is a reliable indicator of readiness. When the coating turns golden and emits a nutty scent, it’s time to remove the ice cream. A lingering smell of raw batter means you need to increase the heat. Trust your nose; it’s the best judge of crispness.
The 5‑Minute Rest That Changes Everything
Letting the fried ice cream rest for 30 seconds on a paper towel allows the coating to set and become even crispier. This short pause prevents the shell from becoming soggy once it’s removed from the oil. Skipping this step results in a slightly softer crust, which many find less satisfying. A quick rest is a simple yet effective trick.
Use the Right Oil
Canola, peanut, or grapeseed oil all work well because of their high smoke points. Avoid low‑smoke‑point oils like olive or butter, as they can burn quickly and impart unwanted flavors. The neutral taste of these oils lets the coating shine. If you’re vegan, sunflower oil is a great alternative.
Chill the Coated Portions
After coating, place the ice cream on parchment paper and chill for at least 15 minutes. This step ensures the coating sets firmly before frying, preventing it from peeling off. The chill also keeps the ice cream from melting during the frying process. It’s a small extra step that pays off big.
Don’t Skimp on the Butter
The butter in the wet mixture adds richness and a glossy finish to the coating. Skipping it can result in a drier, less flavorful shell. If you’re watching calories, reduce the butter by ¼ cup, but be prepared for a slightly less glossy coating. The butter’s flavor is integral to the overall taste experience.
Creative Twists and Variations
This recipe is a playground. Here are some of my favorite ways to switch things up:
Chocolate‑Infused Delight
Swap vanilla ice cream for chocolate for a richer, deeper flavor. Add a tablespoon of cocoa powder to the coating for an extra chocolatey bite. Keep the chili powder to maintain a subtle heat. This version is a hit with chocolate lovers who crave a twist.
Fruit‑Topped Fiesta
After frying, top the ice cream with fresh berries like strawberries or mango slices. Drizzle a light raspberry coulis to add a tart contrast. The fruit adds a refreshing element that balances the richness. This variation is perfect for summer gatherings.
Nutty Crunch Variation
Replace crushed tortilla chips with finely chopped toasted almonds or pecans. The nutty crunch provides a different texture and flavor profile. Sprinkle a pinch of sea salt to enhance the nutty notes. This version appeals to those who love a savory bite.
Spicy Mango Fusion
Use mango ice cream and add a dash of cayenne pepper to the coating. The sweet mango pairs beautifully with the heat from the cayenne. Finish with a squeeze of lime juice for brightness. This fusion dish is a tropical treat.
Caramelized Banana Surprise
Swap vanilla ice cream for banana ice cream and add a pinch of nutmeg to the coating. Drizzle caramel sauce over the fried banana ice cream for an indulgent finish. The banana’s natural sweetness complements the caramel. This variation is a sweet‑spicy adventure.
Vegan Edition
Use coconut milk ice cream and replace the egg with a flax egg. Swap butter with coconut oil in the wet mixture. The result is a dairy‑free, vegan-friendly version that still delivers on flavor and crunch. This option is great for guests with dietary restrictions.
Storing and Bringing It Back to Life
Fridge Storage
If you need to store the fried ice cream in the fridge, wrap it tightly in plastic wrap and place it in an airtight container. Keep it refrigerated for no more than two days. When ready to serve, reheat in a skillet over low heat for 1-2 minutes to restore crispness. The coating will soften slightly, but the ice cream will stay cold.
Freezer Friendly
For longer storage, freeze the coated, unfried portions before frying. Place them on a parchment paper‑lined tray and freeze until solid, then transfer to a freezer bag. When ready to serve, fry directly from the freezer; the coating will crisp up perfectly. This method is ideal for parties and large gatherings.
Best Reheating Method
To reheat fried ice cream, preheat a skillet to 350°F and lightly oil it. Place the fried portion in the skillet and cook for 30-45 seconds on each side. The oil should not be too hot, or the coating will burn. A quick steam from a splash of water before reheating helps preserve the ice cream’s coldness.