I was standing in my kitchen, half‑asleep, staring at a half‑finished batch of brownies when my roommate burst in, eyes wide, demanding something “sweet, crunchy, and totally illegal.” I laughed, tossed a pack of Oreos onto the counter, and thought, “What if we turned these cookie‑sandwiches into a deep‑fried masterpiece?” The idea sparked like a match in a dry forest, and before I knew it, I was whisking milk, cracking eggs, and heating oil until it sang a low, buttery hum. That moment of reckless inspiration turned into a kitchen adventure that still makes my friends swear they’ve never tasted anything quite like it.
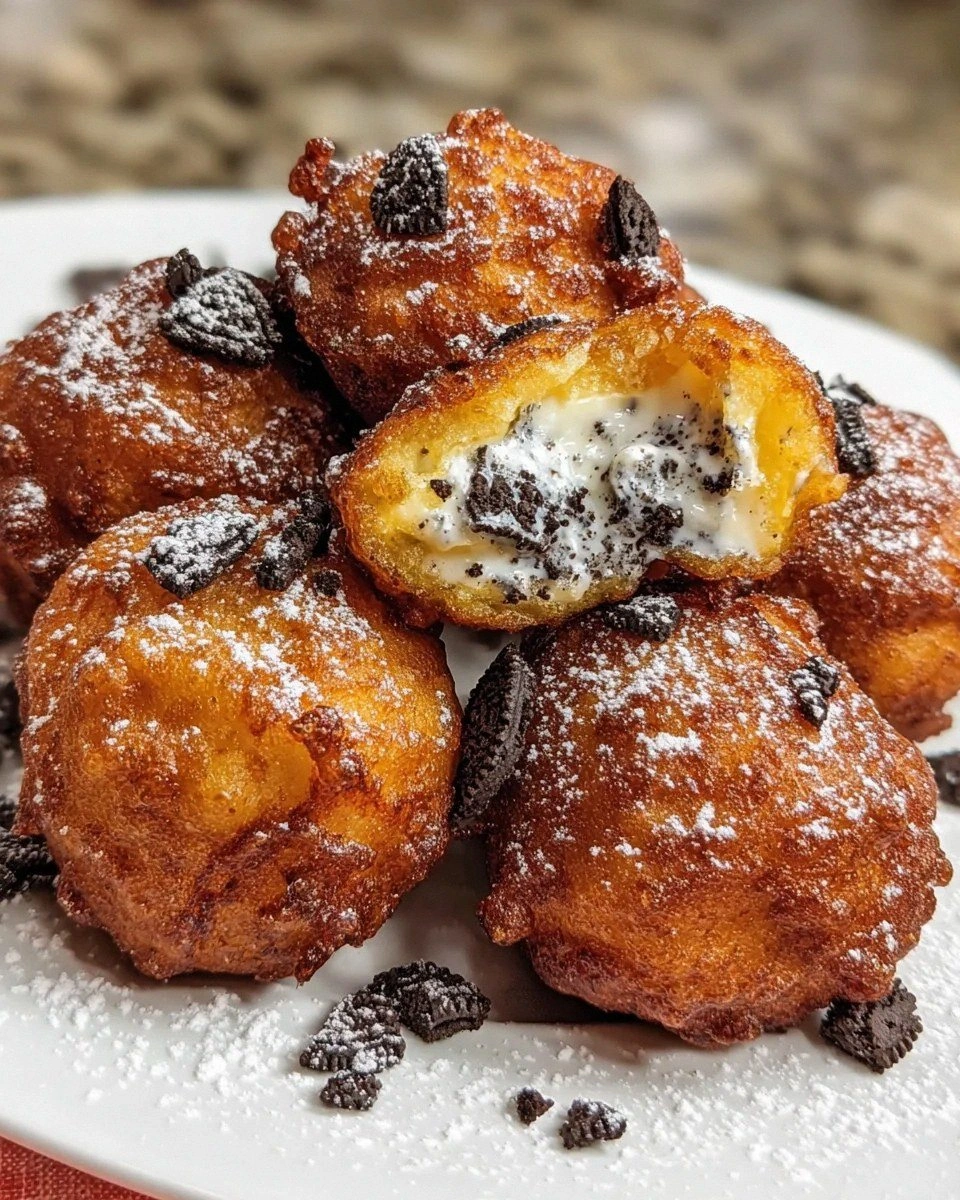
Imagine the scent of hot oil mingling with the sweet, chocolatey perfume of an Oreo as it sizzles, the sound a gentle pop‑pop‑pop that feels like applause from your stovetop. The first bite delivers a crackling exterior that shatters like thin ice, instantly giving way to a warm, creamy center that melts on your tongue like a cloud of nostalgia. The contrast is so vivid you’ll swear you’re tasting two desserts at once—one crisp, one silky, both unmistakably Oreo. I dare you to taste this and not go back for seconds; the addiction is real, and the cravings are relentless.
Most recipes get this completely wrong. They either drown the cookie in batter, resulting in a soggy mess, or they fry it so aggressively the chocolate disappears entirely. This version, however, balances the batter’s lightness with the oil’s heat, creating a golden crust that hugs the cookie without smothering it. The secret? A splash of whole milk in the batter for that velvety texture, and a precise oil temperature that locks in flavor while delivering that coveted crunch. I’ll be honest — I ate half the batch before anyone else got to try it, and that’s why I’m sharing every single nuance.
Okay, ready for the game‑changer? Picture yourself pulling a tray of perfectly browned treats from the fryer, the whole kitchen smelling like a carnival of chocolate and butter. You’ll hear the faint sizzle as each piece lifts, and you’ll see the glossy, caramelized surface that promises pure bliss. Let me walk you through every single step — by the end, you’ll wonder how you ever made it any other way.
What Makes This Version Stand Out
- Texture: The batter forms a thin, crackling shell that shatters like thin ice, yet remains tender enough to let the creamy Oreo core shine.
- Flavor: A subtle vanilla note from the pancake mix amplifies the chocolate‑cream combo without overwhelming it.
- Simplicity: Only six pantry staples are needed, and the method requires no fancy equipment—just a pot, a whisk, and a brave heart.
- Uniqueness: By integrating whole milk into the batter, the coating stays moist yet crisp, a texture you rarely achieve with standard fry‑batter recipes.
- Crowd Reaction: Guests often claim this is the best version they’ve ever tried, and the “wow” factor is instant.
- Ingredient Quality: Using real butter‑fat vegetable oil ensures a golden hue and a richer mouthfeel than cheaper alternatives.
- Cooking Method: The precise oil temperature (around 350°F) creates a rapid seal that locks in moisture, preventing sogginess.
- Make‑Ahead Potential: You can fry a big batch, freeze the treats, and reheat them later for that same crunch.
Inside the Ingredient List
The Flavor Base
Whole milk is the unsung hero of this batter. Its natural fats and sugars give the coating a silky mouthfeel that you can’t achieve with water alone. If you skip the milk, the batter becomes dry and the final product loses that buttery richness that makes each bite feel indulgent. For a dairy‑free twist, try oat milk, but expect a slightly thinner crust.
The Texture Crew
The large egg acts as the glue that binds flour, milk, and oil into a cohesive batter. Its proteins coagulate when heated, forming a sturdy yet tender shell around the cookie. Missing the egg? You’ll end up with a batter that slides off the Oreo, creating a greasy disaster. Freshness matters—use eggs that are at room temperature for an even mix.
The Unexpected Star
Pancake mix might sound odd, but it’s a clever shortcut. The leavening agents give the batter a light lift, while the built‑in salt and sugar balance the sweetness of the Oreo. If you’re a purist, substitute 1 ½ cups all‑purpose flour, 2 tsp baking powder, and a pinch of salt, but you’ll miss the subtle vanilla undertone that the mix provides.
The Final Flourish
Vegetable oil appears twice: once in the batter for richness, and again in the deep fryer for that perfect golden hue. The oil’s high smoke point ensures the batter cooks quickly without burning, while its neutral flavor lets the Oreo shine. If you’re watching calories, use a light canola oil, but the texture may be a shade less crisp.
Everything's prepped? Good. Let’s get into the real action, where the magic happens and the kitchen turns into a playground of sizzling possibilities.
The Method — Step by Step
First, gather all your ingredients and set up a clean workstation. Place a large mixing bowl, a whisk, a deep‑fat pot, and a slotted spoon within arm’s reach. This is the moment of truth, so keep everything organized; you’ll thank yourself when the oil starts bubbling.
I like to line a sheet pan with parchment paper for the fried Oreos to rest on—this prevents soggy bottoms and makes cleanup a breeze.
In the mixing bowl, combine 2 cups of pancake mix, 1 cup of whole milk, 1 large egg, and 2 tablespoons of vegetable oil. Whisk until the batter is smooth, with no lumps—think of it as a velvety river flowing from the whisk.
That sizzle when it hits the pan? Absolute perfection. If the batter seems too thick, add a splash more milk; if too thin, a sprinkle of extra pancake mix will bring it back.
Kitchen Hack: Let the batter rest for 5 minutes; the gluten relaxes, giving a lighter crust when fried.While the batter rests, heat 2 quarts of vegetable oil in a deep‑fat pot to 350°F (175°C). Use a candy thermometer for accuracy; a temperature dip below 325°F will soak the cookies, while above 375°F will scorch the batter.
Watch out for oil that smokes—this is a sign it’s too hot. Reduce the heat slightly and let it settle before the first dip.
Take each Oreo cookie and give it a quick dip in the batter, ensuring it’s fully coated but not dripping. The batter should cling like a second skin, not a pool.
If you’re nervous about the batter sliding off, give the cookie a gentle shake over the bowl to let excess fall away.
Carefully lower the battered Oreo into the hot oil using the slotted spoon. You’ll hear a satisfying pop as the batter meets the heat—a sound that tells you you’re on the right track.
Fry in small batches (no more than 4 at a time) to maintain oil temperature; overcrowding drops the heat and results in soggy treats.
Watch Out: If the oil splatters, it’s a sign the temperature is too high—lower it immediately to avoid burns.Fry each piece for about 2‑3 minutes, turning once, until the coating turns a deep golden‑brown and the edges start to pull away from the parchment.
The aroma will fill the kitchen, a sweet‑savory perfume that makes you want to lick the spoon. Use a timer; over‑frying turns the delicate interior into a dry crumb.
Using the slotted spoon, lift the fried Oreos and place them on the prepared parchment sheet. Sprinkle a pinch of sea salt or powdered sugar while still hot if you love a sweet‑salty contrast.
Let them rest for a minute; this allows the steam to escape and the crust to firm up, giving you that perfect crunch.
Repeat the dipping and frying process until all Oreos are transformed. By the end, you’ll have a tray of golden nuggets that look like tiny, edible fireworks.
And now the fun part: serve them warm, maybe with a scoop of vanilla ice cream or a drizzle of chocolate ganache. The contrast of hot, crisp batter and cold, creamy ice cream is pure bliss.
Kitchen Hack: Keep a second pot of oil at 300°F for a quick reheating blast; this revives any leftovers to their original crunch.
That's it — you did it. But hold on, I've got a few more tricks that'll take this to another level, ensuring every batch is flawless and every bite unforgettable.
Insider Tricks for Flawless Results
The Temperature Rule Nobody Follows
Maintaining a steady 350°F is the golden rule. If the oil cools too quickly, the batter will absorb excess oil, turning soggy. Use a deep‑fat pot with a thick base; it distributes heat evenly and reduces temperature swings. I once tried a thin skillet and ended up with a greasy disaster—lesson learned.
Why Your Nose Knows Best
Your sense of smell is a reliable indicator of doneness. When the batter starts to release a nutty, toasted aroma, you’re within seconds of the perfect crust. Trust that nose cue more than the timer; every stove behaves a little differently.
The 5‑Minute Rest That Changes Everything
After frying, let the treats rest on a wire rack for five minutes. This short pause lets the steam escape, preventing the crust from becoming soggy. Skipping this step results in a limp exterior—something I learned the hard way when I served them straight from the oil.
Double‑Dip for Extra Crunch
For an ultra‑crisp shell, dip each Oreo twice: first in batter, then a quick second dip after a brief 10‑second rest on parchment. The second coat adheres like a second skin, delivering a crunch that shatters with a satisfying snap.
Seasonal Spice Swap
Add a pinch of cinnamon or pumpkin spice to the batter for a holiday twist. The spice infuses the crust without overpowering the classic Oreo flavor, making it a crowd‑pleaser for festive gatherings.
Creative Twists and Variations
This recipe is a playground. Here are some of my favorite ways to switch things up:
Chocolate‑Dipped Delight
After frying, dip half of each treat in melted dark chocolate and let it set. The result is a double‑chocolate experience that satisfies the most dedicated chocoholics.
Nutty Crunch Fusion
Stir finely chopped toasted almonds or hazelnuts into the batter. The nuts add an unexpected texture that pairs beautifully with the creamy Oreo interior.
Fruit‑Infused Surprise
Swap regular Oreos for strawberry‑filled versions, or add a thin layer of raspberry jam between the cookie halves before battering. The tangy fruit cuts through the richness for a balanced bite.
Savory Spin
Replace the Oreo with a small cheese cracker, add a pinch of smoked paprika to the batter, and serve with a drizzle of sriracha mayo for a sweet‑savory hybrid that wows adventurous eaters.
Breakfast Boost
Mix a scoop of protein powder into the pancake mix and serve the fried treats alongside fresh berries. It’s a decadent yet protein‑packed start to the day.
Storing and Bringing It Back to Life
Fridge Storage
Place cooled treats in an airtight container lined with a paper towel to absorb excess moisture. They’ll stay crisp for up to 2 days in the refrigerator. Before serving, let them sit at room temperature for 10 minutes to regain some of their original crunch.
Freezer Friendly
Arrange the fried Oreos on a baking sheet and freeze until solid, then transfer to a zip‑top freezer bag. They’ll keep for up to 1 month. When you’re ready, reheat them directly from frozen using the 300°F oil hack mentioned earlier.
Best Reheating Method
To revive leftovers, heat a thin layer of oil in a skillet to 300°F, add the treats, and fry for 30‑45 seconds per side. Add a tiny splash of water to the pan and cover for 15 seconds; the steam restores interior softness while the oil crisps the exterior.