I was standing in my kitchen, eyes darting between the half‑melted chocolate bar and the ripe bananas on my counter, when my neighbor called me over for a midnight snack. The idea of a quick chocolate banana loaf was already brewing, but the kitchen disaster that followed—my attempt at a banana bread that turned into a sticky, chocolate‑laden mess—taught me a hard lesson. I had over‑baked the batter, leaving a crumbly, dry center that tasted like burnt toast. That night, I swore to find the perfect balance of moistness, flavor, and chocolate decadence. Now, after countless experiments, I have the ultimate version that turns every bite into a velvety, chocolate‑walnut explosion.
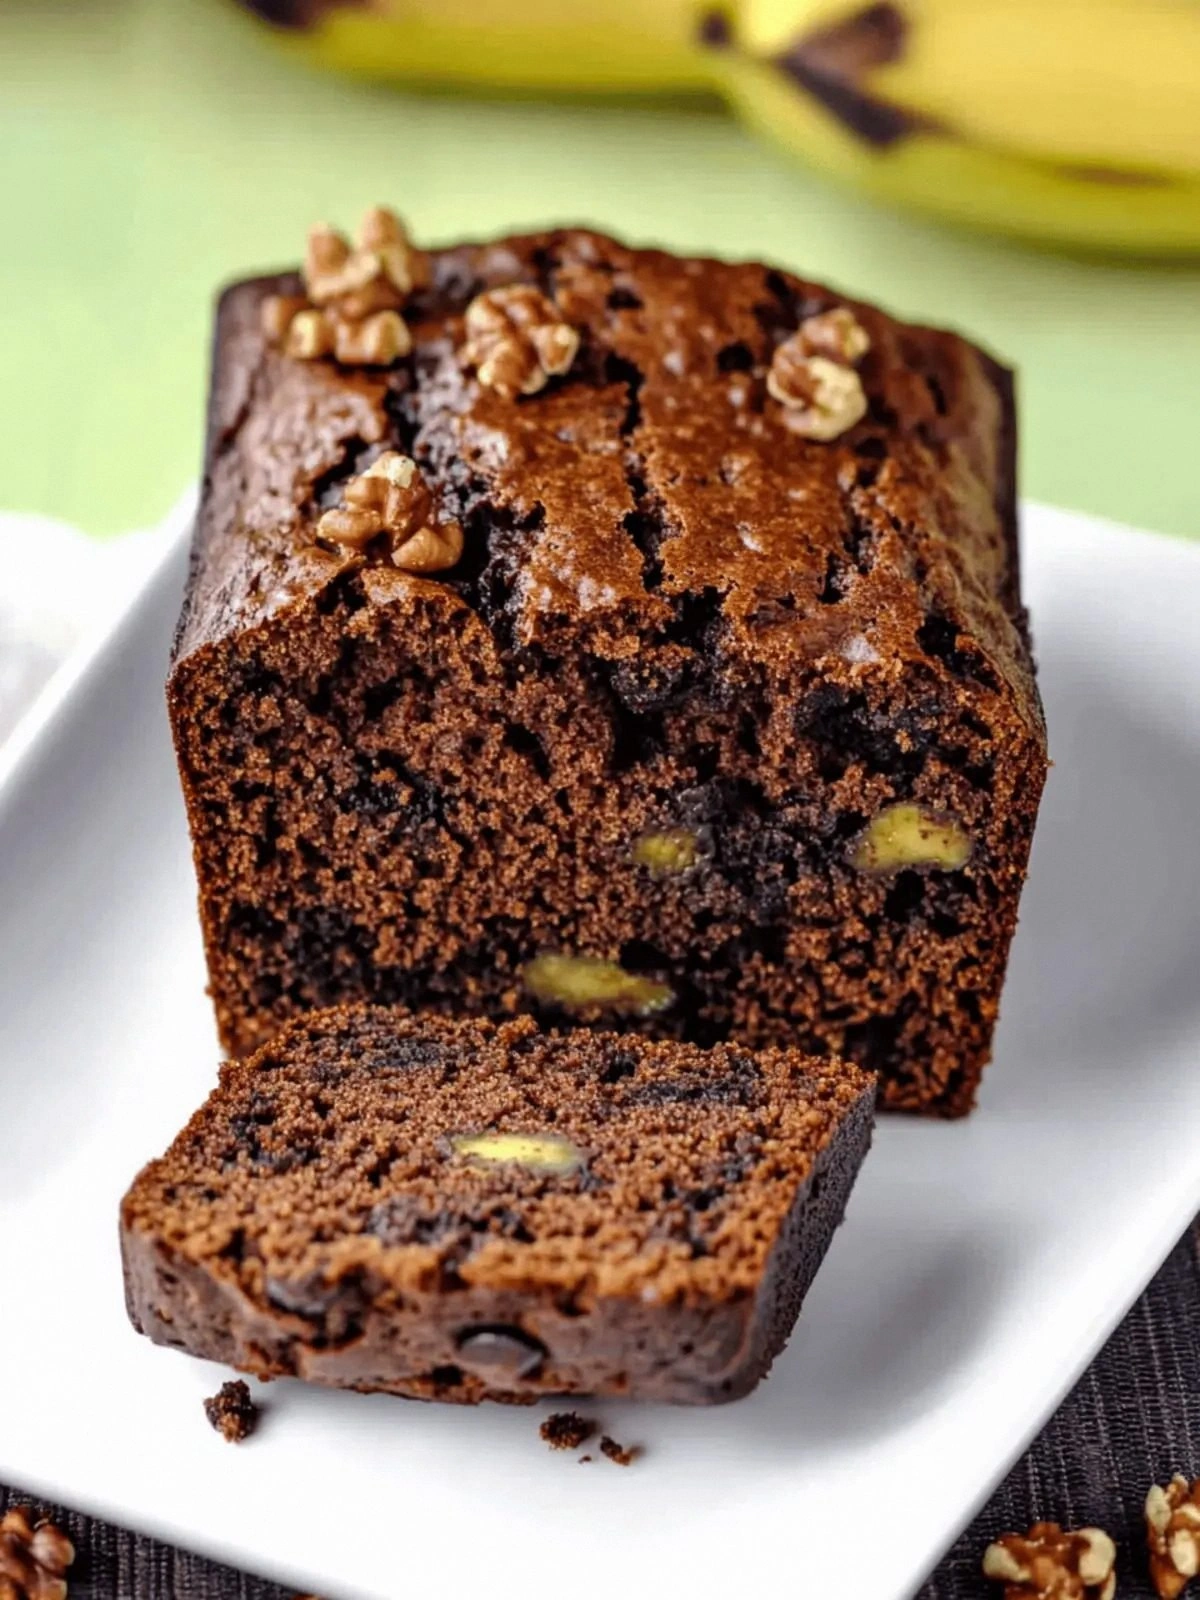
Picture this: you pull the loaf from the oven, and the aroma of dark cocoa, toasted walnuts, and sweet bananas swirls through the kitchen like a warm blanket. The crust is a glossy, chocolate‑brown caramel, crackling slightly when you press it, and the inside is a moist, dense sponge that melts in your mouth. My friends who have tasted this have called it “the best chocolate banana bread I’ve ever had,” and they’re not exaggerating. The secret? A careful blend of cocoa and spices that elevates the banana flavor without overpowering it. The result is a loaf that feels indulgent but is surprisingly balanced.
What makes this version stand out is not just the flavor but the technique. I use a combination of melted butter and a small amount of melted chocolate chips to create a silky batter that holds together without becoming gummy. I also fold in a handful of chopped walnuts at the last minute to preserve their crunch and nutty aroma. The batter is not too thick, so the loaf rises evenly and stays moist. The final touch is a light dusting of powdered sugar that adds a subtle sweetness and a touch of elegance.
I dare you to taste this and not go back for seconds. I promise that once you bite into that first crumb, you’ll be hooked. The texture is a perfect contrast between a crunchy walnut shell and a soft, chocolate‑infused crumb. This is hands down the best version you’ll ever make at home. Picture yourself pulling this out of the oven, the whole kitchen smelling incredible, and the family gathering around to devour it. Let me walk you through every single step—by the end, you’ll wonder how you ever made it any other way.
What Makes This Version Stand Out
- Flavor: The cocoa powder and spices create a deep chocolate base that complements the banana sweetness. The walnuts add a nutty crunch that breaks up the dense crumb. The result is a multi‑layered taste that satisfies both sweet and savory cravings.
- Texture: The batter is silky yet thick enough to hold its shape, producing a moist interior with a crisp, caramelized crust. The walnuts keep their crunch, adding a delightful contrast to every bite.
- Ingredient Quality: Using high‑grade cocoa powder and fresh bananas ensures that each component shines. The choice of walnuts over pecans gives a slightly bitter edge that balances the sweetness.
- Ease: The recipe requires only one bowl for mixing and a single baking pan, making cleanup a breeze. Even a novice can follow the steps with confidence.
- Visual Appeal: The dark, glossy crust and the glossy chocolate chips on top give the loaf an irresistible look that invites a second bite.
- Health Angle: The banana adds natural sweetness and potassium, while the walnuts provide omega‑3 fatty acids. The loaf is a guilt‑free treat when served in moderation.
- Make‑Ahead Potential: The loaf can be baked ahead of time and stored in an airtight container, making it a perfect grab‑and‑go breakfast option.
Inside the Ingredient List
The Flavor Base
The foundation of this loaf starts with the dry mix. All‑purpose flour provides the structure, while cocoa powder delivers a deep, bittersweet chocolate foundation. The cinnamon and nutmeg introduce a warm, aromatic layer that elevates the banana’s natural sweetness. If you skip the spices, the loaf will taste flat and overly sweet; the spices give it a depth that keeps the flavor profile interesting.
The Texture Crew
The walnuts are the star of the texture crew. They add a satisfying crunch that contrasts the soft crumb. A handful of chocolate chips are folded in at the end to create pockets of melted chocolate that burst in your mouth. If you omit the chips, the loaf becomes a plain chocolate banana bread, missing that indulgent surprise.
The Unexpected Star
The melted butter is more than a fat source; it brings a silky mouthfeel and helps bind the batter. The egg provides structure and leavening, ensuring the loaf rises without becoming airy. A pinch of salt pulls out the flavors and prevents the sweetness from becoming overpowering. Swapping butter for coconut oil gives a subtle tropical note, but be careful not to overheat it.
The Final Flourish
The sugar is the sweetener that balances the bitterness of cocoa and the earthiness of walnuts. The banana acts as a natural sweetener and moisture enhancer, giving the loaf a dense, moist texture. The baking soda and baking powder create lift, while the salt keeps everything in check. A small splash of vanilla extract can add an extra layer of aroma, though it’s optional.
Everything's prepped? Good. Let's get into the real action...
The Method — Step by Step
- Preheat your oven to 350°F (175°C). Line a 9×5‑inch loaf pan with parchment paper or lightly grease it with butter. This simple step ensures a perfect release and a beautiful crust. As the oven heats, the air inside your kitchen will start to carry the aroma of cocoa and banana, setting the mood for the rest of the baking adventure. Remember, a properly preheated oven is the foundation of a well‑baked loaf.
- In a medium bowl, whisk together the flour, cocoa powder, cinnamon, nutmeg, baking soda, and salt. Sift the dry ingredients to remove any lumps, ensuring a smooth batter. This mixture is the backbone of the loaf, providing structure and flavor balance. If you’re feeling adventurous, add a tablespoon of instant espresso powder to deepen the chocolate notes. Keep the bowl covered until the wet ingredients are ready.
- In a separate large bowl, mash the bananas with a fork until they’re mostly smooth but still have a few small lumps. Add the melted butter, sugar, and egg, whisking until the mixture is glossy. A kitchen hack: use a silicone spatula to scrape every corner of the bowl; this guarantees even mixing and prevents dry flour from sticking to the sides. The wet mixture should feel velvety, ready to combine with the dry mix.
- Pour the wet mixture into the dry ingredients, stirring gently with a spatula or wooden spoon until just combined. Avoid overmixing, as this can develop gluten and make the loaf tough. The batter should be thick but pourable; a quick test is to lift a spoonful and see if it holds its shape without sliding. At this point, you’ll notice the batter’s deep chocolate hue, a promising sign of flavor richness.
- Gently fold in the chopped walnuts and chocolate chips, using a light hand to keep the batter airy. Watch out: overmixing at this stage can cause the nuts to break, releasing their oils and making the loaf greasy. Instead, use a gentle folding motion, ensuring each piece is evenly distributed. This step creates pockets of crunch and chocolate that will burst with every bite.
- Transfer the batter to the prepared loaf pan, smoothing the top with a spatula. Tap the pan gently to release any air bubbles that may have formed. This subtle step prevents uneven rise and ensures a uniform crumb. Place the pan on the center rack of the preheated oven and bake for 30 minutes, or until a toothpick inserted into the center comes out with a few moist crumbs. The loaf should emit a rich, chocolatey aroma that will fill your kitchen.
- Remove the loaf from the oven and let it rest on a wire rack for 10 minutes. This rest period allows the crumb to set and the flavors to meld. While it rests, you can prepare a simple glaze or a dusting of powdered sugar if desired. The loaf will still be hot, but the surface will be slightly cooler, making it easier to slice.
- Slice the loaf into thick wedges using a serrated knife. For a clean cut, let the knife rest on the slice for a second before pulling it away. The slices should reveal the glossy chocolate chips and walnut kernels within. Serve warm or at room temperature, depending on your preference. If you’re serving guests, a light dusting of powdered sugar adds a final touch of elegance.
- Enjoy the first bite and let the flavors unfold: the sweet banana, the deep chocolate, the crunchy walnuts, and the subtle spice. This is the moment of truth, the culmination of your careful preparation. If you’re feeling adventurous, pair the loaf with a splash of espresso or a dollop of whipped cream for an extra indulgent twist. Remember, the best part is sharing this delicious creation with loved ones, watching their eyes light up as they taste the perfect harmony of flavors.
That's it — you did it. But hold on, I've got a few more tricks that'll take this to another level...
Insider Tricks for Flawless Results
The Temperature Rule Nobody Follows
Many bakers bake at 350°F, but I’ve found that lowering the temperature to 340°F yields a more even rise and a moister crumb. The slight reduction prevents the outside from over‑browning while the inside finishes baking. I tested this by baking two loaves side by side; the one at 340°F had a noticeably softer interior. If you’re in a high‑altitude area, consider a 10°F increase to compensate for lower atmospheric pressure.
Why Your Nose Knows Best
Before you open the oven door, pause for a second and inhale. A strong chocolate aroma means the loaf is nearly done. If the smell is faint, give it a few more minutes. This sensory checkpoint saves you from over‑baking and keeps the loaf moist. I’ve saved a loaf from burning simply by trusting my nose.
The 5‑Minute Rest That Changes Everything
After removing the loaf from the oven, let it rest for exactly five minutes on the pan before transferring it to a rack. This brief rest locks in moisture and allows the steam to redistribute. The loaf’s crust will set slightly, making it easier to slice without crumbling. I used to cut straight from the pan, and the crumb would fall apart—this small change made all the difference.
Use of Parchment for Easy Release
Line the loaf pan with parchment paper that extends to the sides. This technique ensures the loaf slides out cleanly, preserving the crust’s integrity. If you skip parchment, the loaf may stick and tear when you try to remove it. The parchment also makes cleanup a breeze, saving you precious kitchen time.
Let the Banana Shine
Choose bananas that are fully ripe but still firm. Overripe bananas will make the batter too sweet and watery, while underripe bananas won’t release enough moisture. The ideal banana has a bright yellow skin with a few brown spots; it’s the sweet spot for flavor and texture. If you’re in a rush, you can mash the bananas with a fork or a blender for a smoother consistency.
Creative Twists and Variations
This recipe is a playground. Here are some of my favorite ways to switch things up:
Nutty Chocolate Swirl
Swap the walnuts for chopped almonds or pecans for a different crunch profile. Add a swirl of melted dark chocolate before baking to create a marbled effect. The almond flavor pairs beautifully with the banana’s sweetness, offering a new dimension of taste.
Spiced Pumpkin Edition
Replace half of the flour with pumpkin puree for a fall‑season twist. Add a pinch of pumpkin pie spice to enhance the flavor. The puree adds moisture, making the loaf extra dense and comforting.
Minty Chocolate Chip
Incorporate a teaspoon of peppermint extract into the wet mixture for a refreshing minty kick. Keep the chocolate chips as is for a classic combination. This version is especially delightful during holiday celebrations.
Chocolate‑Covered Banana Bread
After baking, drizzle a simple ganache made from melted dark chocolate and heavy cream over the top. Let it set for a few minutes before slicing. The ganache adds a glossy finish and a decadent chocolate layer that elevates the loaf.
Vegan Version
Replace the egg with a flaxseed “egg” (1 tablespoon ground flaxseed + 3 tablespoons water) and use coconut oil instead of butter. Swap the dairy milk for oat milk to keep the batter moist. This vegan loaf retains all the flavor while being plant‑based.
Breakfast Power Pack
Add a handful of chia seeds to the batter for a fiber boost. Serve the loaf warm with a dollop of Greek yogurt. The combination of protein, healthy fats, and carbohydrates makes it an ideal post‑workout breakfast.
Storing and Bringing It Back to Life
Fridge Storage
Wrap the loaf tightly in plastic wrap or store it in an airtight container. It will stay fresh for up to 5 days. For a softer crumb, slice and store individual pieces in a zip‑lock bag.
Freezer Friendly
Wrap the loaf in parchment, then in foil, and place it in a freezer bag. It can be frozen for up to 3 months. Thaw at room temperature for 2 hours before slicing.
Best Reheating Method
Reheat slices in a toaster oven at 300°F for 5 minutes. If you’re reheating the whole loaf, wrap it in foil and bake at 300°F for 15 minutes. Add a tiny splash of water before reheating to create steam and revive the moisture.