I still remember the first time I served roasted cauliflower to my die-hard steak-loving cousin. He took one skeptical bite, those perfectly charred edges crunching between his teeth, and his eyes went wide like he'd just discovered a secret portal to flavor town. "Wait, this is just cauliflower?" he mumbled through a mouthful, already reaching for seconds. That moment — watching someone who thought vegetables were rabbit food transform into a cauliflower evangelist — that's when I knew I'd cracked the code.
Here's the thing: most roasted cauliflower recipes are liars. They promise crispy, golden perfection but deliver sad, steamed florets that taste like disappointment and broken dreams. They tell you to toss everything together, spread it on a pan, and hope for the best. But hope isn't a cooking strategy, my friends. After three years of obsessive testing, burning through more heads of cauliflower than I care to admit, and conducting very scientific taste tests (read: feeding my neighbors until they begged for mercy), I've discovered the holy grail technique that guarantees shatteringly crisp edges, tender centers, and flavor that punches you right in the taste buds.
Picture this: it's 7 PM on a Tuesday, your kitchen is warm from the oven, and you're pulling out a sheet pan of vegetables that looks like it belongs in a magazine. The edges are caramelized to deep mahogany, the seasonings have formed a savory crust, and the aroma — oh, that aroma — is making your neighbors jealous. This isn't just dinner; it's a flex. And the best part? You can achieve this level of vegetable mastery every single time once you understand the method behind the madness.
I dare you to taste this and not go back for seconds. Actually, I dare you to taste this and not immediately text someone about it. The technique I'm about to share isn't just another recipe — it's a complete mindset shift about how we treat our vegetables. Stay with me here — this is worth it. Let me walk you through every single step — by the end, you'll wonder how you ever made it any other way.
What Makes This Version Stand Out
Restaurant-Quality Crisp: We're talking edges that shatter like thin ice, creating that satisfying crunch that makes you close your eyes involuntarily. The secret lies in a two-stage cooking process that most home cooks never consider, transforming humble cauliflower into something that could sit proudly on any fine-dining menu.
Flavor-Packed Seasoning: Most recipes treat seasoning like an afterthought, but here it's the main event. We're building layers of flavor that penetrate deep into each floret, not just sitting on the surface like wallflowers at a dance. Every bite delivers a perfect balance of savory, smoky, and just-enough heat.
Foolproof Technique: This method works whether you're a kitchen novice or a seasoned pro. The steps are so clear and specific that failure becomes impossible. If you've ever struggled with soggy vegetables, you're not alone — and I've got the fix.
Minimal Equipment: One bowl, one sheet pan, and a hot oven. That's it. No fancy gadgets, no special pans you use once and forget about. This recipe respects your kitchen space and your wallet.
Make-Ahead Magic: Prep these bad boys in the morning, keep them in the fridge, and pop them in the oven when you're ready. They'll still emerge just as crispy as if you'd made them fresh. Game-changer for dinner parties or busy weeknights.
Addictively Healthy: Here's where it gets wild — these are actually good for you. Like, genuinely nutritious. You're essentially eating a superfood that tastes like it should be bad for you. Your body and your taste buds can finally agree on something.
Crowd-Pleasing Power: Kids who hate vegetables? Converted. Picky eaters? Begging for more. That friend who claims they don't like cauliflower? They're asking for the recipe before the meal ends. This is the great equalizer of side dishes.
Alright, let's break down exactly what goes into this masterpiece...
Inside the Ingredient List
The Foundation: Choosing Your Cauliflower
The cauliflower you select makes or breaks this dish, and here's why: older cauliflower has already started breaking down its cellular structure, which means more moisture and less crisp potential. You want a head that feels heavy for its size, with tight, creamy-white florets that show no signs of browning. The leaves should look fresh and perky, not wilted like they've given up on life. Give it a gentle squeeze — it should feel dense and compact, not spongy or yielding. If you can only find pre-cut florets, that's fine, but avoid any packages with condensation inside; that's a one-way ticket to Soggy City.
The Flavor Base: Oil and Spices
Olive oil isn't just a cooking medium here — it's a flavor vehicle that carries all our seasonings into every nook and cranny of the cauliflower. Use a good quality extra virgin olive oil, but not your fancy finishing oil. This needs to stand up to high heat while still bringing fruity, peppery notes to the party. The garlic powder and onion powder are the dynamic duo of the spice world, providing deep, savory undertones that make people ask "what's that amazing smell?" Smoked paprika is the secret weapon, adding complexity and that irresistible barbecue-like aroma without any actual smoking required. It's like liquid camping memories, but edible.
The Heat Factor: Controlling the Burn
Cayenne pepper is optional, but I urge you to try it at least once. We're using just enough to wake up your taste buds, not enough to send you running for milk. It adds a gentle warmth that builds slowly, making each bite slightly more addictive than the last. If you're feeding spice-sensitive folks, you can absolutely skip it, but consider adding a pinch of sweet paprika instead to maintain the color complexity without the heat. The black pepper, though, is non-negotiable. Freshly ground, it adds floral notes and a sharp bite that pre-ground pepper wishes it could achieve.
The Finishing Touch: Parmesan and Herbs
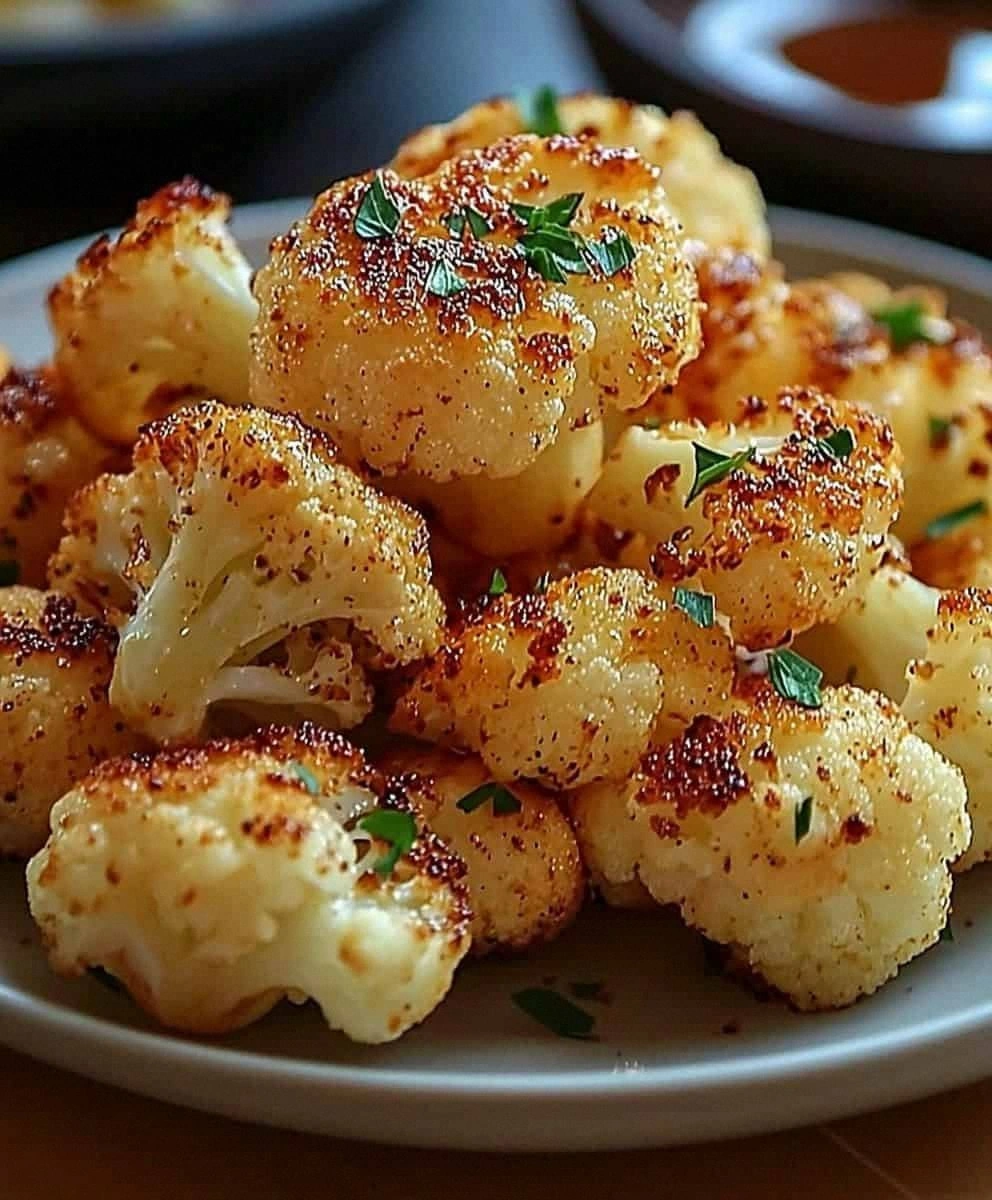
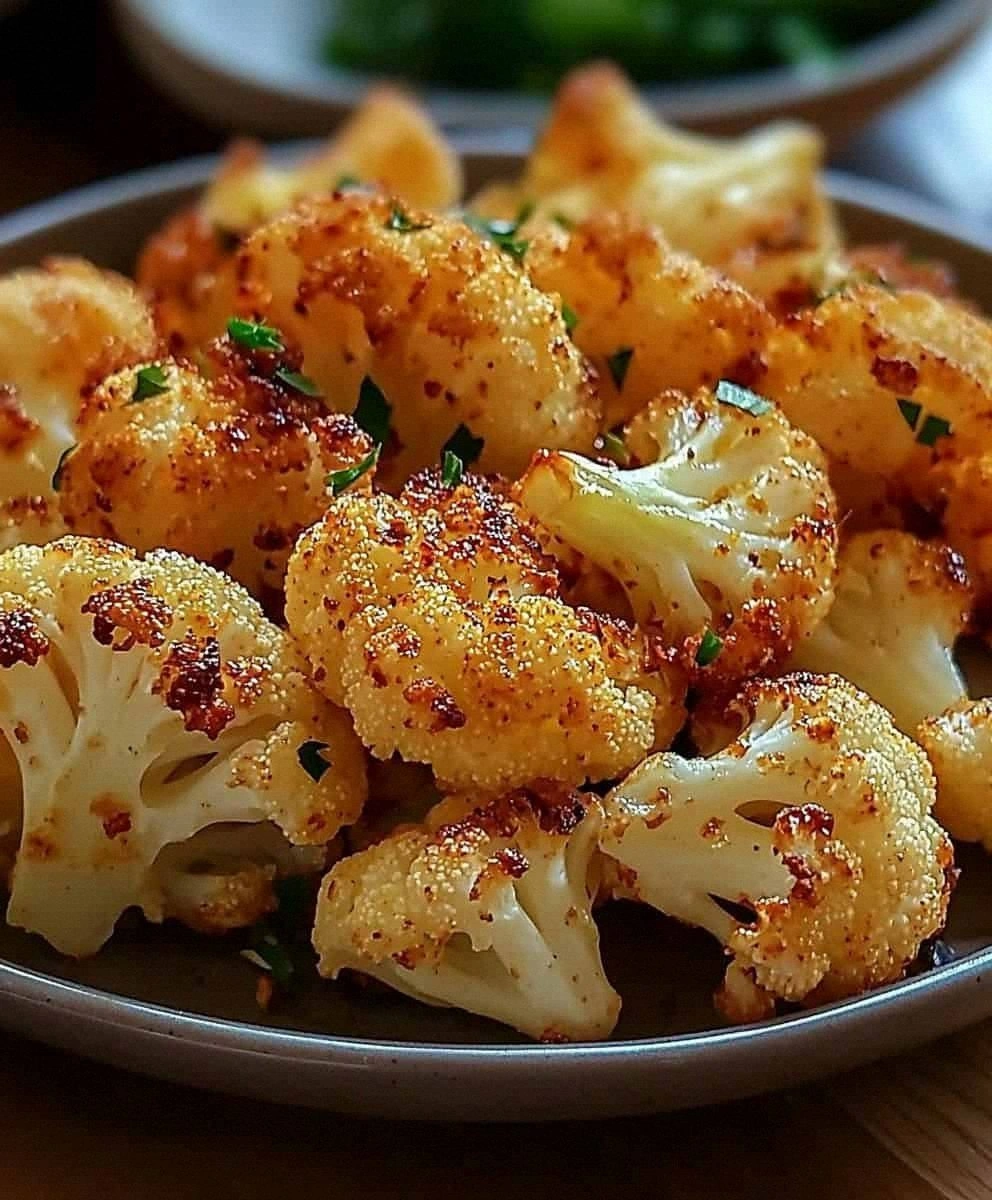
Parmesan cheese might seem like an afterthought, but it's actually performing double duty. First, it adds that irresistible umami punch that makes vegetables taste somehow more like themselves. Second, and more importantly, it creates little lacy crisps around the edges of the florets as it melts and browns. These cheese frico bits are like vegetable candy — crunchy, salty, absolutely addictive. Fresh parsley at the end isn't just for color (though it does make everything look fresh and vibrant). It adds a clean, slightly bitter note that cuts through all the richness and resets your palate between bites.
Everything's prepped? Good. Let's get into the real action...
The Method — Step by Step
- Start by cranking your oven to 425°F (220°C) and position a rack in the lower third. This isn't just a suggestion — high heat is crucial for caramelization. While it's heating, place your rimmed baking sheet in there to preheat as well. Yes, we're going to heat up an empty pan, and yes, this makes all the difference. That sizzle when the cauliflower hits the hot metal? Absolute perfection. Your kitchen should start smelling like potential within minutes.
- While the oven works its magic, break down your cauliflower. Remove the leaves and cut the head into florets about the size of golf balls — not bigger, not smaller. Too small and they'll burn before they cook through; too large and you'll get that dreaded raw center with burnt edges. Pay attention to the stem side of each floret — you want some stem attached, but trim any especially thick pieces so everything cooks evenly. Think of it as giving each piece a fighting chance at glory.
- Now for the game-changer: place all your florets in a large bowl and microwave them for 2 minutes. I know, I know — microwaving vegetables sounds like culinary heresy. But here's the thing: this quick steam jumpstarts the cooking process, ensuring the centers become tender while the exteriors get crispy. It's like pre-gaming for vegetables. They'll emerge slightly softened but still holding their shape beautifully.
- Dump out any liquid that's accumulated in the bowl from the microwaving. Pat those florets dry with paper towels — I cannot stress this enough. Water is the enemy of crispiness, and we're about to wage war against it. Each floret should feel dry to the touch, like a well-washed wine glass before polishing. This step alone will elevate your cauliflower from good to absolutely legendary.
- Time to build our flavor bomb. To the same bowl (see? minimal dishes!), add the olive oil, garlic powder, onion powder, smoked paprika, salt, black pepper, and cayenne if using. The oil should coat the bottom of the bowl like a shimmering pool. Use more than you think you need — the cauliflower will absorb quite a bit, and we want every surface lubricated for maximum browning potential. This isn't the time to be shy with fat.
- Okay, ready for the game-changer? Add the Parmesan cheese directly to the oil and spice mixture. Yes, before the cauliflower. This creates a sort of cheesy paste that will cling to each floret, ensuring even distribution and those incredible lacy cheese crisps we talked about. Stir it all together — it should look like a thick, orange-tinted dressing. Don't worry if it seems weird; trust the process.
- Now, the fun part: add your dried cauliflower florets to the bowl and toss like your life depends on it. Use your hands — they're your best tools here. Massage that seasoning into every nook and cranny, making sure each floret is thoroughly coated. The cheese mixture should cling to the cauliflower like a savory frosting. If things look dry, drizzle in another tablespoon of oil. Better over-seasoned than under-seasoned at this stage.
- Carefully remove your screaming-hot baking sheet from the oven (oven mitts, please — we're not trying to add emergency room visits to this recipe). The sheet should be so hot that water droplets would dance across the surface. Working quickly but carefully, arrange your cauliflower cut-side down where possible. This maximizes contact with the hot surface, creating those gorgeous caramelized bottoms. Don't crowd the pan — give each piece its personal space to achieve maximum crispiness.
- Slide that pan back into the oven and don't even think about touching it for the first 15 minutes. This is when the magic happens — the bottoms are browning, the cheese is crisping, and your kitchen is starting to smell like a vegetarian barbecue joint. After 15 minutes, use a thin spatula to flip the florets. They should release easily; if they're sticking, they need more time. Continue roasting for another 10-15 minutes until they're deeply golden with charred edges.
- The final step is crucial: let them rest for 5 minutes on the pan. I know they're calling to you, whispering sweet nothings about how good they smell, but patience here transforms them from good to absolutely transcendent. During this rest, they continue to crisp up as steam escapes. Transfer to a serving platter, shower with fresh parsley, and prepare for the compliments to roll in. You did it. But hold on, I've got a few more tricks that'll take this to another level...
Insider Tricks for Flawless Results
The Temperature Rule Nobody Follows
Here's something that'll blow your mind: your oven's temperature display is probably lying to you. Most home ovens can be off by 25-50 degrees, which means the difference between perfectly roasted and disappointingly steamed. Invest in an oven thermometer — they're cheap, they last forever, and they'll transform everything you bake. For this recipe, you want an actual temperature of 425°F, not what your oven claims is 425°F. I've seen ovens that claim 425°F but are actually running at 475°F, turning beautiful cauliflower into charcoal faster than you can say "dinner's ready."
Why Your Nose Knows Best
Forget timers — your nose is the most sophisticated piece of cooking equipment you own. When the cauliflower is perfectly roasted, your kitchen will smell like the world's best vegetarian restaurant. It's a toasty, slightly nutty aroma with hints of caramel and smoke. If you smell burning, you've gone too far. If you don't smell anything yet, they're not done. This might sound like kitchen voodoo, but trust me: after you've made this recipe a few times, you'll know it's ready by scent alone. A friend tried skipping this intuitive step once — let's just say it didn't end well.
The 5-Minute Rest That Changes Everything
Patience isn't just a virtue — it's the secret weapon of professional chefs. Those five minutes of rest time after roasting aren't just for show. During this period, the residual heat continues to drive off moisture while the exterior crisps up even more. The cheese bits transform from melty to crunchy, creating those addictive frico chips we talked about. Plus, letting them cool slightly intensifies the flavors. Hot cauliflower tastes primarily of heat; warm cauliflower reveals all its complex, nutty, caramelized glory. It's like the difference between a good song and a great song — that final rest is the perfect note that ties everything together.
The Storage Secret for Maximum Crisp
If you somehow manage to have leftovers (and that's a big if), store them in a paper towel-lined container with the lid slightly ajar. This prevents steam from getting trapped and turning your crispy masterpiece into a soggy mess. The paper towel absorbs excess moisture, keeping those edges crisp for up to three days. When you're ready to reheat, skip the microwave — that's vegetable sabotage. Instead, pop them under the broiler for 2-3 minutes or in a hot skillet for even faster results. They'll emerge almost as good as fresh, which is more than you can say for most leftovers.
The Cutting Technique That Changes Everything
How you cut your cauliflower matters more than you think. Instead of randomly hacking at it, try cutting through the stem side first, then breaking the florets apart by hand. This gives you natural, rustic pieces with lots of surface area for browning. Plus, those irregular edges create more crispy bits — and we all know the crispy bits are the best part. Think of it like this: smooth, uniform pieces are boring. Embrace the chaos of hand-broken florets. They'll roast more evenly, look more appealing, and give you those incredible textural contrasts that make people wonder what your secret is.
Creative Twists and Variations
This recipe is a playground. Here are some of my favorite ways to switch things up:
Mediterranean Magic
Swap the smoked paprika for regular sweet paprika, add a teaspoon of dried oregano and a squeeze of lemon juice after roasting. Finish with crumbled feta cheese instead of Parmesan, and swap the parsley for fresh oregano. The result tastes like a Greek island vacation in vegetable form — bright, herbaceous, and impossibly fresh. This version pairs beautifully with grilled fish or as part of a mezze spread.
Asian-Inspired Umami Bomb
Replace the Parmesan with a tablespoon of white miso paste mixed into the oil, swap the smoked paprika for Chinese five-spice powder, and finish with toasted sesame seeds and scallions instead of parsley. Add a drizzle of sesame oil right before serving. The miso creates an incredible umami crust while the five-spice adds warmth and complexity. Serve this alongside rice and grilled salmon for a restaurant-quality meal at home.
Buffalo-Style Party Cauliflower
Keep everything the same but add a tablespoon of buffalo seasoning to the spice mix. After roasting, toss the hot cauliflower with a mixture of melted butter and hot sauce (2:1 ratio). The cheese in the original recipe acts like a primer, helping the buffalo sauce cling to every surface. Serve with ranch dressing and celery sticks, and watch them disappear faster than chips at a Super Bowl party.
Curry Coconut Dream
Replace the olive oil with coconut oil, swap the spice blend for 2 teaspoons of curry powder, and add a tablespoon of shredded coconut to the cheese mixture. The coconut toasts as it roasts, creating little flavor bombs throughout. Finish with cilantro and a squeeze of lime. This version transforms the dish into something that tastes like it came from a beachside shack in Thailand — exotic, comforting, and completely addictive.
Everything Bagel Cauliflower
Keep the base recipe but add 2 tablespoons of everything bagel seasoning to the mix. The sesame seeds, poppy seeds, garlic, and onion in the seasoning blend create an incredible texture contrast while adding familiar breakfast flavors to dinner. The cheese in the original recipe plays beautifully with the seasoning blend, creating something that tastes like the best parts of an everything bagel but in vegetable form. It's weird, it's wonderful, and it's become my go-to brunch side dish.
Chipotle Lime Fiesta
Replace the smoked paprika with chipotle powder (use half the amount — it's potent), add the zest of one lime to the oil mixture, and finish with a squeeze of fresh lime juice and chopped cilantro. The chipotle adds heat and smokiness while the lime provides brightness that cuts through the richness. This version is incredible in tacos, burrito bowls, or just eaten straight from the pan while standing over your kitchen sink.
Storing and Bringing It Back to Life
Fridge Storage
Let the cauliflower cool completely before storing — hot vegetables in cold containers create condensation, and condensation is the enemy of crispiness. Store in an airtight container lined with paper towels, with more paper towels between layers. They'll maintain their texture for up to 4 days this way, though honestly, they've never lasted more than 2 days in my house. The paper towel trick works because it absorbs excess moisture that would otherwise turn your crispy edges soft and sad.
Freezer Friendly
Here's something that might surprise you: roasted cauliflower freezes beautifully. Let it cool completely, then spread it in a single layer on a baking sheet and freeze until solid. Transfer to freezer bags, squeeze out excess air, and freeze for up to 3 months. When you're ready to eat, don't thaw — that way lies mushy disappointment. Instead, pop them frozen into a 400°F oven for 10-12 minutes. They'll emerge almost as good as fresh, which is more than you can say for most frozen vegetables.
Best Reheating Method
The microwave is your enemy here — it'll turn your crispy masterpiece into a rubbery mess faster than you can say "leftovers." Instead, heat a skillet over medium-high heat with just a whisper of oil. Add your cold cauliflower in a single layer and let it sit, undisturbed, for 2-3 minutes. This recrisps the bottoms while warming everything through. For even better results, pop them under the broiler for 3-4 minutes, watching carefully. The high heat recreates that fresh-from-the-oven magic, making them almost indistinguishable from freshly roasted.