I still remember the Thanksgiving when everything went sideways. The turkey was dry, the mashed potatoes turned to glue, and my stuffing — the one thing I thought I could nail — crumbled apart like a sad sandcastle when I tried to slice it. My family, bless their polite hearts, kept passing it around with those forced smiles that screamed "please don't make us eat more of this." Fast forward to last week, when I turned that kitchen disaster into these golden, crispy Turkey Stuffing Balls that had my cousin sneaking into the kitchen at midnight to steal the leftovers. The kitchen smelled like a holiday candle factory exploded in the best possible way, with sage and thyme dancing through the air while crispy edges sizzled in the pan. That first bite? Pure magic — crunchy exterior giving way to a tender, herb-packed center that tastes like all the best parts of Thanksgiving rolled into one perfect bite. I dare you to taste these and not go back for seconds; I ate half the batch before anyone else got to try it, standing over the stove in my pajamas, burning my tongue because I couldn't wait for them to cool. Picture yourself pulling these out of the oven, the whole kitchen smelling incredible, your family crowding around like you've just performed some kind of culinary miracle. This is hands down the best version you'll ever make at home, and I'm about to show you exactly how to nail it every single time.
Here's the thing about stuffing — most recipes get it completely wrong. They treat it like an afterthought, some soggy bread cubes that exist only to soak up gravy. But what if I told you that stuffing could be the star of the show? These Turkey Stuffing Balls transform everything you think you know about this humble side dish. Instead of a mushy casserole that nobody really wants, you get these perfectly portioned, crispy-on-the-outside, cloud-soft-on-the-inside flavor bombs that work as an appetizer, side dish, or even the main event. The secret lies in how we handle the bread (spoiler: we're going to toast it until it sings), the ratio of herbs (more is definitely more), and a technique that keeps them from falling apart that I learned from my Italian grandmother's arancini recipe.
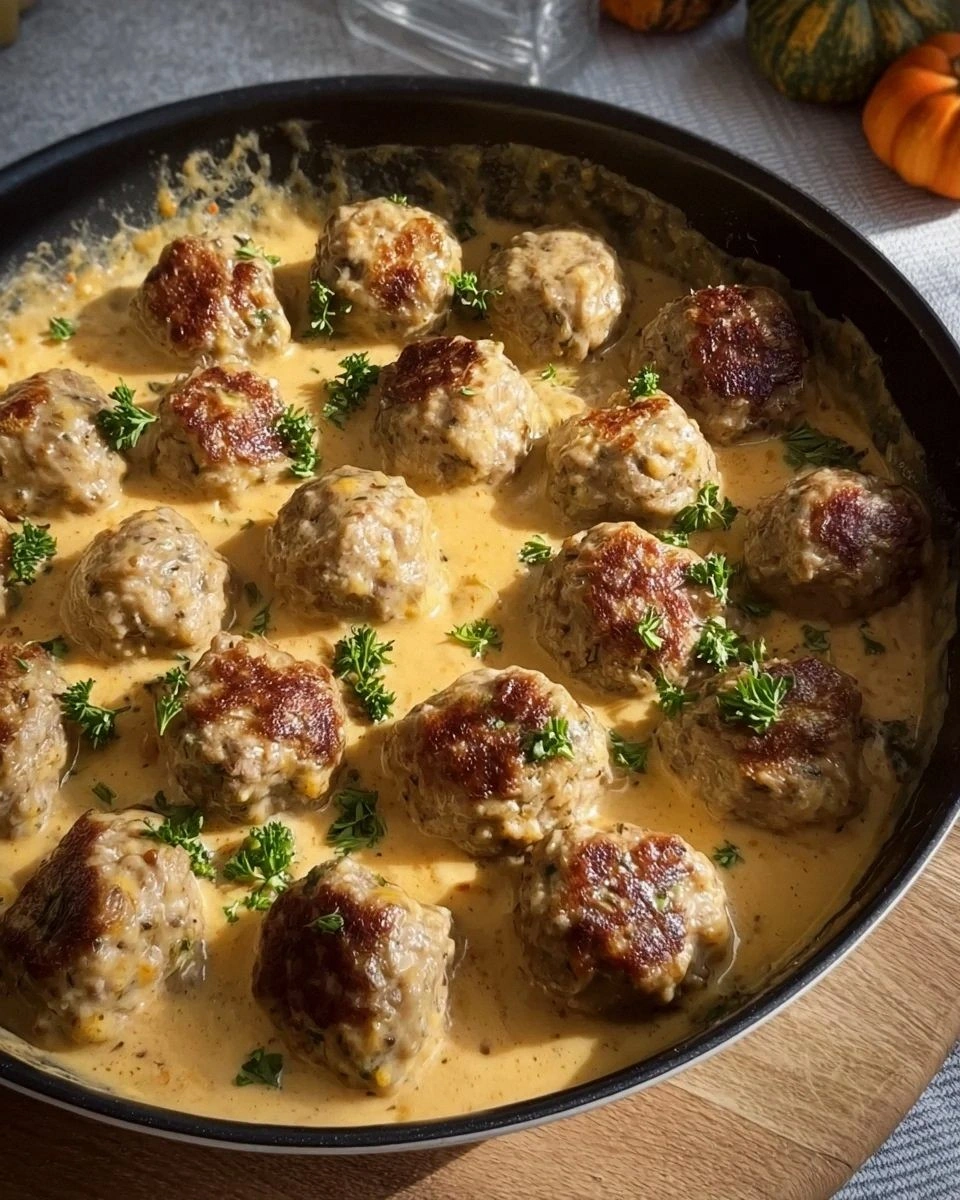
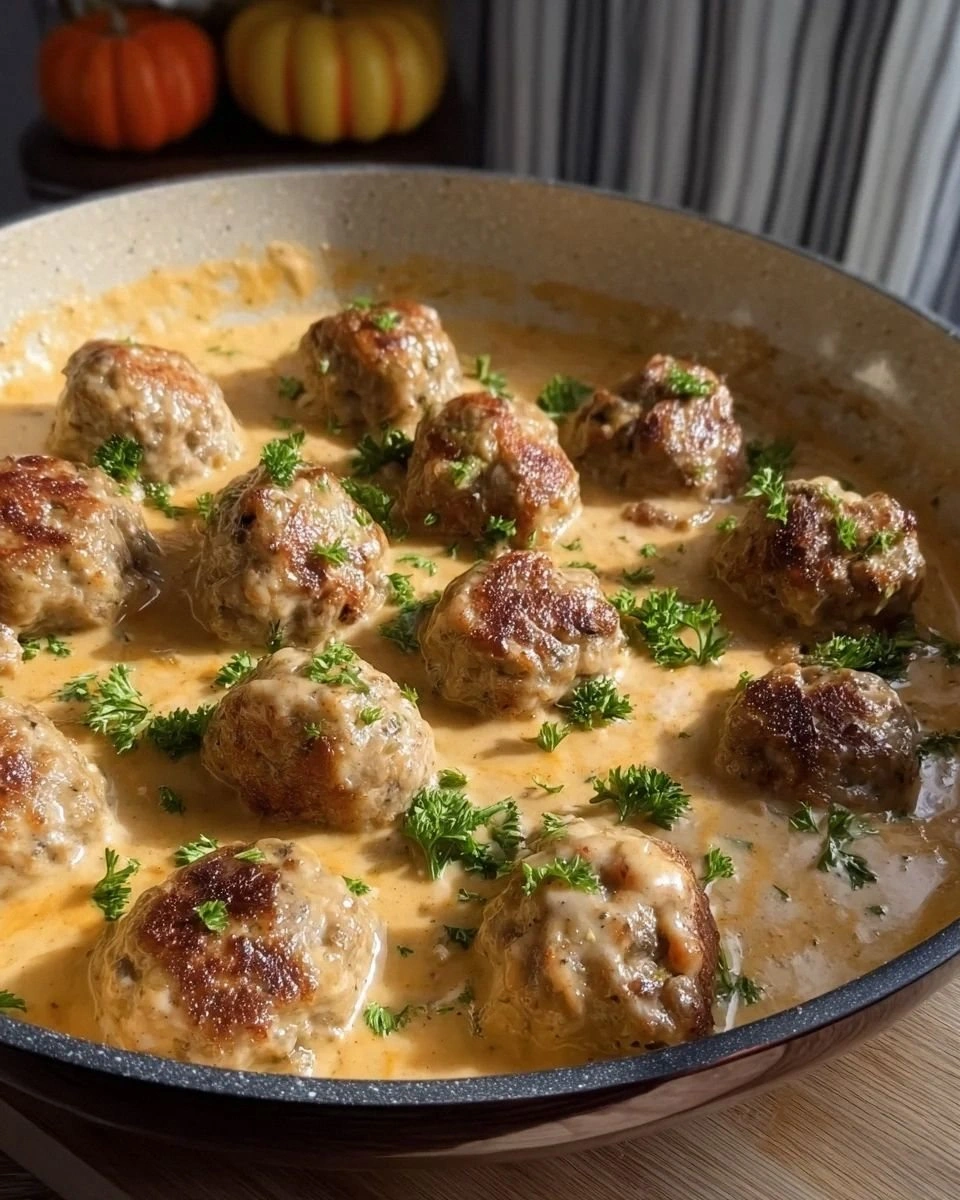
The real game-changer? We're taking all those nostalgic flavors — the sage, the onion, the celery, that umami-packed turkey stock — and concentrating them into these little golden orbs that you can pick up with your fingers. No more fighting over the crispy corner pieces because every single ball has that perfect textural contrast. The edges shatter like thin ice when you bite into them, revealing a steaming hot center that's so packed with flavor, you might just skip the turkey altogether next year. I'll be honest — I ate half the batch before anyone else got to try it, and I'm not even sorry about it.
Stay with me here — this is worth it. We're about to turn your leftovers into something that people will actually request, not just tolerate. Even if you've never successfully made stuffing before, even if your previous attempts could double as doorstops, this recipe will make you look like a kitchen wizard. Let me walk you through every single step — by the end, you'll wonder how you ever made it any other way.
What Makes This Version Stand Out
Texture Revolution: While traditional stuffing sits in a pan getting progressively soggier, these balls are engineered for maximum textural contrast. The exterior forms a golden, crispy shell that gives way to a tender, almost cloud-like interior. Every bite has that coveted edge piece texture that people usually fight over.
Flavor Concentration: By reducing the turkey stock and toasting the bread cubes until they're golden brown, we're essentially creating flavor bombs. Each ball contains the concentrated essence of Thanksgiving — it's like someone took all the best parts of the meal and compressed them into perfect, poppable portions.
Make-Ahead Magic: Unlike traditional stuffing that needs to be served immediately, these balls actually improve as they sit. You can prep them completely, freeze them raw, and then bake them straight from frozen when guests arrive. The ultimate stress-free entertaining solution that tastes like you slaved all day.
Portion Control Perfection: No more awkward scooping or wondering if people are taking too much. Each ball is a perfect two-bite serving, making them ideal for buffets, potlucks, or those times when you want to feel classy eating stuffing with your fingers. Plus, kids go absolutely nuts for them — it's like Thanksgiving meets chicken nuggets.
Leftover Transformation: Got day-old bread? Some turkey stock from the freezer? A few sad vegetables in the crisper? This recipe turns humble scraps into something that people will beg you to make again. It's practically kitchen alchemy, and you'll feel like a genius every time.
Customizable Canvas: Once you master the base recipe, these balls become your playground. Add cranberries for sweetness, sausage for richness, or go wild with different herbs. The technique stays the same while the flavor possibilities are endless, making this your new go-to for using up whatever's in your fridge.
Crispy Guarantee: Most stuffing balls fail because they fall apart or turn soggy. Not these bad boys. The binding technique I'm about to show you creates an almost protective shell that stays crisp for hours, not minutes. They're practically indestructible, which means you can actually enjoy your party instead of hovering over the food.
Alright, let's break down exactly what goes into this masterpiece...
Inside the Ingredient List
The Flavor Base
The bread is everything here — and I don't say that lightly. We're using day-old sourdough or country bread, torn into rustic pieces that'll create those perfect nooks and crannies for soaking up all the herby, turkey-packed liquid gold. Fresh bread is your enemy here; you want it stale enough that it could double as a weapon. This isn't just about texture (though that's crucial) — stale bread has developed this incredible, almost cheesy flavor that fresh bread hasn't earned yet. If all you have is fresh bread, cube it up and leave it on a baking sheet overnight, or speed things up by toasting it in a 250°F oven for about 45 minutes. The goal is bread that could break a window, not bread that'll turn to paste the second it hits liquid.
Turkey stock forms the soul of these balls, but not just any turkey stock — we're talking about the concentrated stuff that tastes like Thanksgiving in liquid form. If you've got homemade stock from your turkey carcass, you're already ahead of the game. If not, grab the best quality you can find and reduce it by half in a saucepan until it's almost syrupy. This is where the umami lives, the secret ingredient that'll have people asking "what's in these?" while they reach for their fourth one. The stock needs to be warm when you add it to the bread; cold stock equals greasy, separated balls that'll fall apart faster than my willpower at a bakery.
The Texture Crew
Butter might seem basic, but here it serves double duty — first for sautéing our aromatics until they're soft and fragrant, then for adding richness that binds everything together. We're using unsalted butter because we want to control the seasoning, and honestly, once you start cooking with good butter, you'll never go back to the cheap stuff. The butter needs to foam but not brown when you add the vegetables; brown butter is delicious, but it'll compete with the herbs instead of supporting them. Save the brown butter for another application where it can be the star.
Eggs are the unsung heroes of this operation, the invisible glue that holds our dreams together. One egg per two cups of bread cubes is the magic ratio — enough to bind without turning things rubbery. The eggs need to be at room temperature so they incorporate evenly; cold eggs can cause the butter to seize up, creating little pockets of scrambled egg in your stuffing balls. Nobody wants that. Beat them lightly before adding them to the mixture, and they'll disappear into the bread, doing their binding work invisibly.
The Unexpected Star
Celery leaves are my secret weapon here — those frilly tops that most people throw away are packed with more celery flavor than the stalks, plus they add these beautiful green flecks throughout the balls. Chop them roughly so they distribute evenly, and don't be shy about using a lot. They bring this bright, almost citrusy note that cuts through the richness and keeps things interesting. If you can't find celery with good leaves, substitute flat-leaf parsley, but you're missing out on one of nature's greatest free ingredients.
Poultry seasoning gets a bad rap as that dusty jar in your grandmother's spice cabinet, but when it's fresh and used properly, it's pure magic. We're making our own blend — sage, thyme, rosemary, and a whisper of nutmeg — because the pre-mixed stuff is usually heavy on sage and light on everything else. Fresh herbs will give you brighter flavor, but dried herbs work fine as long as they're not older than your car insurance. The key is toasting them briefly in the butter before adding the vegetables; this wakes up their essential oils and makes your kitchen smell like you've been cooking for hours.
The Final Flourish
Turkey drippings are liquid gold, and if you have them, we're using every last drop. Just a tablespoon or two mixed into the stock adds this incredible depth that screams "Thanksgiving" without being overwhelming. If you don't have drippings, a tiny bit of soy sauce or Worcestershire sauce will give you that same umami punch. The goal isn't to make these taste like turkey — it's to make them taste like the best parts of Thanksgiving dinner condensed into one perfect bite.
Parmesan cheese might seem like an odd addition, but trust me on this one. A quarter cup of finely grated Parm adds this subtle nuttiness and helps with the browning on the outside of the balls. It melts into the bread and creates these little pockets of savory goodness that'll make you wonder why you never thought of this before. Use the real stuff if you can — the pre-grated stuff in the green can works in a pinch, but it won't melt the same way.
Everything's prepped? Good. Let's get into the real action...
The Method — Step by Step
- Start by heating a large skillet over medium heat and add three tablespoons of butter. When it foams and subsides (this takes about 90 seconds — don't rush it), toss in one finely diced onion and two ribs of celery, also finely diced. The sizzle when the vegetables hit the pan? Absolute perfection. Cook them slowly, stirring occasionally, until they're soft and translucent but not brown — about 8 minutes. Your kitchen should start smelling like Thanksgiving at this point, and if it doesn't, your heat is too low. While these cook, season with a teaspoon of salt and half teaspoon of pepper — this draws out moisture and concentrates flavors.
- While the aromatics work their magic, place your stale bread cubes in the largest bowl you own. I'm talking about 8 cups of bread here, torn into pieces that are roughly the size of your thumb. The irregular shapes are crucial — they create those perfect textural contrasts we talked about. If your bread isn't quite stale enough, spread it on a baking sheet and pop it in a 200°F oven for about 20 minutes while the vegetables cook. The bread should feel like it could draw blood if thrown hard enough — that's how you know it's ready.
- Now for the game-changer: add two tablespoons of poultry seasoning and one minced garlic clove to the vegetables. Stir constantly for just 30 seconds — you want to wake up the herbs but not burn them. The mixture will become incredibly fragrant, like you've been transported to a New England herb garden in autumn. Pour this aromatic mixture over your bread cubes and toss gently with your hands. Don't mash — you want to keep those beautiful craggy edges intact.
- Here's where most recipes get it wrong — they add cold liquid to hot bread and wonder why they get mush. Heat up 2 cups of turkey stock until it's steaming but not boiling. Beat two eggs in a separate bowl, then whisk in half cup of the warm stock to temper them. This prevents scrambled egg disasters and ensures everything binds together smoothly. Pour this mixture over the bread, add your celery leaves and parsley, and mix with your hands until every cube is moistened but not soggy. The mixture should hold together when squeezed but still have some texture.
- Let the mixture rest for 10 minutes — this is crucial. During this time, the bread absorbs the liquid and the flavors meld together. While it rests, line a baking sheet with parchment paper and heat your oven to 375°F. This resting period transforms the mixture from a loose collection of ingredients into a cohesive mass that'll hold together perfectly. Don't skip this step, even if you're tempted — it's the difference between stuffing balls and stuffing crumbles.
- Now the fun part: roll the mixture into golf ball-sized spheres, pressing firmly so they hold together but not so hard that they become dense. You should get about 24 balls from this batch. Place them on the prepared baking sheet with space between each one — they need room to breathe and brown properly. If the mixture starts sticking to your hands, wet them slightly with cold water. This is the moment of truth — if they fall apart now, add another beaten egg to the mixture and try again.
- Brush each ball with melted butter — be generous here, this is what creates that golden, crispy exterior that'll make people weak in the knees. Bake for 25-30 minutes, turning once halfway through, until they're golden brown and crispy on all sides. Don't walk away from the oven during the last 10 minutes — this is when they go from perfect to burnt in what feels like seconds. The edges will start pulling away from the ball slightly when they're done, and they'll feel firm but not hard when you press them gently.
- While they bake, make the dipping sauce if you're using one — but honestly, these are so packed with flavor that they don't need much. A simple cranberry mayo (just cranberry sauce mixed with mayo) or some warm turkey gravy on the side is all you need. When they come out of the oven, let them rest for 5 minutes — this allows the exterior to set and prevents molten hot stuffing from burning your mouth. Sprinkle with fresh parsley if you're feeling fancy, then watch them disappear faster than your willpower at a sample sale.
That's it — you did it. But hold on, I've got a few more tricks that'll take this to another level...
Insider Tricks for Flawless Results
The Temperature Rule Nobody Follows
Here's the thing about temperature that separates good stuffing balls from legendary ones: everything needs to be warm when it comes together. Not hot, not cold — warm. When your bread mixture is room temperature and your stock is warm (think baby bottle temperature), they marry together in this beautiful way that creates the perfect texture. Too hot and the eggs start to scramble, creating little rubbery pockets. Too cold and the butter solidifies, making greasy, separated balls that fall apart faster than my resolve at a wine tasting. A friend tried skipping this step once — let's just say it didn't end well, and her dog wouldn't even eat the results.
Why Your Nose Knows Best
Your nose is the most underutilized tool in your kitchen arsenal, especially when it comes to these stuffing balls. When the aromatics are cooking, lean in and smell — when the onions smell sweet and the celery smells like fresh-cut grass with a hint of pepper, they're done. When you're toasting the herbs, wait until you can smell them from across the kitchen — that's when their essential oils are at their peak. Even the bread cubes will tell you when they're perfectly toasted — they'll smell nutty and warm, like the best bakery you've ever visited. Trust your senses over the clock every single time.
The 5-Minute Rest That Changes Everything
I know you're going to want to dig in immediately — believe me, I've burned my mouth more times than I care to admit — but those five minutes of resting time are crucial. During this period, the exterior firms up and develops that perfect crispy shell, while the interior settles and the flavors meld together into something greater than the sum of their parts. It's like the difference between a good movie and a great movie — that final edit makes all the difference. Set a timer if you have to, but don't skip this step. Use the time to set out your dipping sauces or pour yourself a well-deserved glass of wine.
The Freezer Secret
Okay, ready for the game-changer? These balls freeze beautifully, but there's a trick to it. Instead of freezing them cooked, freeze them raw on a baking sheet until solid, then transfer to a freezer bag. When you're ready to serve, bake them straight from frozen at 350°F for about 40 minutes — they'll actually turn out crispier than the fresh version because the exterior has time to dry out while the inside thaws and cooks. This is your new entertaining secret weapon. Keep a bag in your freezer and you'll never be caught without an impressive appetizer again.
The Size Matters Rule
Don't get cocky and try to make jumbo stuffing balls — bigger is definitely not better here. Golf ball size is perfect because it ensures even cooking and the ideal ratio of crispy exterior to tender interior. Too big and the outside burns before the inside heats through. Too small and they dry out and get crumbly. Use that ice cream scoop I mentioned, or if you don't have one, a heaping tablespoon will do the trick. Consistency is key here — you want them all the same size so they cook evenly and look professional.
The Make-Ahead Magic
If you've ever struggled with timing everything for a dinner party, you're not alone — and I've got the fix. You can prep these completely up to the baking step, cover them with plastic wrap, and refrigerate for up to 24 hours. Just add 5-10 minutes to the baking time when you're ready to cook them. The flavors actually improve as they sit, and the bread has more time to absorb all those beautiful flavors. This is stress-free entertaining at its finest — do all the work when you have time, then just pop them in the oven when guests arrive.
Creative Twists and Variations
This recipe is a playground. Here are some of my favorite ways to switch things up:
The Italian Job
Swap the poultry seasoning for Italian herbs (oregano, basil, thyme), add some minced garlic and a handful of grated Parmesan to the mixture, and serve with warm marinara for dipping. The result tastes like Thanksgiving met Italy and had a beautiful baby. Add some diced prosciutto or pancetta to the aromatics for extra richness that'll make you weep with joy.
The Sweet and Savory
Add a handful of dried cranberries and some chopped toasted pecans to the basic mixture. The sweetness plays beautifully against the savory herbs, and the nuts add this incredible crunch that takes the texture to another level. Serve with a maple-mustard dipping sauce that'll have people licking their fingers and asking for the recipe.
The Spicy Southern
Add some andouille sausage and Cajun seasoning to give these balls a kick that'll wake up your taste buds. The smoky sausage adds incredible depth, while a touch of cayenne gives just enough heat to make things interesting without overwhelming the other flavors. Serve with remoulade sauce and watch them disappear.
The Breakfast Version
Add some cooked breakfast sausage and a handful of shredded cheddar to transform these into the ultimate brunch appetizer. Serve with maple syrup for dipping — it's like Thanksgiving breakfast in perfect, poppable form. I made these for a brunch party once and people literally formed a line at the kitchen door.
The Mediterranean
Swap the celery for fennel, add some lemon zest and chopped olives, and use Greek herbs instead of poultry seasoning. The result is bright and fresh, with those classic Mediterranean flavors that transport you to a seaside taverna. Serve with tzatziki for dipping and pretend you're on vacation.
The Everything Bagel
Add everything bagel seasoning to the exterior before baking — it creates this incredible crust that's both familiar and completely addictive. Mix some cream cheese with chives for dipping and you've basically turned Thanksgiving into your favorite breakfast. This one's particularly dangerous because you can't stop at just one.
Storing and Bringing It Back to Life
Fridge Storage
Cooked stuffing balls will keep in an airtight container in the refrigerator for up to 4 days, but let's be real — they'll never last that long. Store them in a single layer if possible, or separate layers with parchment paper to prevent them from getting soggy. To reheat, pop them in a 350°F oven for about 10 minutes until they're heated through and crispy again. The microwave works in a pinch, but you'll lose that beautiful crispy exterior that makes these so special.
Freezer Friendly
These are freezer champions — both raw and cooked versions freeze beautifully. For raw balls, freeze them on a baking sheet until solid, then transfer to freezer bags. They'll keep for up to 3 months and can be baked straight from frozen. For cooked balls, let them cool completely, then freeze in a single layer before transferring to bags. Reheat from frozen at 350°F for about 20 minutes until hot and crispy. Add a tiny splash of water before reheating — it steams back to perfection.
Best Reheating Method
The oven is your friend here — it restores that crispy exterior while heating the inside evenly. Avoid the microwave unless you're truly desperate, as it turns the outside rubbery and the inside gummy. If you must use the microwave, wrap them in a damp paper towel and heat in short bursts, but know that you're compromising on texture. For best results, reheat in a toaster oven or regular oven until they're hot all the way through and the exterior is crisp again. It's worth the extra few minutes to restore them to their former glory.