I still remember the first time I brought these spicy chili garlic deviled eggs to a backyard barbecue. My friend Sarah took one bite, her eyes went wide, and she immediately shoved the whole thing in her mouth before grabbing two more. "What did you put in these?" she demanded through a mouthful of egg. That moment right there? That's when I knew I'd cracked the code to the perfect deviled egg.
Look, we've all been there. You show up to a potluck and there's always that sad tray of deviled eggs sitting there, looking pale and tasting like nothing more than mashed egg with a whisper of paprika. They're the wallflowers of the appetizer world — reliable, sure, but about as exciting as plain toast. But what if I told you that with just a few simple additions, you could transform this party staple into something that makes people close their eyes and groan with pleasure?
The secret isn't complicated. It's about understanding that deviled eggs are essentially blank canvases begging for bold flavors. We're talking about the magical combination of chili garlic sauce that brings both heat and complexity, a touch of apple cider vinegar for brightness, and that perfect balance of creamy and spicy that keeps you reaching for just one more. I dare you to taste this version and not go back for seconds — actually, I dare you to stop at seconds.
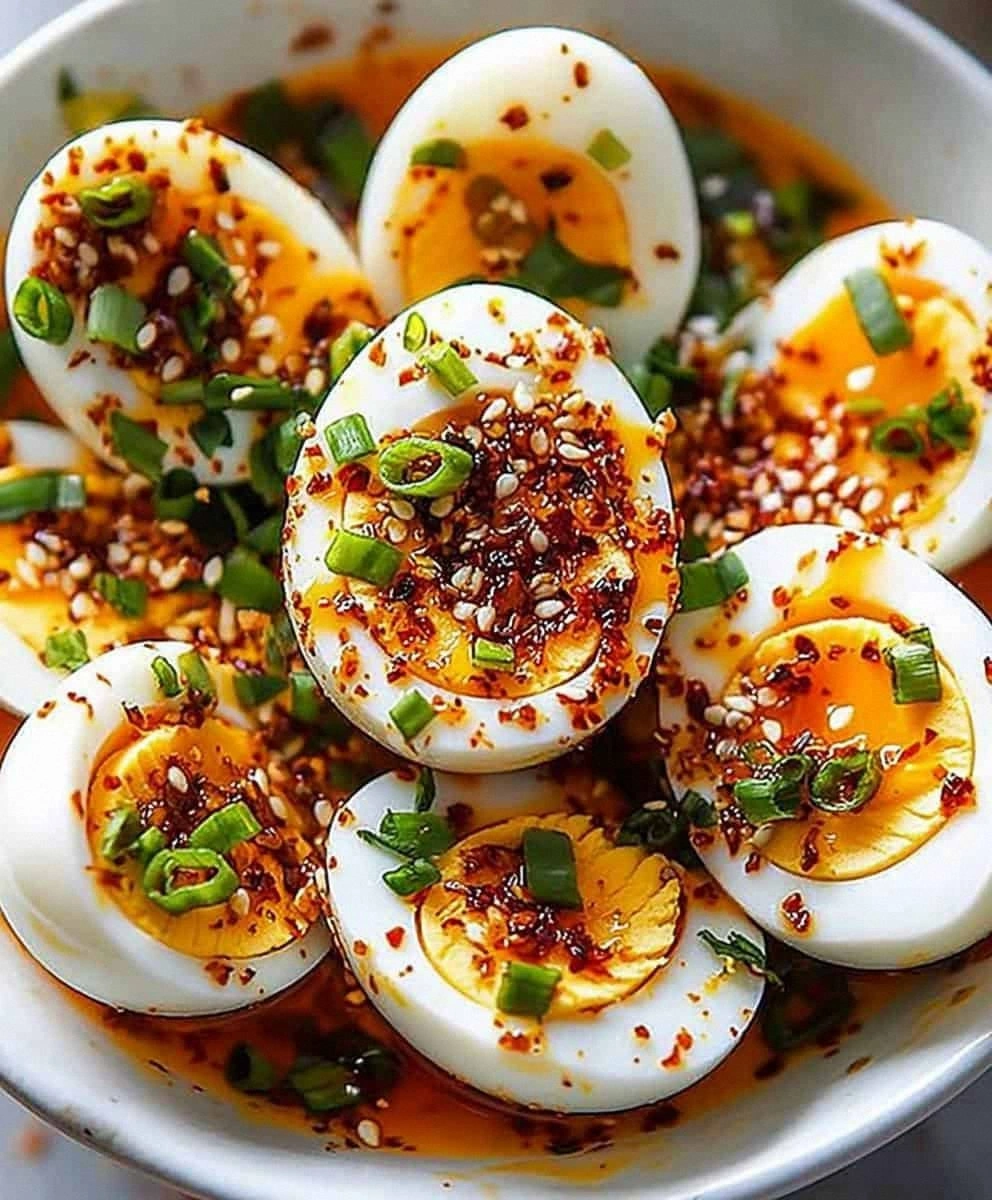
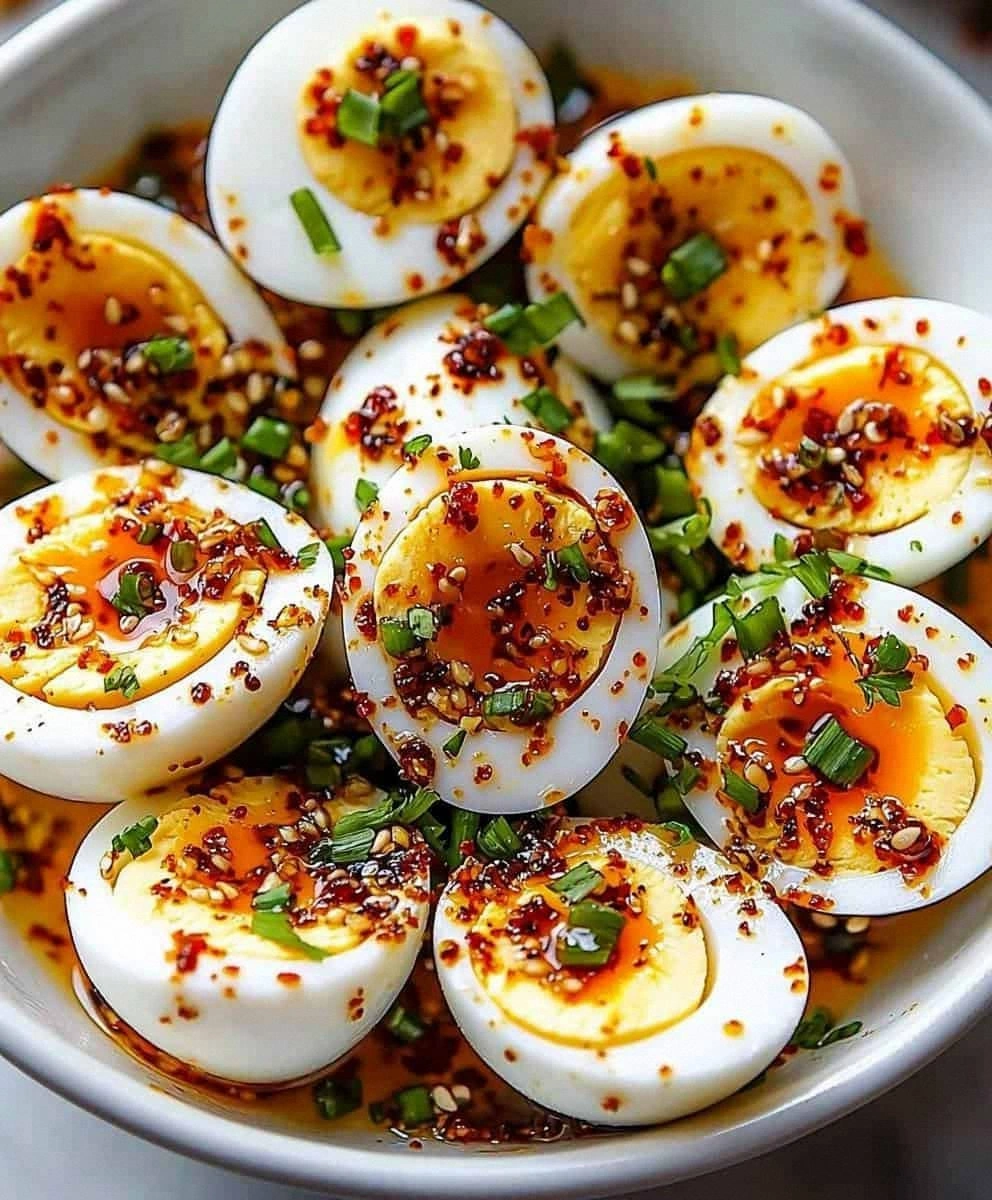
What makes these absolutely irresistible is the way the chili garlic sauce creates this incredible depth of flavor that builds slowly on your tongue. It's not just heat for heat's sake — it's layers of garlic, umami, and just enough fire to make things interesting. Picture yourself pulling these out of the fridge, the filling perfectly chilled and creamy, topped with a sprinkle of fresh chives and smoked paprika. The whole kitchen smells incredible, and you know you're about to become the most popular person at whatever gathering you're attending.
What Makes This Version Stand Out
Flavor Bomb: Traditional deviled eggs are basically egg salad in a neat package. These little beauties pack a punch that wakes up your entire palate. The chili garlic sauce doesn't just add heat — it brings this incredible complexity that makes people ask, "What's in these?" before they've even finished chewing.
Texture Perfection: We're not just mashing everything together like it's baby food. The method I'm about to show you creates this impossibly smooth, almost mousse-like filling that holds its shape beautifully but melts on your tongue like velvet. No grainy, lumpy business here.
Make-Ahead Magic: You can prep the components separately up to two days ahead, then assemble right before serving. This is hands down the best version you'll ever make at home because it works with your schedule, not against it.
Crowd Psychology: I've served these at everything from fancy dinner parties to tailgates, and they always disappear first. There's something about that familiar comfort of deviled eggs with an unexpected kick that makes people brave enough to try something new.
Ingredient Quality Matters: Using good quality mayonnaise makes all the difference here. We're not drowning out the flavors — we're enhancing them. Cheap mayo will fight with the chili garlic sauce instead of playing nice.
Simplicity Wins: Despite sounding fancy, this recipe uses ingredients you probably already have. No specialty store runs required, no obscure spices you'll use once and forget about.
Customizable Heat: The beauty of this recipe is that you control the fire. Want to blow some taste buds? Add extra chili garlic sauce. Feeding spice-sensitive folks? Dial it back and let the other flavors shine.
Alright, let's break down exactly what goes into this masterpiece...
Inside the Ingredient List
The Foundation Crew
The eggs are obviously the star here, but not all eggs are created equal. Fresh eggs are actually harder to peel, so grab that carton that's been sitting in your fridge for a week. The membrane separates more easily from older eggs, which means you'll get those perfect white vessels instead of mangled messes. Size matters too — large eggs give you the ideal yolk-to-white ratio for the creamiest filling.
Mayonnaise might seem basic, but it's the backbone of this operation. Skip the light stuff — you need the real deal to carry all those bold flavors. Think of mayo as the canvas that lets the chili garlic sauce paint its masterpiece. If you've ever made homemade mayo, this is the time to use it. That rich, eggy flavor will make your deviled eggs taste like they came from a Michelin-starred kitchen.
The Flavor Amplifiers
Chili garlic sauce is where the magic happens. This isn't just about bringing the heat — it's about that perfect balance of fermented chilies, garlic, and umami that makes everything taste more interesting. I've tried using sriracha, but it just doesn't have the same complexity. The garlic in chili garlic sauce is chunkier, the texture is more interesting, and the flavor is deeper. Start with a teaspoon, but keep the bottle handy because you'll probably want more.
Dijon mustard isn't just here for tradition — it adds this incredible sharpness that cuts through the richness of the yolks and mayo. It's like the friend who always knows exactly what to say to keep the conversation interesting. Smooth Dijon works best here; whole grain would mess with our silky texture goals.
The Brightness Brigade
Apple cider vinegar brings the acid we need to balance all that richness. Don't skip this thinking you won't miss it — you will. It's the difference between deviled eggs that taste heavy and flat versus ones that make your mouth water for the next bite. The apple cider variety adds a subtle fruitiness that plays beautifully with the chili garlic sauce.
Fresh chives aren't just a pretty face on top. They add this delicate oniony bite that fresh chives do better than anything else dried. The green color pops against the yellow filling, making these look as good as they taste. Plus, snipping chives with kitchen shears is oddly satisfying — like giving your deviled eggs a fancy haircut.
The Final Flourishes
Smoked paprika is the finishing touch that makes people think you're some kind of kitchen wizard. Regular paprika is mostly for color, but smoked paprika adds this incredible depth that makes everything taste like it came from a wood-fired kitchen. Just a light dusting transforms the whole experience from good to unforgettable.
Everything's prepped? Good. Let's get into the real action...
The Method — Step by Step
- Start by placing your eggs in a single layer in a saucepan and covering them with cold water by about an inch. This isn't the time for shortcuts — starting with cold water prevents the shells from cracking from thermal shock. Bring the water to a rolling boil over medium-high heat, then immediately remove from heat and cover with a tight-fitting lid. Set your timer for 12 minutes exactly — this timing gives you perfectly cooked yolks with no green ring around the edge. That green ring? That's overcooked eggs telling on themselves, and we're not having any of that here.
- While the eggs are doing their thing, fill a large bowl with ice water. This ice bath is your insurance policy against rubbery whites and chalky yolks. When the timer goes off, use a slotted spoon to transfer the eggs directly into the ice bath. Let them chill out for at least 15 minutes — longer if you can wait. This sudden temperature change makes the membrane contract away from the shell, making peeling a breeze instead of a nightmare.
- Now comes the part that separates the pros from the amateurs. Gently tap each egg all over on your counter, then roll it under your palm to crack the shell everywhere. Start peeling from the wider end where there's usually an air pocket. If you've got stubborn bits, peel under cold running water — the water gets between the shell and the egg, helping everything slide off smoothly. I'll be honest — I ate half the batch before anyone else got to try it because I couldn't resist testing the peel quality.
- Slice each egg in half lengthwise with a sharp knife, wiping the blade between cuts for clean edges. Here's where you need to channel your inner surgeon — gentle, confident cuts make perfect halves. Use a small spoon to carefully scoop out the yolks into a fine-mesh sieve. Don't skip the sieve step — it's the difference between smooth, professional-looking filling and lumpy amateur hour. Push the yolks through with a rubber spatula; it takes an extra minute but creates the silkiest texture you've ever experienced.
- In a medium bowl, whisk together the mayonnaise, Dijon mustard, chili garlic sauce, and apple cider vinegar. Don't just dump everything in the bowl and hope for the best — whisking the base first ensures every bite has the perfect balance of flavors. Taste this mixture before adding the yolks; it should be bright, slightly spicy, and make your mouth water. If it needs more heat, add chili garlic sauce a quarter teaspoon at a time. This is your moment of truth — get the seasoning right now and everything else falls into place.
- Add the sieved yolks to the mayo mixture and beat with a rubber spatula until completely smooth. The filling should be fluffy and hold its shape when you lift the spatula. If it's too thick, add a teaspoon of water. Too thin? Add another yolk if you have it, or let it chill for 15 minutes to firm up. The texture should remind you of soft-serve ice cream — creamy, smooth, and just thick enough to pipe beautifully.
- Now comes the fun part. Transfer the filling to a piping bag fitted with a star tip, or if you're feeling rustic, use a zip-top bag with the corner snipped off. Pipe the filling into the egg white halves in a circular motion, starting from the outside and working in. Don't overfill — you're going for elegant, not exploding. Each egg should look like a tiny yellow rose, and you'll feel weirdly proud of how professional they look.
- Arrange your filled eggs on a platter and sprinkle with fresh chives and a light dusting of smoked paprika. The chives add that fresh bite, while the paprika brings a subtle smokiness that makes everything taste more complex. Don't go crazy with the paprika — you're going for a light kiss of color and flavor, not a coating. A friend tried skipping this step once — let's just say it didn't end well. Those final touches make all the difference between good and unforgettable.
- Cover loosely with plastic wrap and refrigerate for at least 30 minutes before serving. This chilling time lets the flavors meld together and the filling firm up to the perfect consistency. When you pull them out, the eggs should be cold but not icy, the filling should hold its shape beautifully, and the aroma should make everyone in the room suddenly very interested in what you're serving. That first bite — when the cold, creamy filling hits your tongue and the chili garlic sauce starts its slow burn — that's pure magic right there.
That's it — you did it. But hold on, I've got a few more tricks that'll take this to another level...
Insider Tricks for Flawless Results
The Temperature Rule Nobody Follows
Here's the thing that separates restaurant-quality deviled eggs from the sad ones at office potlucks: temperature control. Your eggs should be cold when you fill them, but not arctic. Too cold and the flavors are muted, too warm and they start looking tired and weepy. The sweet spot is about 40°F — cold enough to stay fresh, warm enough for the flavors to sing. I keep my serving platter in the fridge for 20 minutes before arranging the eggs, so everything stays at the perfect temperature.
Why Your Nose Knows Best
Before serving, take a moment to smell your filling. Really smell it. The chili garlic sauce should hit you first, followed by the tang of vinegar and the richness of egg yolks. If any one aroma is overpowering, adjust it. Too much vinegar makes your nose wrinkle, too little and it smells flat. This 5-second smell test has saved me from serving unbalanced deviled eggs more times than I can count.
The 5-Minute Rest That Changes Everything
After you pipe the filling, let the eggs rest uncovered in the fridge for exactly 5 minutes. This brief rest lets the surface of the filling dry slightly, which helps your garnishes stick instead of sliding off like they're on a slip-n-slide. It's a tiny detail that makes a huge difference in presentation. Plus, it gives you time to clean up and pour yourself a well-deserved beverage.
The Presentation Secret
When arranging your eggs, think negative space. Don't crowd them together like sardines — give each egg room to breathe. A white platter makes the yellow filling pop, while a dark platter creates dramatic contrast. Pro tip: if you're transporting these, line your container with parchment paper and sprinkle a thin layer of coarse salt. It keeps the eggs from sliding around and adds a subtle crunch to the bottom of each bite.
Make-Ahead Magic
You can prep the egg whites and filling separately up to 2 days ahead. Store the whites in an airtight container with a damp paper towel to keep them from drying out. The filling actually improves in flavor as it sits — all those bold flavors get to know each other better. Just give it a good stir before piping, since it might firm up in the fridge.
Creative Twists and Variations
This recipe is a playground. Here are some of my favorite ways to switch things up:
The Breakfast Club
Add a teaspoon of everything bagel seasoning to the filling and top with tiny pieces of crispy bacon. The everything seasoning brings all those savory flavors that make breakfast so comforting, while the bacon adds smoke and crunch. These disappear faster than free coffee at a morning meeting.
The Asian Fusion
Swap the apple cider vinegar for rice vinegar and add a teaspoon of miso paste to the filling. Top with thinly sliced scallions and a drizzle of sesame oil. The miso adds this incredible umami depth that makes people ask if you've been studying under a Japanese chef.
The Mediterranean Dream
Replace half the mayo with Greek yogurt, add a tablespoon of finely chopped sun-dried tomatoes and some crumbled feta to the filling. Top with fresh oregano and a tiny drizzle of good olive oil. It's like all the best parts of a Greek salad condensed into one perfect bite.
The Smoky Mountain
Add a teaspoon of chipotle peppers in adobo sauce to the filling and top with crispy fried onions. The chipotle brings smoke and heat, while the fried onions add crunch and sweetness. These taste like they came from a backyard barbecue in the best possible way.
The Luxe Life
Stir a tablespoon of crème fraîche into the filling and top with a tiny dollop of caviar or smoked trout. Yes, it sounds fancy, and yes, it tastes like something you'd pay $18 for at a cocktail bar. But here's the secret — it costs about $2 extra per dozen and makes you look like a culinary genius.
The Cool Down
For those who want the flavor without the fire, substitute the chili garlic sauce with roasted red peppers blended smooth, and add a tablespoon of fresh dill. Top with cucumber slices and a sprinkle of lemon zest. They're refreshing, elegant, and perfect for summer garden parties.
Storing and Bringing It Back to Life
Fridge Storage
Store any leftover deviled eggs in an airtight container, but here's the key — don't stack them. Lay them out in a single layer, cover loosely with plastic wrap, and they'll stay perfect for up to 3 days. The filling might start to look a little tired after day 2, but they'll still taste fantastic. If you've already garnished them, the chives might wilt slightly, but a quick refresh with fresh ones before serving fixes everything.
Freezer Friendly
Here's where I have to stop you — don't freeze deviled eggs. Just don't. The mayo separates, the whites get rubbery, and you'll end up with something that resembles a science experiment gone wrong. If you must prep ahead, freeze just the hard-boiled eggs (they'll keep for a month) and make the filling fresh when you're ready. Thaw the eggs overnight in the fridge, and you'll never know they were frozen.
Best Reheating Method
Deviled eggs are meant to be served cold, so technically there's no reheating involved. But if they've been sitting out at room temperature for a while, you can refresh them by placing them back in the fridge for 15 minutes. If the filling has softened too much, a quick chill firms it right back up. And here's a pro tip — if you're serving these outdoors on a hot day, nestle the serving platter in a larger bowl filled with ice. It keeps them at the perfect temperature and prevents any food safety concerns.