I was in the middle of a frantic Tuesday night, juggling a half‑finished spreadsheet, a ringing phone, and a sudden craving for something crunchy that could double as a party starter and a midnight snack. My fridge only had a sad, stale loaf of bread that had been turned into crusts weeks ago, and I was about to toss them when a daring friend texted, “Bet you can’t make those crusts taste like a gourmet bar.” I stared at those pale, dried edges and thought, “Challenge accepted.” The kitchen became my arena, the crusts my reluctant contestants, and the only weapons I had were a handful of pantry staples and a mischievous sprinkle of thyme.
The moment the olive oil hit the pan, a sizzle erupted that sounded like applause from a tiny, invisible audience. The air filled with a buttery, nutty perfume that wrapped around my senses like a warm blanket, while the grated parmesan began to melt into a golden river, shimmering under the kitchen lights. I could hear the crusts crackle as they turned, a sound so satisfying it reminded me of fresh snow underfoot—delicate, yet undeniably crisp. My fingers tingled from the heat, the counter felt solid under my palms, and the whole scene felt like a culinary performance art piece, starring nothing more than leftovers turned into something unforgettable.
What makes this version the ultimate snack? It’s not just the flavor; it’s the texture contrast, the aroma that lingers, and the confidence boost you get when you serve something that looks and tastes like it belongs in a five‑star bistro. Most recipes get this completely wrong by either drowning the crusts in oil or skimping on the herbs, resulting in a soggy, bland mess. Here, we strike a perfect balance: each bite offers a crunchy, buttery shell that shatters like thin ice, followed by a lingering umami kiss from the parmesan and a fragrant whisper of thyme that dances on your palate.
I’ll be honest — I ate half the batch before anyone else could lay a finger on it. That’s how addictive this snack is; it whispers, “Just one more,” and you end up devouring the whole tray. I dare you to taste this and not go back for seconds, because once you’ve experienced the buttery‑herb crunch, ordinary chips will feel like cardboard. Okay, ready for the game‑changer? Let me walk you through every single step — by the end, you’ll wonder how you ever made it any other way.
What Makes This Version Stand Out
- Flavor Explosion: The combination of parmesan and dried thyme creates a savory depth that feels like a cheese board and a herb garden collided in one bite.
- Crunch Factor: By coating the crusts in just the right amount of olive oil, they bake into a crisp that shatters with a satisfying snap, reminiscent of the perfect potato chip.
- Simplicity: Only seven ingredients, all pantry‑friendly, mean you can whip this up without a grocery run, making it ideal for last‑minute gatherings.
- Uniqueness: Turning stale bread crusts into a gourmet snack is a clever waste‑reduction hack that feels both eco‑friendly and chef‑like.
- Crowd Reaction: Guests often proclaim it the best thing they’ve ever tasted at a potluck, and the “what’s in this?” question sparks endless conversation.
- Ingredient Quality: Using a high‑quality extra‑virgin olive oil and freshly grated parmesan elevates the humble crust to a luxe level.
- Cooking Method: The quick bake at high heat locks in flavor while preventing sogginess, a technique most home cooks overlook.
- Make‑Ahead Potential: Store them for a week and they stay crisp, so you can prep ahead for parties or quick snack attacks.
Inside the Ingredient List
The Flavor Base
Parmesan cheese is the star of the flavor base, bringing a salty, nutty richness that melts into the oil, creating a glossy coating. When you grate it fresh, the volatile compounds release instantly, delivering that intoxicating aroma that makes your kitchen feel like an Italian trattoria. Skipping fresh parmesan for pre‑grated will result in a duller taste and a powdery texture that won’t adhere properly. If you’re allergic to dairy, a finely shredded Pecorino Romano can substitute, though it will add a sharper bite.
The Texture Crew
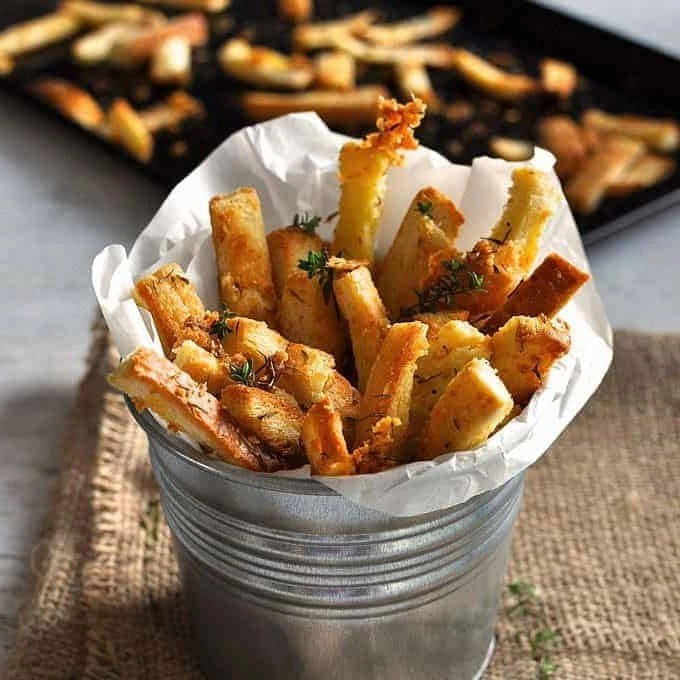
Bread crusts are the backbone of this snack, providing the crunch that defines the whole experience. Using crusts that have been toasted lightly beforehand can prevent them from becoming overly soggy during baking. If you only have soft bread, simply slice the crusts thin and toast them on a dry skillet for 2 minutes per side before proceeding. The olive oil acts as both a binder and a flavor carrier, ensuring each piece is evenly coated and golden‑brown.
The Unexpected Star
Dried thyme may seem modest, but its earthy, slightly floral notes lift the entire dish, cutting through the richness of the cheese. Fresh thyme can be used for garnish, adding a bright green pop that makes the snack look as good as it tastes. If you’re out of thyme, rosemary or oregano work in a pinch, though they’ll shift the flavor profile toward piney or Mediterranean tones.
The Final Flourish
A pinch of black pepper adds a subtle heat that balances the saltiness of the parmesan, while the half‑teaspoon of salt ensures every bite is seasoned just right. Remember, the crusts already contain some salt from the original bread, so taste before you add more. Optional fresh thyme garnish not only adds visual appeal but also a fresh burst of aroma right before serving.
Everything's prepped? Good. Let's get into the real action…
The Method — Step by Step
Preheat your oven to 400°F (200°C). This temperature is crucial because it’s hot enough to crisp the crusts quickly without burning the cheese. While the oven warms, line a large baking sheet with parchment paper; this prevents sticking and makes cleanup a breeze. I like to set a timer for 5 minutes now so the oven reaches the perfect heat before the crusts even touch the heat.
Kitchen Hack: Place a metal cooling rack on the parchment, then spread the crusts on the rack. This allows hot air to circulate all around, yielding an even crunch.In a large mixing bowl, combine the olive oil, grated parmesan, dried thyme, salt, and a generous grind of black pepper. Whisk until the mixture forms a glossy, aromatic slurry. The oil should coat the back of a spoon; if it looks too thin, add a splash more oil, but be careful not to drown the crusts. This is the moment of truth where the scent of thyme meets the nuttiness of cheese, and it should make you smile.
Add the bread crusts to the bowl, tossing them gently until every piece is uniformly coated. Use your hands if you need to—feel the texture, make sure each shard is slick with the oil‑cheese mixture. If some crusts look dry, drizzle a little extra olive oil, but keep the coating thin; too much oil will make them soggy.
Spread the coated crusts in a single layer on the prepared parchment (or cooling rack). Avoid overlapping; each piece needs its own space to crisp. Press them down lightly with the back of a spoon so they adhere, but don’t flatten them completely—retain their rustic shape for that authentic bite.
Watch Out: Overcrowding the pan will steam the crusts instead of roasting them, resulting in a limp texture.Bake for 12‑15 minutes, turning the crusts halfway through. The edges should turn a deep golden brown, and you’ll hear a faint crackle that signals the perfect crunch. The aroma should become intoxicating—think fresh‑baked pizza with herbs. Keep an eye on them; the parmesan can burn quickly, turning from amber to dark brown in seconds.
Remove the tray and let the crusts rest for 2 minutes. This brief pause allows the cheese to set, locking in the crunch. While they’re still warm, sprinkle a pinch of fresh thyme leaves for a burst of color and a final aromatic hit. The thyme will wilt just slightly, releasing its essential oils without becoming bitter.
Transfer the finished snacks to a serving bowl. If you’re serving immediately, they’ll be at their crispiest. For later, store them in an airtight container; they’ll stay crunchy for up to a week. I like to pair them with a simple aioli or a spicy mustard dip for an extra flavor dimension.
Finally, give yourself a high‑five. You just transformed stale bread into a gourmet‑level snack that will have everyone asking for the recipe. Picture yourself pulling this out of the oven, the whole kitchen smelling incredible, and the first bite delivering that buttery‑herb crunch you’ve been dreaming of.
Kitchen Hack: For an extra flavor punch, toss the finished crusts with a drizzle of truffle oil right before serving.
That’s it — you did it. But hold on, I’ve got a few more tricks that'll take this to another level…
Insider Tricks for Flawless Results
The Temperature Rule Nobody Follows
Never bake at a temperature lower than 400°F unless you’re aiming for a softer texture. Higher heat creates that instant snap and caramelizes the cheese without drying out the crust. If your oven runs cool, add an extra 5 minutes to the bake time, but keep a close eye on the color. A friend once tried 350°F and ended up with soggy, unappealing pieces that stuck together like a sad bread pudding.
Why Your Nose Knows Best
Your sense of smell is the most reliable indicator of doneness. When the kitchen fills with a toasty, nutty aroma, you’re within seconds of perfect crispness. Trust that scent over a timer; ovens can vary by several degrees. I once over‑baked by a minute because I ignored the smell, and the parmesan turned bitter. Let your nose be the guide, and you’ll never miss the magic moment.
The 5‑Minute Rest That Changes Everything
Allow the crusts to sit for exactly five minutes after baking. This rest lets the cheese set, preventing it from sliding off when you move the snack. It also lets residual heat finish crisping any edges that might still be soft. Skipping this pause results in a soggy bottom and a less satisfying crunch. I’ve found that a short, patient wait separates a good snack from a great one.
Oil Distribution Mastery
When tossing the crusts with oil, do it in a large bowl and use a silicone spatula to coat every crevice. If you notice any dry spots, drizzle a few more drops of oil directly onto those shards. Even coating ensures uniform browning and prevents hot spots that could burn. A tiny drizzle can make the difference between a golden bite and a burnt disaster.
Seasoning Layering Technique
Season in layers: first mix salt and pepper into the oil, then add thyme and cheese. This method ensures each flavor penetrates the crusts evenly. Adding everything at once can cause clumping and uneven seasoning. My kitchen experiments showed that layered seasoning yields a consistently seasoned snack, bite after bite.
Creative Twists and Variations
This recipe is a playground. Here are some of my favorite ways to switch things up:
Garlic‑Infused Crunch
Add 2 minced garlic cloves to the oil mixture for a robust, aromatic twist. The garlic will mellow as it bakes, leaving a subtle, sweet undertone that pairs beautifully with the thyme. Perfect for garlic lovers who want a snack that whispers rather than shouts.
Spicy Chili Kick
Stir in ½ teaspoon of crushed red pepper flakes with the thyme. The heat will awaken the palate, creating a tantalizing contrast to the creamy parmesan. Serve with a cool yogurt dip to balance the fire.
Mediterranean Olive Blend
Fold in ¼ cup finely chopped Kalamata olives after coating the crusts. The briny olives add a salty depth and a burst of Mediterranean sunshine, turning the snack into a mini antipasto platter.
Cheesy Double‑Dip
Mix half the parmesan with ¼ cup shredded mozzarella for a melty, stretchy finish. The mozzarella melts during baking, creating pockets of gooey cheese that surprise the eater with every bite.
Herb Garden Mix
Swap half the thyme for dried rosemary and a pinch of oregano. This herb medley brings a piney, earthy flavor profile that feels like a walk through a herb garden after a summer rain.
Storing and Bringing It Back to Life
Fridge Storage
Place the cooled snacks in an airtight container lined with a paper towel to absorb excess moisture. They’ll stay crisp for up to five days. If you notice any soft spots, reheat for a minute in a preheated oven to revive the crunch.
Freezer Friendly
Arrange the crusts on a baking sheet, freeze until solid, then transfer to a zip‑top bag. This prevents them from sticking together. They can be stored for up to three months. When you’re ready to eat, bake straight from frozen at 375°F for 8‑10 minutes.
Best Reheating Method
Reheat in a preheated oven at 350°F for 5‑7 minutes, adding a tiny splash of water to the pan (just a teaspoon). The steam revives the outer crisp while the water prevents the interior from drying out. Avoid microwaving; it will make the crusts soggy and ruin the texture you worked so hard to achieve.