Picture this: it’s a rainy Saturday, the kind that makes you crave something sweet and comforting, but you’re stuck in a kitchen that smells faintly of burnt toast from a failed pancake experiment earlier that morning. I was staring at a bowl of plain batter, feeling the weight of a dare from my roommate who claimed she could make “the best carnival snack ever” without ever leaving the house. My mind was racing, the butter was melting, and I could hear the faint hiss of the oil in the pan like a distant train—an ominous promise of crispy goodness waiting to happen. I thought, “What if I could bottle that fair‑ground magic into bite‑size nuggets that melt in your mouth and make you forget the soggy clouds outside?”
Fast forward to the moment the first bite hit my tongue: a delicate crunch that shattered like thin ice, followed by a cloud of vanilla‑kissed sweetness that lingered like a summer sunset. The aroma was a symphony—golden, buttery notes mingling with a whisper of vanilla that made my nose do a little happy dance. The texture? Imagine a feather‑light pillow that’s been toasted to perfection, the kind of crisp that makes you want to close your eyes and listen to the crackle. I dared you to taste this and not go back for seconds, and honestly, I ate half the batch before anyone else even had a chance to try it. This is hands down the best version you’ll ever make at home, and I’m about to spill every secret that makes it so unforgettable.
Most recipes for funnel cake bites get this completely wrong—either they drown the batter in oil, resulting in greasy blobs, or they skip the crucial resting time, leaving the texture dense and soggy. Here’s what actually works: a light batter that’s rested just enough to develop a airy structure, a precise oil temperature that gives you that perfect golden crust, and a finishing dusting of powdered sugar that’s as fine as snow. I’m being honest—I’m still obsessed with the way the powdered sugar clings like a soft veil, and I’m not ashamed to admit that I sometimes sneak a bite straight from the cooling rack. If you’ve ever struggled with getting that perfect crunch without the soggy center, you’re not alone, and I’ve got the fix.
Okay, ready for the game‑changer? We’re going to use a simple batter that feels like a sweet, buttery pancake mix, but we’ll fry it in a way that creates those iconic, web‑like edges you love. The secret ingredient? A pinch of baking powder that lifts the batter just enough to give you that airy bite without turning it into a puffy pancake. And the oil? We’ll keep it at a steady 375°F, because any lower and you’ll get greasy, any higher and you’ll burn the sugar before the inside cooks. Picture yourself pulling these golden nuggets out of the pan, the whole kitchen smelling incredible, the steam rising and the powdered sugar sparkling like fairy dust. Let me walk you through every single step — by the end, you’ll wonder how you ever made it any other way.
What Makes This Version Stand Out
- Flavor: The vanilla‑infused batter delivers a subtle, aromatic sweetness that pairs perfectly with the powdery sugar topping, creating a balanced flavor profile that never feels cloying.
- Texture: Each bite boasts a crisp, lace‑like exterior that shatters like thin ice, while the interior stays pillowy and melt‑in‑your‑mouth soft, a true textural contrast.
- Simplicity: With just nine pantry staples you can whip up a batch in under an hour—no fancy equipment, no obscure ingredients, just pure, straightforward magic.
- Uniqueness: By using a light batter and a controlled fry, we achieve a carnival‑style crunch without the mess of traditional funnel cake funnels.
- Crowd Reaction: These bites become instant party starters; people line up for seconds, and you’ll hear the “more, please!” chorus echoing around the kitchen.
- Ingredient Quality: Using real butter and whole milk elevates the flavor, while the powdered sugar adds a delicate finish that refined sugars simply can’t match.
- Cooking Method: The oil temperature is the unsung hero—maintaining a steady 375°F ensures a golden crust without sogginess.
- Make‑Ahead Potential: You can prep the batter a day ahead, refrigerate it, and still achieve the same airy texture when fried later.
Alright, let's break down exactly what goes into this masterpiece...
Inside the Ingredient List
The Flavor Base
First up, the vanilla extract. One teaspoon might sound modest, but it’s the aromatic anchor that turns a plain sweet batter into a fragrant masterpiece. If you substitute with almond extract, you’ll get a nutty twist, but the classic vanilla is what makes these bites feel like a nostalgic fair‑ground treat. Choose a pure, high‑quality vanilla; the difference between a synthetic and a real vanilla bean can be as stark as night versus day when it comes to aroma.
Next, the granulated sugar in the batter. Two tablespoons sweeten the mix just enough to coax out the butter’s richness without making the dough overly sweet. Skipping this sugar is a mistake—your batter will taste flat, and the caramelization that gives that golden crust will never happen. If you’re feeling adventurous, try a splash of honey for a subtle floral note, but remember honey adds moisture, so you may need to thin the batter slightly.
The Texture Crew
The all‑purpose flour is the structural backbone. Two cups provide the perfect balance between heft and lightness, allowing the batter to hold its shape while still puffing up beautifully. Using cake flour would make it too delicate, while bread flour would weigh it down. Look for flour that’s fresh—older flour can develop a stale taste that dulls the overall flavor.
The baking powder is the unsung hero that gives these bites their airy interior. One tablespoon creates tiny bubbles that expand during frying, ensuring a melt‑in‑your‑mouth center. If you forget it, you’ll end up with dense, heavy bites that lack that signature lift. For a gluten‑free version, swap the flour for a 1:1 gluten‑free blend and keep the baking powder unchanged.
The Unexpected Star
Now, the melted butter. Four tablespoons add richness and flavor depth, coating the flour particles for a tender crumb. Butter also contributes to the browning process, giving the exterior that beautiful amber hue. If you’re dairy‑intolerant, clarified ghee works just as well and adds a nutty undertone.
The large eggs act as emulsifiers, binding the liquid and dry components while adding structure. Two eggs are enough to hold the batter together without making it rubbery. Over‑beating can incorporate too much air, leading to a batter that collapses in the oil; a gentle whisk is all you need.
The Final Flourish
We can’t forget the powdered sugar for the finishing dust. This classic topping adds a delicate sweetness and a visual sparkle that makes the bites look festival‑ready. Sift it just before serving to avoid clumps and to keep the dust light as a feather.
Lastly, the vegetable oil for frying. Choose a neutral oil with a high smoke point—canola, peanut, or sunflower work beautifully. The oil’s temperature stability is crucial; if it fluctuates, you’ll end up with uneven cooking.
Everything's prepped? Good. Let's get into the real action...
The Method — Step by Step
-
Start by whisking together the dry ingredients: flour, granulated sugar, baking powder, and a pinch of salt in a large mixing bowl. The dry mix should look like fine sand—no clumps, no pockets of powder. This is the foundation, so take a moment to sift it; it ensures an even distribution of leavening and prevents any gritty texture.
Feel the powdery texture between your fingers; that’s the promise of a light, airy bite. If you hear a faint “whoosh” as you sift, you’re on the right track.
-
In a separate bowl, beat the two large eggs, then whisk in the whole milk, vanilla extract, and melted butter until the mixture is smooth and glossy. The liquid should have a slightly thick but pourable consistency—think pancake batter that can coat a spoon without dripping off.
Now, pour the wet mixture into the dry ingredients, folding gently with a rubber spatula. The batter will look lumpy at first; keep folding until just combined—over‑mixing will develop gluten and make the bites tough.
Kitchen Hack: Let the batter rest for 10 minutes; this allows the flour to hydrate fully, resulting in a softer interior. -
While the batter rests, heat a deep, heavy‑bottomed pot with enough vegetable oil to submerge the bites—about 3 inches deep. Use a candy thermometer and bring the oil to a steady 375°F (190°C). The oil should shimmer, and when you drop a tiny breadcrumb, it should sizzle and turn golden within 15 seconds.
Patience is key: if the oil is too cool, the bites will absorb oil and become soggy; too hot and the exterior will burn before the inside cooks.
-
When the oil is ready, set a small metal ladle or a squeeze bottle with the batter. If you’re using a ladle, hold it just above the oil surface and let the batter flow in a circular motion, creating a web‑like shape that will fry into a bite‑size disc.
Each bite should be about 2‑3 inches in diameter. The moment the batter hits the oil, you’ll hear a satisfying sizzle—That sizzle when it hits the pan? Absolute perfection.
-
Fry the bites for 2‑3 minutes, turning once with a slotted spoon when the edges turn a deep golden brown and start to pull away from the pot. The aroma will become intoxicating, a buttery, slightly caramelized perfume that fills the kitchen.
Once cooked, lift the bites onto a paper‑towel‑lined plate to drain excess oil.
Watch Out: Do not overcrowd the pot; adding too many bites at once drops the oil temperature, resulting in greasy, under‑cooked centers. -
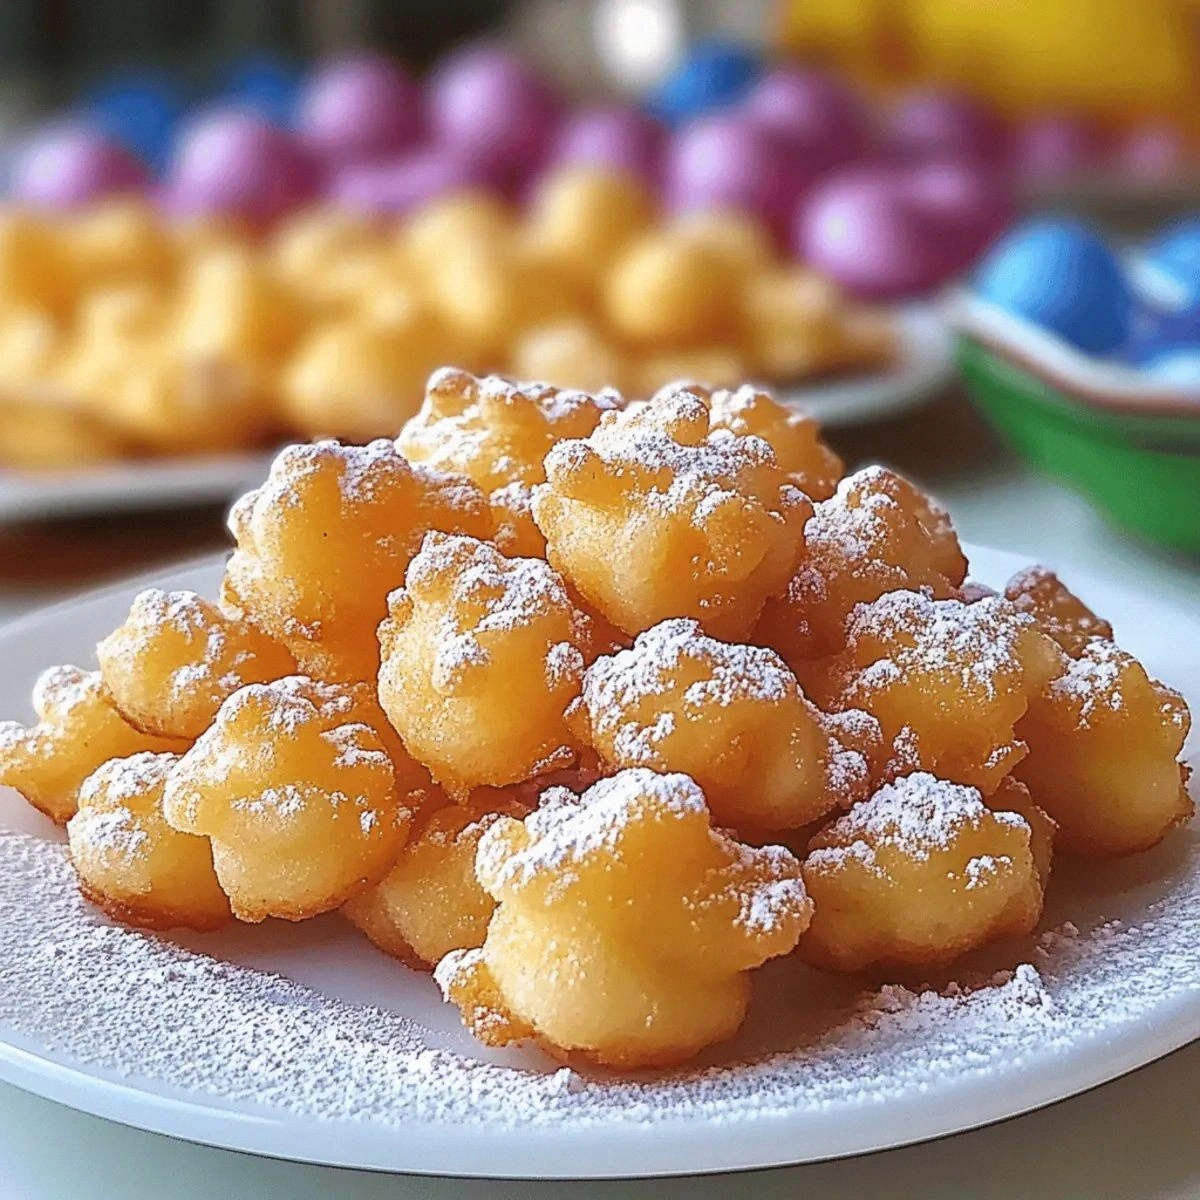
While the bites are still warm, dust them generously with sifted powdered sugar. The sugar should cling like a light snowfall, coating every crevice.
For an extra visual pop, you can add a pinch of cinnamon or cocoa powder to the sugar mix—just enough to create a speckled effect without overpowering the vanilla base.
-
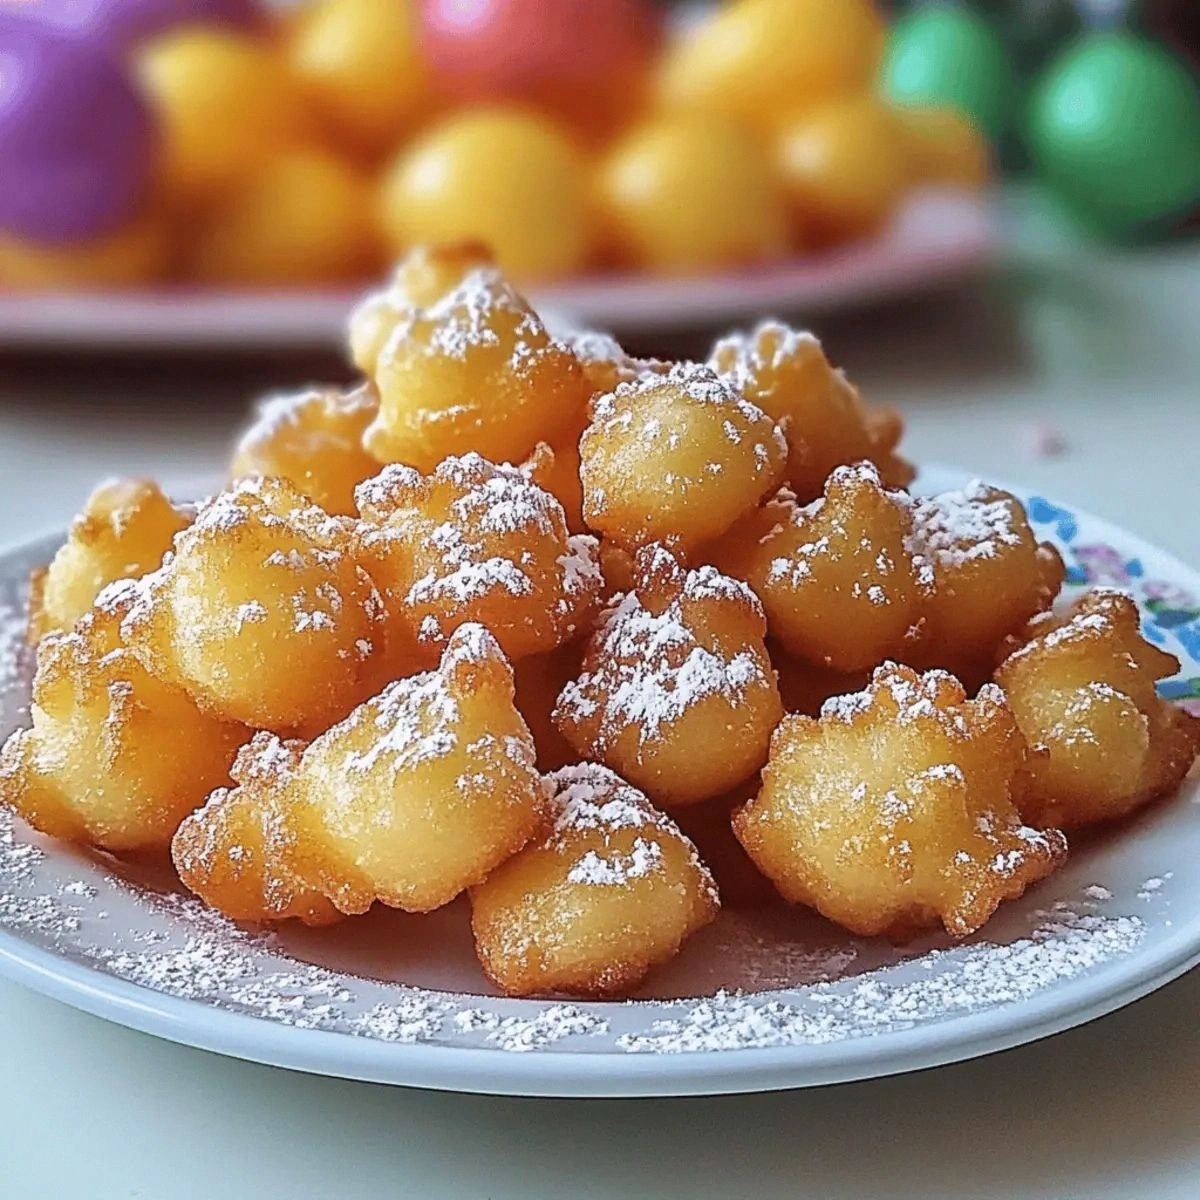
Transfer the finished bites to a serving platter. If you’re serving immediately, arrange them in a single layer to keep the crust crisp. If you need to hold them for a few minutes, keep them on a wire rack instead of a plate to prevent steam from making them soggy.
Take a moment to admire the golden crowns and the delicate dusting—this is the visual cue that tells your guests “you’re about to indulge in something special.”
-
Now, the fun part: taste test. Grab a bite, let the sugar melt on your tongue, and feel the contrast between the crisp outer shell and the soft, buttery interior. That first crunch followed by a melt‑in‑the‑mouth center? That’s the payoff of every meticulous step you just followed.
If you’re feeling daring, drizzle a thin stream of caramel sauce or a dollop of whipped cream for an indulgent twist. But remember, the pure version is already a show‑stopper.
-
That’s it — you did it. But hold on, I've got a few more tricks that'll take this to another level, like how to store leftovers without losing that coveted crunch, and how to reinvent the flavor profile for holiday gatherings.
Stay with me here — this is worth it.
Insider Tricks for Flawless Results
The Temperature Rule Nobody Follows
Maintain a consistent oil temperature of 375°F throughout the frying process. If the oil cools too much after a batch, give it a minute to recover before adding more batter. I once tried to rush the process, and the result was a soggy disaster that tasted more like fried dough than a delicate bite. Trust the thermometer; it’s the silent guardian of crunch.
Why Your Nose Knows Best
Before you even flip the first bite, listen for the subtle change in scent—when the batter starts to caramelize, you’ll notice a sweet, buttery aroma that signals the perfect moment to turn. If you rely solely on visual cues, you might miss the optimal timing, leading to uneven browning.
The 5‑Minute Rest That Changes Everything
After frying, let the bites rest on a wire rack for five minutes before dusting with powdered sugar. This short pause allows the interior to set, preventing the sugar from melting into a soggy glaze. I once skipped this rest and ended up with a sticky mess; never again.
Oil Choice Matters
Using a neutral oil with a high smoke point not only ensures safety but also preserves the clean flavor of the batter. Peanut oil adds a faint nutty undertone that can be delightful, but if you’re allergic, stick with canola or sunflower. The key is to avoid olive oil; its strong flavor will dominate the delicate vanilla notes.
Seasoning the Sugar
For a sophisticated twist, add a pinch of sea salt or a dash of smoked paprika to the powdered sugar. The salt amplifies the sweet, while the paprika introduces a subtle smoky depth that surprises the palate. I tried this at a brunch and the guests were blown away.
Creative Twists and Variations
This recipe is a playground. Here are some of my favorite ways to switch things up:
Chocolate‑Covered Delight
After dusting with powdered sugar, dip half of each bite into melted dark chocolate and let it set on parchment. The bitter chocolate pairs beautifully with the sweet vanilla base, creating a sophisticated flavor contrast that’s perfect for adult gatherings.
Cinnamon‑Apple Fusion
Mix finely diced dried apples into the batter and add a teaspoon of ground cinnamon. The fruit adds a chewy surprise, while the cinnamon elevates the warm, cozy vibe—ideal for autumn evenings.
Maple‑Bacon Crunch
Stir in crumbled cooked bacon into the batter and finish the bites with a drizzle of pure maple syrup instead of powdered sugar. The salty‑sweet combo is a crowd‑pleaser that turns a simple dessert into a brunch hero.
Matcha Green Tea Glow
Replace a quarter of the flour with matcha powder for a subtle earthy flavor and a striking green hue. Top with a light dusting of powdered sugar mixed with a pinch of extra matcha for a visual pop.
Spiced Pumpkin Surprise
Swap half the milk for canned pumpkin puree and add a blend of pumpkin pie spices (cinnamon, nutmeg, clove). This variation is perfect for holiday tables and brings a comforting, seasonal twist.
Nutty Caramel Swirl
Swirl caramel sauce and chopped toasted pecans into the batter just before frying. The caramel creates pockets of gooey sweetness, while the pecans add a satisfying crunch.
Storing and Bringing It Back to Life
Fridge Storage
Place the cooled bites in an airtight container lined with a paper towel to absorb any excess oil. They’ll stay fresh for up to three days, though the crust may soften slightly. Reheat in a preheated 350°F oven for 5‑7 minutes to revive the crunch.
Freezer Friendly
Arrange the bites on a parchment‑lined tray and freeze until solid, then transfer to a zip‑top freezer bag. They’ll keep for up to two months. When you’re ready to serve, bake straight from frozen at 375°F for 8‑10 minutes, then dust with fresh powdered sugar.
Best Reheating Method
For the ultimate revival, use a hot skillet with a splash of oil—just enough to coat the bottom. Heat each bite for 30 seconds per side, allowing the crust to re‑crisp while the interior stays soft. Add a tiny splash of water to the pan and cover briefly; the steam will melt any lingering sugar clumps, giving you that “just‑fried” sensation.