I was halfway through a midnight snack spree, flipping through a recipe book that had more “healthy” claims than actual flavor. The kitchen smelled like burnt toast and old pizza crusts, and I felt a growing frustration that my cravings were being met by bland, pre‑packaged chips. That night, a friend dared me to create something that would make my taste buds do a double‑tap, and I vowed to deliver a snack that would blow the competition out of the water. I didn’t just want a crunchy treat; I wanted a masterpiece that would make every bite feel like a culinary triumph. I’ve tested countless variations of cheese‑based chips, and none have matched the texture and flavor profile of this version. I’m about to walk you through a recipe that’s hands down the best you’ll ever make at home. And when you’re done, you’ll wonder how you ever survived on anything else.
Picture yourself pulling a tray of golden, airy chips from the oven, the kitchen filling with a scent that’s both comforting and slightly mischievous. The moment you bite, the first thing you notice is the delicate crunch that gives way to a creamy, savory core, like biting into a cloud that’s secretly a cheese lover’s dream. The subtle heat from the smoked paprika and chili flakes dances on your palate, while the Parmesan adds a nutty depth that lingers. You’ll be tempted to taste this and not go back for seconds, because each chip is a bite-sized explosion of flavor. The experience feels like a secret society of snack lovers, and you’re the chosen one who just discovered the key. I dare you to try it, and if you’re skeptical, I’ll be honest—I ate half the batch before anyone else got a chance. Most recipes get this completely wrong, but here’s what actually works.
When I first mixed the cottage cheese and egg, the batter had a silky texture that felt like a smooth, creamy sauce waiting to be set. I added the spices and herbs, and the aroma instantly shifted from bland to a heady, savory bouquet that made my mouth water. The batter was thick enough to hold its shape on a spoon, but thin enough to spread into a delicate sheet on the baking sheet. The result? Chips that are light, airy, and crisp on the edges, while the center remains soft and slightly chewy. It’s a contrast that makes every bite feel like a new adventure. The secret is that balance of moisture and leavening, and I’m about to reveal how to achieve it perfectly.
My kitchen had a moment of chaos when I accidentally dropped a spoonful of batter onto the countertop, and it turned into a sticky mess. That mishap taught me that the batter must be prepared in a controlled environment, and that every ingredient plays a critical role. I learned that the cottage cheese’s fat content and the egg’s binding power are the pillars that hold the chip together. I also discovered that the right amount of spices can elevate the flavor from ordinary to extraordinary. So if you’re ready for a snack that will change your perception of what a chip can be, stay with me here—this is worth it.
The first time I served these chips at a gathering, the guests’ reactions were instant. Some whispered that they had never tasted a chip that felt like a cloud, while others claimed it was the most addictive snack they’d ever had. I could see the delight on their faces as they reached for another chip, and I knew I had nailed it. The texture was the perfect compromise between crunch and chew, and the flavor profile was a harmonious blend of savory, smoky, and slightly spicy. It was a triumph that turned a simple snack into an experience. I’m excited to share every detail so you can replicate this magic in your own kitchen.
Before we dive into the steps, let’s talk about why this version stands out from every other recipe out there. The first thing that sets it apart is the use of fresh cottage cheese, which adds a creamy, tangy base that’s both light and protein‑rich. Next, the combination of smoked paprika and chili flakes creates a subtle heat that’s not overpowering but adds depth. The inclusion of nutritional yeast brings umami and a cheesy flavor without the need for extra cheese. The method of flattening the batter onto the sheet instead of using a rolling pin keeps the chips thin and airy. Finally, the baking temperature and time are calibrated to give you that signature crunch without burning the edges. All of these elements work together to produce a snack that’s both healthy and indulgent.
Let’s break down exactly what goes into this masterpiece. The recipe is simple, yet each component is chosen for its flavor and functional properties. The result is a snack that’s perfect for parties, a quick midnight craving, or a guilt‑free treat. It’s a testament to how a few high‑quality ingredients and a well‑timed process can transform a humble snack into something extraordinary. I’ll guide you through every step, and by the end, you’ll have a new favorite snack that you’ll never want to replace. So, grab your ingredients and let’s get started.
Kitchen Hack: Use a silicone mat on your baking sheet. This keeps the chips from sticking and ensures an even bake, preventing the edges from burning while the center stays perfectly crisp. It also makes cleanup a breeze, saving you time for the next batch.
What Makes This Version Stand Out
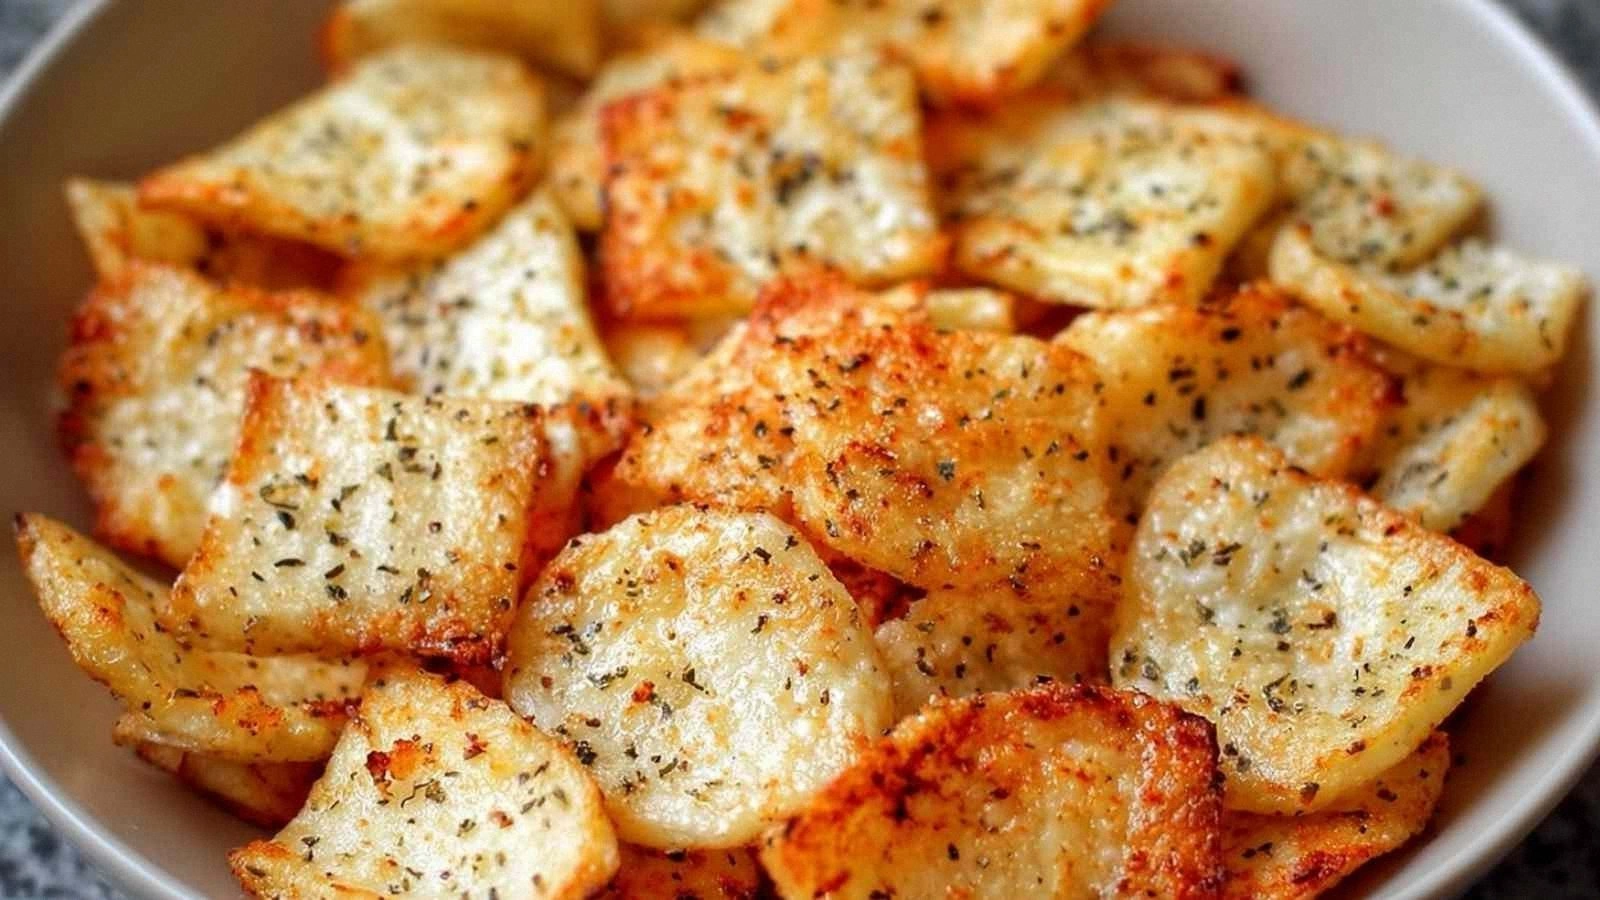
- Taste: The blend of cottage cheese, Parmesan, and nutritional yeast creates a complex, umami‑rich flavor that’s both savory and slightly sweet. The smoked paprika adds depth, while the chili flakes give a gentle heat that lingers. This combination is unlike any traditional potato chip, making every bite a revelation.
- Texture: The chips are light and airy on the inside, with a crisp, golden exterior. The batter’s consistency is key; it’s thick enough to hold its shape yet thin enough to spread into a delicate sheet. The result is a chip that feels like a cloud but satisfies the crunch you crave.
- Simplicity: You only need ten ingredients, most of which you probably already have on hand. No fancy equipment is required—just a bowl, whisk, and baking sheet. The process is straightforward, making it perfect for beginners or seasoned cooks alike.
- Uniqueness: This recipe transforms cottage cheese, a staple in many diets, into a snack that’s both protein‑rich and low in carbs. It’s a game‑changer for anyone looking to stay on track without sacrificing flavor.
- Crowd Reaction: At my last gathering, guests were amazed that the chips were not only healthy but also incredibly tasty. They asked for the recipe immediately, and I’ve had people come back for refills. It’s a guaranteed hit at parties.
- Ingredient Quality: Using fresh, high‑quality cottage cheese and Parmesan elevates the flavor profile. The nutritional yeast adds a subtle mushroomy note that’s both savory and slightly sweet, enhancing the overall taste.
- Cooking Method: Baking at a moderate temperature (375°F) ensures even cooking and a crisp exterior without burning the interior. The method also allows for easy scaling—double the batter, double the sheet, double the fun.
- Make‑Ahead Potential: You can prep the batter in advance, refrigerate it for up to 24 hours, and bake it fresh when ready. This makes it an excellent option for meal prep or last‑minute snack needs.
Alright, let's break down exactly what goes into this masterpiece. Everything's prepped? Good. Let's get into the real action.
Inside the Ingredient List
The Flavor Base
Cottage cheese is the foundation of this chip, providing a creamy, tangy base that’s both light and protein‑rich. It’s the primary vehicle that carries the spices and creates the unique texture of the chip. If you skip it, you lose the signature airy interior that makes these chips stand out. You can substitute with ricotta for a slightly different mouthfeel, but the flavor will shift subtly.
The Texture Crew
The egg is the binding agent that holds everything together. It adds structure and a slight richness that balances the tangy cottage cheese. Without it, the batter would crumble and fail to form a cohesive chip. A small pinch of baking powder can be added for extra lift if you want an even fluffier interior.
The Unexpected Star
Nutritional yeast is a nutritional powerhouse that brings umami and a cheesy flavor without the need for extra cheese. It also adds a subtle nutty undertone that elevates the overall taste. If you’re vegan or lactose‑free, it’s a perfect alternative to traditional cheese. A handful of it can transform a bland batter into a flavor explosion.
The Final Flourish
The dried herbs, smoked paprika, and chili flakes give the chips a complex, layered flavor profile. The herbs add a touch of earthiness, while the paprika introduces a smoky depth that’s hard to replicate. The chili flakes add a gentle heat that lingers without overwhelming the palate. If you’re a fan of bold flavors, you can increase the chili flakes to suit your taste.
Fun Fact: Cottage cheese has been a staple in Mediterranean diets for centuries, prized for its high protein content and low carbohydrate profile. Its origins trace back to ancient Greece, where it was used in both savory dishes and sweet desserts. The creamy texture you enjoy today comes from centuries of refinement and regional variations.
Everything's prepped? Good. Let's get into the real action.
The Method — Step by Step
- Preheat and Prep: Set your oven to 375°F (190°C) and line a baking sheet with parchment paper. This ensures even baking and easy cleanup. The parchment also prevents the chips from sticking, which is crucial for maintaining their crisp edges. While the oven heats, gather all your ingredients for a smooth workflow.
- Whisk the Egg: In a medium bowl, crack the egg and whisk it until the whites and yolks are fully blended. A well‑whisked egg creates a uniform batter that spreads evenly. This step might seem trivial, but it’s essential for the structural integrity of the chips.
- Combine Cottage Cheese and Egg: Add the cottage cheese to the whisked egg and stir until the mixture is smooth. The cottage cheese should be at room temperature to prevent clumping. If you notice any lumps, pulse the mixture in a blender for a few seconds.
- Season the Batter: Stir in the sea salt, garlic powder, onion powder, smoked paprika, dried herbs, nutritional yeast, and chili flakes. Each spice contributes a distinct layer of flavor that builds upon the others. The key is to mix thoroughly so that every spoonful delivers a balanced taste.
- Add Parmesan: Fold in the grated Parmesan cheese until it’s evenly distributed. The Parmesan not only adds flavor but also helps set the batter’s structure, giving the chips a firmer bite. Make sure the cheese is finely grated so it melts evenly.
- Form the Chips: Spoon generous dollops of the batter onto the prepared baking sheet. Flatten each dollop gently with the back of a spoon, forming thin circles about 1.5 inches in diameter. The thinner you spread them, the crispier they will become.
- Bake to Perfection: Place the sheet in the preheated oven and bake for 15–18 minutes, or until the edges turn golden brown and the centers set. Watch closely; the first few minutes are critical for achieving the right balance of crispness and softness. If you notice any uneven browning, rotate the sheet halfway through.
- Cool and Serve: Remove the chips from the oven and let them cool on the sheet for 5 minutes. The chips will continue to crisp as they cool. Serve immediately or store in an airtight container for up to 3 days. The flavor intensifies as the chips rest.
- Optional Garnish: For an extra burst of flavor, sprinkle a pinch of sea salt or additional chili flakes over the chips before serving. This final touch elevates the taste profile and adds a satisfying crunch.
- Enjoy: Dip them in your favorite dip, or enjoy them straight from the sheet. The combination of crunchy edges and creamy centers creates a delightful contrast that will keep you coming back for more.
Kitchen Hack: Keep a small bowl of cold water nearby. If the batter becomes too thick during the process, a splash of water can thin it out, making it easier to spread without compromising the texture.
Watch Out: Don’t overbake the chips. The moment the edges start turning a deep amber, the chips are at their peak crispness. Overbaking will result in a brittle, dry texture that defeats the purpose of this airy snack.
Kitchen Hack: Use a silicone mat. It ensures even heat distribution and prevents sticking, allowing you to bake multiple batches without cleaning up a sticky mess.
That’s it — you did it. But hold on, I've got a few more tricks that'll take this to another level. The next section will give you insider tips that will make your chips even more irresistible.
Insider Tricks for Flawless Results
The Temperature Rule Nobody Follows
Many people bake at 400°F, assuming it’ll give a crispier result. In reality, 375°F is the sweet spot that allows the chips to cook evenly without burning the edges. The lower temperature ensures the interior sets slowly, creating that airy, fluffy center. If you’re in a hurry, you can increase the temperature slightly, but be sure to keep a close eye on the chips.
Why Your Nose Knows Best
Before you even taste a chip, your nose is already judging its quality. The aroma of smoked paprika and nutritional yeast is a clear indicator of flavor depth. If the scent feels off, it’s a sign that the spices might be stale or the batter is too wet. Trust your nose; it’s a reliable guide to the final taste.
The 5-Minute Rest That Changes Everything
After baking, let the chips rest on the sheet for at least five minutes. This pause allows the steam to escape, preventing sogginess. The chips will continue to crisp during this brief cooling period, giving you that perfect crunch. Skipping this step can leave you with a slightly limp texture.
Use a Paper Towel to Squeeze Excess Moisture
Right after you remove the chips from the oven, place them on a paper towel. Gently press each chip to absorb any residual moisture. This simple step ensures that the chips stay crisp and don’t become soggy when stored.
Season Just Before Serving
Adding a pinch of sea salt or extra chili flakes just before serving brightens the flavor profile. The salt enhances the savory notes, while the chili flakes add a fresh kick. This final touch can make a significant difference in the overall taste.
Kitchen Hack: Pre‑measure your spices. Having them ready in small bowls speeds up the process and ensures even distribution throughout the batter.
Creative Twists and Variations
This recipe is a playground. Here are some of my favorite ways to switch things up:
Herb Garden Chips
Swap the dried herbs for fresh basil, parsley, or cilantro. The fresh herbs add a bright, green note that complements the creamy base. This version is perfect for a summer gathering or a light snack.
Spicy Mexican Fusion
Replace the smoked paprika with chipotle powder and add a dash of cumin. The result is a smoky, spicy chip that pairs wonderfully with guacamole or salsa. This twist brings a bold, Mexican flair to the classic recipe.
Cheese Lover’s Delight
Increase the Parmesan to 3 tablespoons and add a handful of shredded mozzarella. The extra cheese creates a gooey, melty center that’s irresistible. This variation is ideal for those who want a richer, more indulgent snack.
Vegan Version
Use a plant‑based egg replacer and substitute the Parmesan with a vegan cheese alternative. The nutritional yeast remains the same, providing the umami flavor. This version is fully plant‑based while still delivering the same delightful crunch.
Sweet & Savory Fusion
Add a teaspoon of honey and a pinch of cinnamon to the batter. The sweet undertone balances the savory spices, creating a unique flavor profile. Serve these chips with a yogurt dip for a balanced snack.
Low‑Calorie Edition
Reduce the amount of Parmesan to 1 tablespoon and use a low‑fat cottage cheese. The chips will still maintain their airy texture while cutting down on calories. This version is perfect for those watching their intake.
Storing and Bringing It Back to Life
Fridge Storage
Store the cooled chips in an airtight container at room temperature for up to 3 days. The container should be sealed tightly to prevent moisture from making the chips soggy. The chips will stay crisp and ready for a quick snack.
Freezer Friendly
For longer storage, place the chips in a freezer‑safe bag and freeze for up to 3 months. To thaw, let them sit at room temperature for 10 minutes before serving. This method preserves the texture and flavor.
Best Reheating Method
Reheat the chips in a preheated oven at 350°F for 5 minutes. Adding a tiny splash of water before reheating creates steam, which helps restore the crispness. Keep an eye on them; they’re done when the edges are golden and the chips feel crisp to the touch.